Number Nerds Unite!
Furnished content.
(from Lumberjocks.com)
 Just finished this commission. On the original I cut each cell and put them together like a big mosaic, this time I cut strips and routed the cells with a V bit. Not really that much easier as trying to land the router exactly where the rows meet was a booger.If I do it again I think I'll put a slight chamfer on the strips and only route the columnsBeech and an unidentified white wood. Laser engraved message. Just finished this commission. On the original I cut each cell and put them together like a big mosaic, this time I cut strips and routed the cells with a V bit. Not really that much easier as trying to land the router exactly where the rows meet was a booger.If I do it again I think I'll put a slight chamfer on the strips and only route the columnsBeech and an unidentified white wood. Laser engraved message.
Read more here
posted at: 12:00am on 30-Jun-2022
path: /Woodworking | permalink | edit (requires password)
Box with sliding top.
Furnished content.
(from Lumberjocks.com)
 Simple box, made from Ash 1/4” stock. Made by cutting rabets on the edges snd a dado to create the slide. Purpleheart for the turn lock, with small brass nail cinched over on the inside. Finished with Danish Oil and Howard's Feed & Wax, buffed.This was made to house a Bevel Gauge which I made last month. I lined the bottom and sides to keep it in placem Sent to a great Guy here on LJ. Simple box, made from Ash 1/4” stock. Made by cutting rabets on the edges snd a dado to create the slide. Purpleheart for the turn lock, with small brass nail cinched over on the inside. Finished with Danish Oil and Howard's Feed & Wax, buffed.This was made to house a Bevel Gauge which I made last month. I lined the bottom and sides to keep it in placem Sent to a great Guy here on LJ.
 Thanks for looking and comments always welcome. Thanks for looking and comments always welcome.
Read more here
posted at: 12:00am on 30-Jun-2022
path: /Woodworking | permalink | edit (requires password)
Blacksmithing at a Glance
Furnished content.
(from Popularwoodworking.com)
Blacksmithing is a hasty sport. Unlike woodworking, where you can step back and contemplate a cabinet's lines or run your hands over a planed surface to check its smoothness, working with hot iron means moving fast. You've only seconds before …Source
Read more here
posted at: 12:00am on 30-Jun-2022
path: /Woodworking | permalink | edit (requires password)
Two decorative jewelry boxes
Furnished content.
(from Lumberjocks.com)
 Hello again :) Hello again :)
Here are two jewelry boxes I have made.
“cabinet” like box is made from combination of apricot, beech, poplar and beech plywood. It has “secret” compartment :)
Other one (simple box) is made from beech and maple. Pattern on that maple is main decoration on box.
Hope that you like this little project.
Read more here
posted at: 12:00am on 30-Jun-2022
path: /Woodworking | permalink | edit (requires password)
Lumber-Drying Clamps
Furnished content.
(from Popularwoodworking.com)
I've dried my own lumber for years, but I always had a problem getting enough weight on top of the stack, to keep the upper boards from warping. Here's a solution: Use clamps made from threaded rods. Start building the …Source
Read more here
posted at: 12:00am on 30-Jun-2022
path: /Woodworking | permalink | edit (requires password)
Grain Raising
Furnished content.
(from Popularwoodworking.com)
A better understanding of what causes grain raising will help you manage it. Our finishing expert Bob Flexner explains this phenomenon and how to deal with it.Source
Read more here
posted at: 12:00am on 29-Jun-2022
path: /Woodworking | permalink | edit (requires password)
Pill box lid from unknown found burl
Furnished content.
(from Lumberjocks.com)
 Pill box lid from unknown found burl. Pill box lid from unknown found burl.
Read more here
posted at: 12:00am on 29-Jun-2022
path: /Woodworking | permalink | edit (requires password)
Domino Set
Furnished content.
(from Lumberjocks.com)
 I had a lot of fun making this domino set as a wedding gift for a friend! As far as the backstory to this set, my friend and I spend this entire past February with eight other young men working with Christian Aid Ministries rebuilding homes that were destroyed in Ocracoke, NC from hurricane Dorian back in 2019. Over the trip, we played many games of 42 (very much like Rook, but with dominos). Noticing my friend's liking for the game sparked the thought to build him a set- and the rest is history!As far as the specifics for the dominos, the back side of the dominos are old-growth reclaimed redwood; the middle is maple burl, and the top is red gum eucalyptus. The box is solid walnut burl with an olivewood lid. The dominos were oiled with new 5w20 engine oil to add color and a unique twist being that my friend is an auto mechanic. I know this may not be a generally accepted finish, but it really turned out cool! After oiling, each domino was buffed on the drill press with wax both to protect and to prevent a noticeable engine oil feel.All in all, this project took me roughly eight hours to accomplish, being my first domino set. I did make each domino 3/8” thick, so as to avoid them tipping over as easily as the cheap modern 1/4” ones do. The slight cracks in the boxtop were sanded smooth but left unfilled for a rustic look. Each dividing groove on the dominos was cut on a Sawstop, this worked well and I was glad for the safety backup. Each domino hole was drilled by hand via drillpress. Overall, it was an extremely rewarding project! I had a lot of fun making this domino set as a wedding gift for a friend! As far as the backstory to this set, my friend and I spend this entire past February with eight other young men working with Christian Aid Ministries rebuilding homes that were destroyed in Ocracoke, NC from hurricane Dorian back in 2019. Over the trip, we played many games of 42 (very much like Rook, but with dominos). Noticing my friend's liking for the game sparked the thought to build him a set- and the rest is history!As far as the specifics for the dominos, the back side of the dominos are old-growth reclaimed redwood; the middle is maple burl, and the top is red gum eucalyptus. The box is solid walnut burl with an olivewood lid. The dominos were oiled with new 5w20 engine oil to add color and a unique twist being that my friend is an auto mechanic. I know this may not be a generally accepted finish, but it really turned out cool! After oiling, each domino was buffed on the drill press with wax both to protect and to prevent a noticeable engine oil feel.All in all, this project took me roughly eight hours to accomplish, being my first domino set. I did make each domino 3/8” thick, so as to avoid them tipping over as easily as the cheap modern 1/4” ones do. The slight cracks in the boxtop were sanded smooth but left unfilled for a rustic look. Each dividing groove on the dominos was cut on a Sawstop, this worked well and I was glad for the safety backup. Each domino hole was drilled by hand via drillpress. Overall, it was an extremely rewarding project!
-Dale
Read more here
posted at: 12:00am on 29-Jun-2022
path: /Woodworking | permalink | edit (requires password)
Charcuterie Dish
Furnished content.
(from Lumberjocks.com)
 This dish was from a 1 1/4” thick slab of pistachio that was cut from a tree from California that was grafted about 70 yr ago. So the tree might be 100 yrs old or more.The light colored wood is the root stock and the dark brown/black wood is the latest tree stock from the graft. The slab was about 5 ft long and very dry and cracked everywhere. I made 4 long pieces from the sides of the tree stock and threw the center away but saved this end to make this dish. It took a lot of filling with black epoxy at every step of the way.This tells what to put on a charcuterie board/ tray/dish: https://foodiesfamily.com/what-to-put-on-a-charcuterie-board/.It finished at 14 5/8” diameter and 7/8” thick The bottom is about 3/8” thick. It is finished with Danish oil and buffed and waxed.Cheers, Jim This dish was from a 1 1/4” thick slab of pistachio that was cut from a tree from California that was grafted about 70 yr ago. So the tree might be 100 yrs old or more.The light colored wood is the root stock and the dark brown/black wood is the latest tree stock from the graft. The slab was about 5 ft long and very dry and cracked everywhere. I made 4 long pieces from the sides of the tree stock and threw the center away but saved this end to make this dish. It took a lot of filling with black epoxy at every step of the way.This tells what to put on a charcuterie board/ tray/dish: https://foodiesfamily.com/what-to-put-on-a-charcuterie-board/.It finished at 14 5/8” diameter and 7/8” thick The bottom is about 3/8” thick. It is finished with Danish oil and buffed and waxed.Cheers, Jim
Read more here
posted at: 12:00am on 28-Jun-2022
path: /Woodworking | permalink | edit (requires password)
Hope Chest
Furnished content.
(from Lumberjocks.com)
 A lady from our church asked if I could make a Hope Chest for her daughter. This is what I came up with. A lady from our church asked if I could make a Hope Chest for her daughter. This is what I came up with.
I made up the panels with a shiplap, about 3/8 thick. Then I made the framework to fit the panels. It ended up about 20×20x40.
All curly maple, just a lot of different boards with different colors.
I hope she likes it.
Read more here
posted at: 12:00am on 28-Jun-2022
path: /Woodworking | permalink | edit (requires password)
4 Tips for Dovetailing by Hand
Furnished content.
(from Popularwoodworking.com)
Cutting your own dovetails is a right of passage for many woodworkers. Many out there find it intimidating when they first start though. Here are a few techniques that will help you out (or help you improve the skills you …Source
Read more here
posted at: 12:00am on 28-Jun-2022
path: /Woodworking | permalink | edit (requires password)
Hercules 12v Drill Review
Furnished content.
(from Popularwoodworking.com)
Tool: 12v Cordless 3/8 Drill/Driver Shop Now Manufacturer: Hercules MSRP: $39.99 (bare tool) + $34.99 (charger) + $24.99 (battery) The Hercules 3/8 12v drill isn't the flashiest, most high-tech option on the market, and …Source
Read more here
posted at: 12:00am on 28-Jun-2022
path: /Woodworking | permalink | edit (requires password)
Flag
Furnished content.
(from Lumberjocks.com)
 I just finished a flag using 1 1/2 poplar slats . I stained the stripes with barn red and antique white. I painted the blue field with ink blue. I had a friend cnc the stars. He has made his flags plus cutting the stars for other club members. My wife wants it hung before the fourth. I just finished a flag using 1 1/2 poplar slats . I stained the stripes with barn red and antique white. I painted the blue field with ink blue. I had a friend cnc the stars. He has made his flags plus cutting the stars for other club members. My wife wants it hung before the fourth.
Read more here
posted at: 12:00am on 28-Jun-2022
path: /Woodworking | permalink | edit (requires password)
More Boxes
Furnished content.
(from Lumberjocks.com)
 This is the last round of boxes for a bit. Build the same as the latest ones, finger joints. These are 9” x 7” x 2” Ash sides, 1 has 1/4” Oak plywood, the other is 1/4” Maple plywood.Both were finished with Danish Oil and Howard's Feed & Wax, then buffed.For those interested there is a blog about the boxes. This is the last round of boxes for a bit. Build the same as the latest ones, finger joints. These are 9” x 7” x 2” Ash sides, 1 has 1/4” Oak plywood, the other is 1/4” Maple plywood.Both were finished with Danish Oil and Howard's Feed & Wax, then buffed.For those interested there is a blog about the boxes.
https://www.lumberjocks.com/EricFai/blog/133587The interior after padding installed.
 From the last set after adding padding. From the last set after adding padding.
 There is one more I will post after it's delivered.Thanks for looking and comments are always welcome. There is one more I will post after it's delivered.Thanks for looking and comments are always welcome.
Read more here
posted at: 12:00am on 27-Jun-2022
path: /Woodworking | permalink | edit (requires password)
Wooden Ball w Storage
Furnished content.
(from Lumberjocks.com)
 I've wanted a wooden ball that could be unscrewed into two halves. I've found that every project should have a surprise to it, like a carved signature, or threaded halves. The wood is myrtle wood, the 1.25” threads were made using a Beall Tools Tap and Die. Enjoy. I've wanted a wooden ball that could be unscrewed into two halves. I've found that every project should have a surprise to it, like a carved signature, or threaded halves. The wood is myrtle wood, the 1.25” threads were made using a Beall Tools Tap and Die. Enjoy.
Read more here
posted at: 12:00am on 27-Jun-2022
path: /Woodworking | permalink | edit (requires password)
18v battery holder (3D printed or wood??? WOOD)
Furnished content.
(from Lumberjocks.com)
 These are for 18v RIDGID batteries – I Just (well the wife) got into 3D printing and we were looking at some cool things to print for wood working. We did find a lot of stuff you can print to use but maybe it's because we don't know much about the technology but they seem to take for ever. We came across these battery holder for power tools. Looking to print one was going to take upwards of 3 hours. Well what great opportunity to shoot into my R&D lab (my garage) to try and knock out few of these holders. I took some measurements of the battery and did some cutting to come up with a rough build (2nd pic) that took about 30 minutes. After I got/made few adjustments, knocked out a second piece (1st pic). After that I figured it was pretty well dialed in for all the measurements so I cut enough for a small batch. Didn't complete the final piece in case I wanted to make one for my dewalt power tools and I have one to fool with. Come to find out The dimension of the rail is the same size so all I need to do is cut it shorter to fit my dewalt. I can drill these into any open space I have. I may place some in permanent location and others just in random places on my French cleat by screwing on some cleats. I don't know why I made 12 since I only have about 6 batteries. Guess it's time to go buy some more tools LOL. After I was done with these I went in to check on the 3D printed one. It failed at about 85% over 2 hour into it. Settings must have been off or something These are for 18v RIDGID batteries – I Just (well the wife) got into 3D printing and we were looking at some cool things to print for wood working. We did find a lot of stuff you can print to use but maybe it's because we don't know much about the technology but they seem to take for ever. We came across these battery holder for power tools. Looking to print one was going to take upwards of 3 hours. Well what great opportunity to shoot into my R&D lab (my garage) to try and knock out few of these holders. I took some measurements of the battery and did some cutting to come up with a rough build (2nd pic) that took about 30 minutes. After I got/made few adjustments, knocked out a second piece (1st pic). After that I figured it was pretty well dialed in for all the measurements so I cut enough for a small batch. Didn't complete the final piece in case I wanted to make one for my dewalt power tools and I have one to fool with. Come to find out The dimension of the rail is the same size so all I need to do is cut it shorter to fit my dewalt. I can drill these into any open space I have. I may place some in permanent location and others just in random places on my French cleat by screwing on some cleats. I don't know why I made 12 since I only have about 6 batteries. Guess it's time to go buy some more tools LOL. After I was done with these I went in to check on the 3D printed one. It failed at about 85% over 2 hour into it. Settings must have been off or something
Read more here
posted at: 12:00am on 27-Jun-2022
path: /Woodworking | permalink | edit (requires password)
Hard Maple and Padauk Segmented Bowl (?)
Furnished content.
(from Lumberjocks.com)
 Hard Maple and Padauk. Alternate block pattern, * 3/4” T x 8 1/4” W WOP finish.Construction details here: https://www.lumberjocks.com/adot45/blog/133591 Hard Maple and Padauk. Alternate block pattern, * 3/4” T x 8 1/4” W WOP finish.Construction details here: https://www.lumberjocks.com/adot45/blog/133591
Read more here
posted at: 12:00am on 26-Jun-2022
path: /Woodworking | permalink | edit (requires password)
BB, Curly Maple & Ebony Box
Furnished content.
(from Lumberjocks.com)
 I was gifted by a fellow LJ'r some curly maple that was glued to BB plywood. It needed some tlc and thoughtful handling so I asked my wife to come out to the shop and tell me what to do. We all know what that accomplished so I went ahead and started chopping, cutting and fitting. This was a total seat of the pants build because it took me 2 weeks to get the final finish coat of wipe on poly. In between the start and final I changed my mind too many times to count. I actually had a wild cherry piece cut and fitted for the top til I was told that didn't look right. So I fit another piece of curly to match the bottom and didn't like that so I trimmed the opening with ebony then refit the top for that cavity. Of course I had to miter the pieces just to make it it a little more difficult. Cutting a miter on a 1/8' thick x 3/16” high stick of ebony can be a challenge on the table saw but thanks to incra I “gotter done” I was gifted by a fellow LJ'r some curly maple that was glued to BB plywood. It needed some tlc and thoughtful handling so I asked my wife to come out to the shop and tell me what to do. We all know what that accomplished so I went ahead and started chopping, cutting and fitting. This was a total seat of the pants build because it took me 2 weeks to get the final finish coat of wipe on poly. In between the start and final I changed my mind too many times to count. I actually had a wild cherry piece cut and fitted for the top til I was told that didn't look right. So I fit another piece of curly to match the bottom and didn't like that so I trimmed the opening with ebony then refit the top for that cavity. Of course I had to miter the pieces just to make it it a little more difficult. Cutting a miter on a 1/8' thick x 3/16” high stick of ebony can be a challenge on the table saw but thanks to incra I “gotter done”
So that brought the corners of ebony to the top and I then had to tie in the bottom. I did that with 3/16” x 1/2” wide mitered pieces on the bottom I didn't do it yet but I will most likely put some felt pads on the bottom to elevate the ebony just off the sitting surface.
Almost forgot – the top is a lift off with a rabbit cut in the carcus prior to glue up, the last picture shows the fit.
All in all it was a fun project and I've got enough for 4 or 5 more boxes but I've got some bowls to make first.
This was btw my first trip using Ebony, quite a learning experience.Thanks for looking and have a GREAT day !
Read more here
posted at: 12:00am on 26-Jun-2022
path: /Woodworking | permalink | edit (requires password)
Flattening A Plane Sole, Part 3
Furnished content.
(from Popularwoodworking.com)
In previous entries, I explained how to lap short-bodied planes using diamond stones and sandpaper rolls (click to read parts 1 and 2.). This entry is dedicated to lapping larger planes and explaining how to avoid inadvertent convexing of …Source
Read more here
posted at: 12:00am on 25-Jun-2022
path: /Woodworking | permalink | edit (requires password)
Segmented Jacaranda Hollow Form
Furnished content.
(from Lumberjocks.com)
 This turning measures approximately 7” x 5”. Decorated with pyrography and sprayed with clear satin lacquer. This turning measures approximately 7” x 5”. Decorated with pyrography and sprayed with clear satin lacquer.
Read more here
posted at: 12:00am on 25-Jun-2022
path: /Woodworking | permalink | edit (requires password)
A Set of Concealed Catch-all Boxes for Trinkets
Furnished content.
(from Lumberjocks.com)
 This is a set of three stacking boxes which look like a stack of books but is actually two drawers and a flip-top box.Anybody might walk right by this without knowing its true purpose! And that was the plan.Made from a bunch of scraps, along with some purpleheart and other hardwoods, and some leftover sheetgoods. The drawer bottoms are 'flocked' they feel like suede but are a soft surface. Finally I got to use my #66 Reeder to scratch in the effect of pages in a book. The bottom 'book' can accommodate 8 1/2” X 11” sheets if so desired. I put in bookmarks in the upper two units, made from kerosene lamp wicks.The graphics were achieved through multiple methods, either scanned originals or created with MS Paint, then printed on onion skin paper and then transferred onto the surfaces with clear gloss polyurethane.This will be a retirement gift for a teacher with 35 years in the school system, I masked off her name for the photos. This is a set of three stacking boxes which look like a stack of books but is actually two drawers and a flip-top box.Anybody might walk right by this without knowing its true purpose! And that was the plan.Made from a bunch of scraps, along with some purpleheart and other hardwoods, and some leftover sheetgoods. The drawer bottoms are 'flocked' they feel like suede but are a soft surface. Finally I got to use my #66 Reeder to scratch in the effect of pages in a book. The bottom 'book' can accommodate 8 1/2” X 11” sheets if so desired. I put in bookmarks in the upper two units, made from kerosene lamp wicks.The graphics were achieved through multiple methods, either scanned originals or created with MS Paint, then printed on onion skin paper and then transferred onto the surfaces with clear gloss polyurethane.This will be a retirement gift for a teacher with 35 years in the school system, I masked off her name for the photos.
I hope she likes it!
Read more here
posted at: 12:00am on 25-Jun-2022
path: /Woodworking | permalink | edit (requires password)
Platform Bed - stair/shelves
Furnished content.
(from Lumberjocks.com)
 The bed in this small room took up a lot of floor space. The bed in this small room took up a lot of floor space.
I raised the bed so the wardrobe and a chest of drawers would fit underneath.Created a stair with treads acting as shelves.
Painted the frame Downpipe Grey
Treads finished with polyurethane varnish
Stair part of the treads carpeted to match new flooring.A nice project, which was designed on the go.  
Read more here
posted at: 12:00am on 25-Jun-2022
path: /Woodworking | permalink | edit (requires password)
Pine six board bench
Furnished content.
(from Lumberjocks.com)
 I got out some black oak for this idea, but thought a shake-down version would be good. I got out some black oak for this idea, but thought a shake-down version would be good.
Screws, shellac, wipe on poly.
Read more here
posted at: 12:00am on 24-Jun-2022
path: /Woodworking | permalink | edit (requires password)
Meat turner from osage orange wood
Furnished content.
(from Lumberjocks.com)
 Meat turner made from osage orage. Meat turner made from osage orage.
Read more here
posted at: 12:00am on 24-Jun-2022
path: /Woodworking | permalink | edit (requires password)
Walnut knob
Furnished content.
(from Lumberjocks.com)
 Installing a client's bank of lawyer bookcases, I noticed that one of 12 little knobs was missing. Installing a client's bank of lawyer bookcases, I noticed that one of 12 little knobs was missing.
Traced a paper template, & turned on drill press. You would not pick it out the field without looking for it, so a success, I thought.
Read more here
posted at: 12:00am on 24-Jun-2022
path: /Woodworking | permalink | edit (requires password)
Working Safely in the Shop
Furnished content.
(from Popularwoodworking.com)
Safety is the #1 goal in woodworking. June is national safety month, so we're covering some shop safety best practices. Learn about avoiding hazards while woodworking, as well as the essential equipment to protect yourself. Sponsored by RZMask: https://rzmask.com/ …Source
Read more here
posted at: 12:00am on 24-Jun-2022
path: /Woodworking | permalink | edit (requires password)
Hoto 12v Drill Review
Furnished content.
(from Popularwoodworking.com)
Tool: 12v Brushless Drill Shop Now Manufacturer: Hoto MSRP: $149.99 (Includes internal 2 ah battery, charging cable, 8 drill bits, and 10 screwdriver bits) I'm sure many of you out there, especially the ones that haven't had …Source
Read more here
posted at: 12:00am on 23-Jun-2022
path: /Woodworking | permalink | edit (requires password)
Table top Marble Run
Furnished content.
(from Lumberjocks.com)
 Table top Marble run for the grandkids. Walnut, maple, cherry, bloodwood. Table top Marble run for the grandkids. Walnut, maple, cherry, bloodwood.
Marbles shoot to the top with spring tab (cherry) then the pivot at top routes marbles alternately side to side.
Marbles land at bottom after striking the bell and roll to the loading tab for next shot.
Fun little project for scrap wood. About 11 inches wide and 20 inches tall.
Read more here
posted at: 12:00am on 23-Jun-2022
path: /Woodworking | permalink | edit (requires password)
Second round of presentation Boxes
Furnished content.
(from Lumberjocks.com)
 The prototype went so well I decided to make more of these presentation boxes. Oak sides with 1/4” Maple plywood, measuring 13-1/2” x 9” x 2-1/2”. These do not have the clasp on the front yet, (out of stock). I'll get those on later, still waiting for a delivery of foam padding.Simple box joint joinery with a grove to hold the panels. Changed the finishing schedule a bit from the last one. 1 coat of Danish Oil and 1 coat of Howard's Feed an Wax, buffed.Used simple hinges on the back. Drilled with this: The prototype went so well I decided to make more of these presentation boxes. Oak sides with 1/4” Maple plywood, measuring 13-1/2” x 9” x 2-1/2”. These do not have the clasp on the front yet, (out of stock). I'll get those on later, still waiting for a delivery of foam padding.Simple box joint joinery with a grove to hold the panels. Changed the finishing schedule a bit from the last one. 1 coat of Danish Oil and 1 coat of Howard's Feed an Wax, buffed.Used simple hinges on the back. Drilled with this:
 These are from the 2nd blog about box building. These are from the 2nd blog about box building.
https://www.lumberjocks.com/EricFai/blog/133583Thanks for looking and comments always welcome.
Read more here
posted at: 12:00am on 23-Jun-2022
path: /Woodworking | permalink | edit (requires password)
Build a Canoe Paddle
Furnished content.
(from Popularwoodworking.com)
A single length of framing lumber will help you hone your skills with a spokeshave, a drawknife and a block plane. It was a bright summer's day in 1993 at historic Strawberry Banke in Portsmouth, N.H. My wife, Sally, …Source
Read more here
posted at: 12:00am on 23-Jun-2022
path: /Woodworking | permalink | edit (requires password)
Cherry table
Furnished content.
(from Lumberjocks.com)
 Quarantine project. Cherry planks salvaged at the dump, plus a few salvaged from a remodel project, so some plugged screw holes. Dominos, wipe on poly. Quarantine project. Cherry planks salvaged at the dump, plus a few salvaged from a remodel project, so some plugged screw holes. Dominos, wipe on poly.
Read more here
posted at: 12:00am on 22-Jun-2022
path: /Woodworking | permalink | edit (requires password)
The Magic of Iron & Fire
Furnished content.
(from Popularwoodworking.com)
A chairmaker explains his fascination with the ancient art of blacksmithing and being able to make his own woodworking tools. It was April of 1986, and I'd just arrived at a craft show up a long dirt road, an …Source
Read more here
posted at: 12:00am on 22-Jun-2022
path: /Woodworking | permalink | edit (requires password)
Reclaimed lumber queen bed
Furnished content.
(from Lumberjocks.com)
 Rustic reclaimed pine with a 40 x23 drawer on each side. Rustic reclaimed pine with a 40 x23 drawer on each side.
Read more here
posted at: 12:00am on 22-Jun-2022
path: /Woodworking | permalink | edit (requires password)
Yellow Snake Pull Toy
Furnished content.
(from Lumberjocks.com)
 Pull toy made completely from repurposed lumber Pull toy made completely from repurposed lumber
Read more here
posted at: 12:00am on 22-Jun-2022
path: /Woodworking | permalink | edit (requires password)
Apron Planes
Furnished content.
(from Lumberjocks.com)
 Pictured is an all Ebony plane along side an Ebony bodied plane with Cocobolo sides.Thanks for looking! Pictured is an all Ebony plane along side an Ebony bodied plane with Cocobolo sides.Thanks for looking!
Read more here
posted at: 12:00am on 21-Jun-2022
path: /Woodworking | permalink | edit (requires password)
Routing Small Pieces
Furnished content.
(from Popularwoodworking.com)
Whenever creating small pieces that include a routed detail of some sort, it's best to do the routing on the larger parent board, and then separate the small piece from the larger. However, this isn't always possible, and you may …Source
Read more here
posted at: 12:00am on 21-Jun-2022
path: /Woodworking | permalink | edit (requires password)
Clocks & Bowl
Furnished content.
(from Lumberjocks.com)
 Two scroll sawn clocks and a bowl – scroll saw designs from The Wooden Teddy Bear Two scroll sawn clocks and a bowl – scroll saw designs from The Wooden Teddy Bear
Read more here
posted at: 12:00am on 21-Jun-2022
path: /Woodworking | permalink | edit (requires password)
Wide Mouth Four Footed Erlenmeyer Hackberry Flask
Furnished content.
(from Lumberjocks.com)
 Here is another piece in the Footed Vessel Series (formerly known as Three Legged Dog Series). Here is another piece in the Footed Vessel Series (formerly known as Three Legged Dog Series).
I recently found a nice piece of freshly cut hackberry. It isn't the flashiest wood but it is a pleasure to cut when green. I processed the wood into 9 blanks and this is the first I've turned from it.It has four carved feet and a wide natural edge with the green bark left in place. There are four piths in this piece.
I am still exploring some variations on the foot concept and also the Erlenmyer Flask shape. This piece was fun and quick. I was able to use the negative rake scraper and a bowl gouge with long wings on a 55 Degree grind to do some shear/sheer scraping to clean up the outside. I ended up wet sanding this one because the Maloof oil/poly/ms made it a little muddy.I enjoy turning green wood because of how easily it cuts. The wall on this vessel is relatively thin at just under 3/16ths of an inch. I worked fairly quickly and immersed the bowl in silicon beads here in the Texas heat for a couple of hours before I finished it. This is how much it moved and warped in the two hours. This Erlenmyer flask is 4” at its tallest and 7 1/4” at its widest. This Erlenmyer flask is 4” at its tallest and 7 1/4” at its widest.
As I mentioned I ended up wet sanding it with a Maloof type wipe on finish.
Polished with the Beall buffing system and Howard's Feed and Wax.Here is another pic of the Wide Mouth Four Footed Erlenmeyer Hackberry Flask.
 Thanks for looking. Thanks for looking.
Read more here
posted at: 12:00am on 21-Jun-2022
path: /Woodworking | permalink | edit (requires password)
3 Traditional Hand Tools Plus 1 Hand Skill
Furnished content.
(from Popularwoodworking.com)
Tools solve problems in wood. Hand tools bought just to collect do not serve you well. But tools bought when you need them will serve many projects to come. Don't hesitate to buy a good hand tool suitable to the …Source
Read more here
posted at: 12:00am on 21-Jun-2022
path: /Woodworking | permalink | edit (requires password)
PVC Grass Trimmer Wheels Attachment
The last time I did the trimming around my yard, and around the 4,700 shrubs, posts, and planters in it (okay, that's an exaggeration, but you get my point), I ended the day with an aching back and a sore hip, and I swore I wasn't going to lug my trimmer around and use it the same way ever again.
So this is what I came up with. It can be attached to any trimmer in the same way you see here. I hope it saves your back too.
In a few days, I'll post a short video of it in action. By all means, use the comments for any questions.
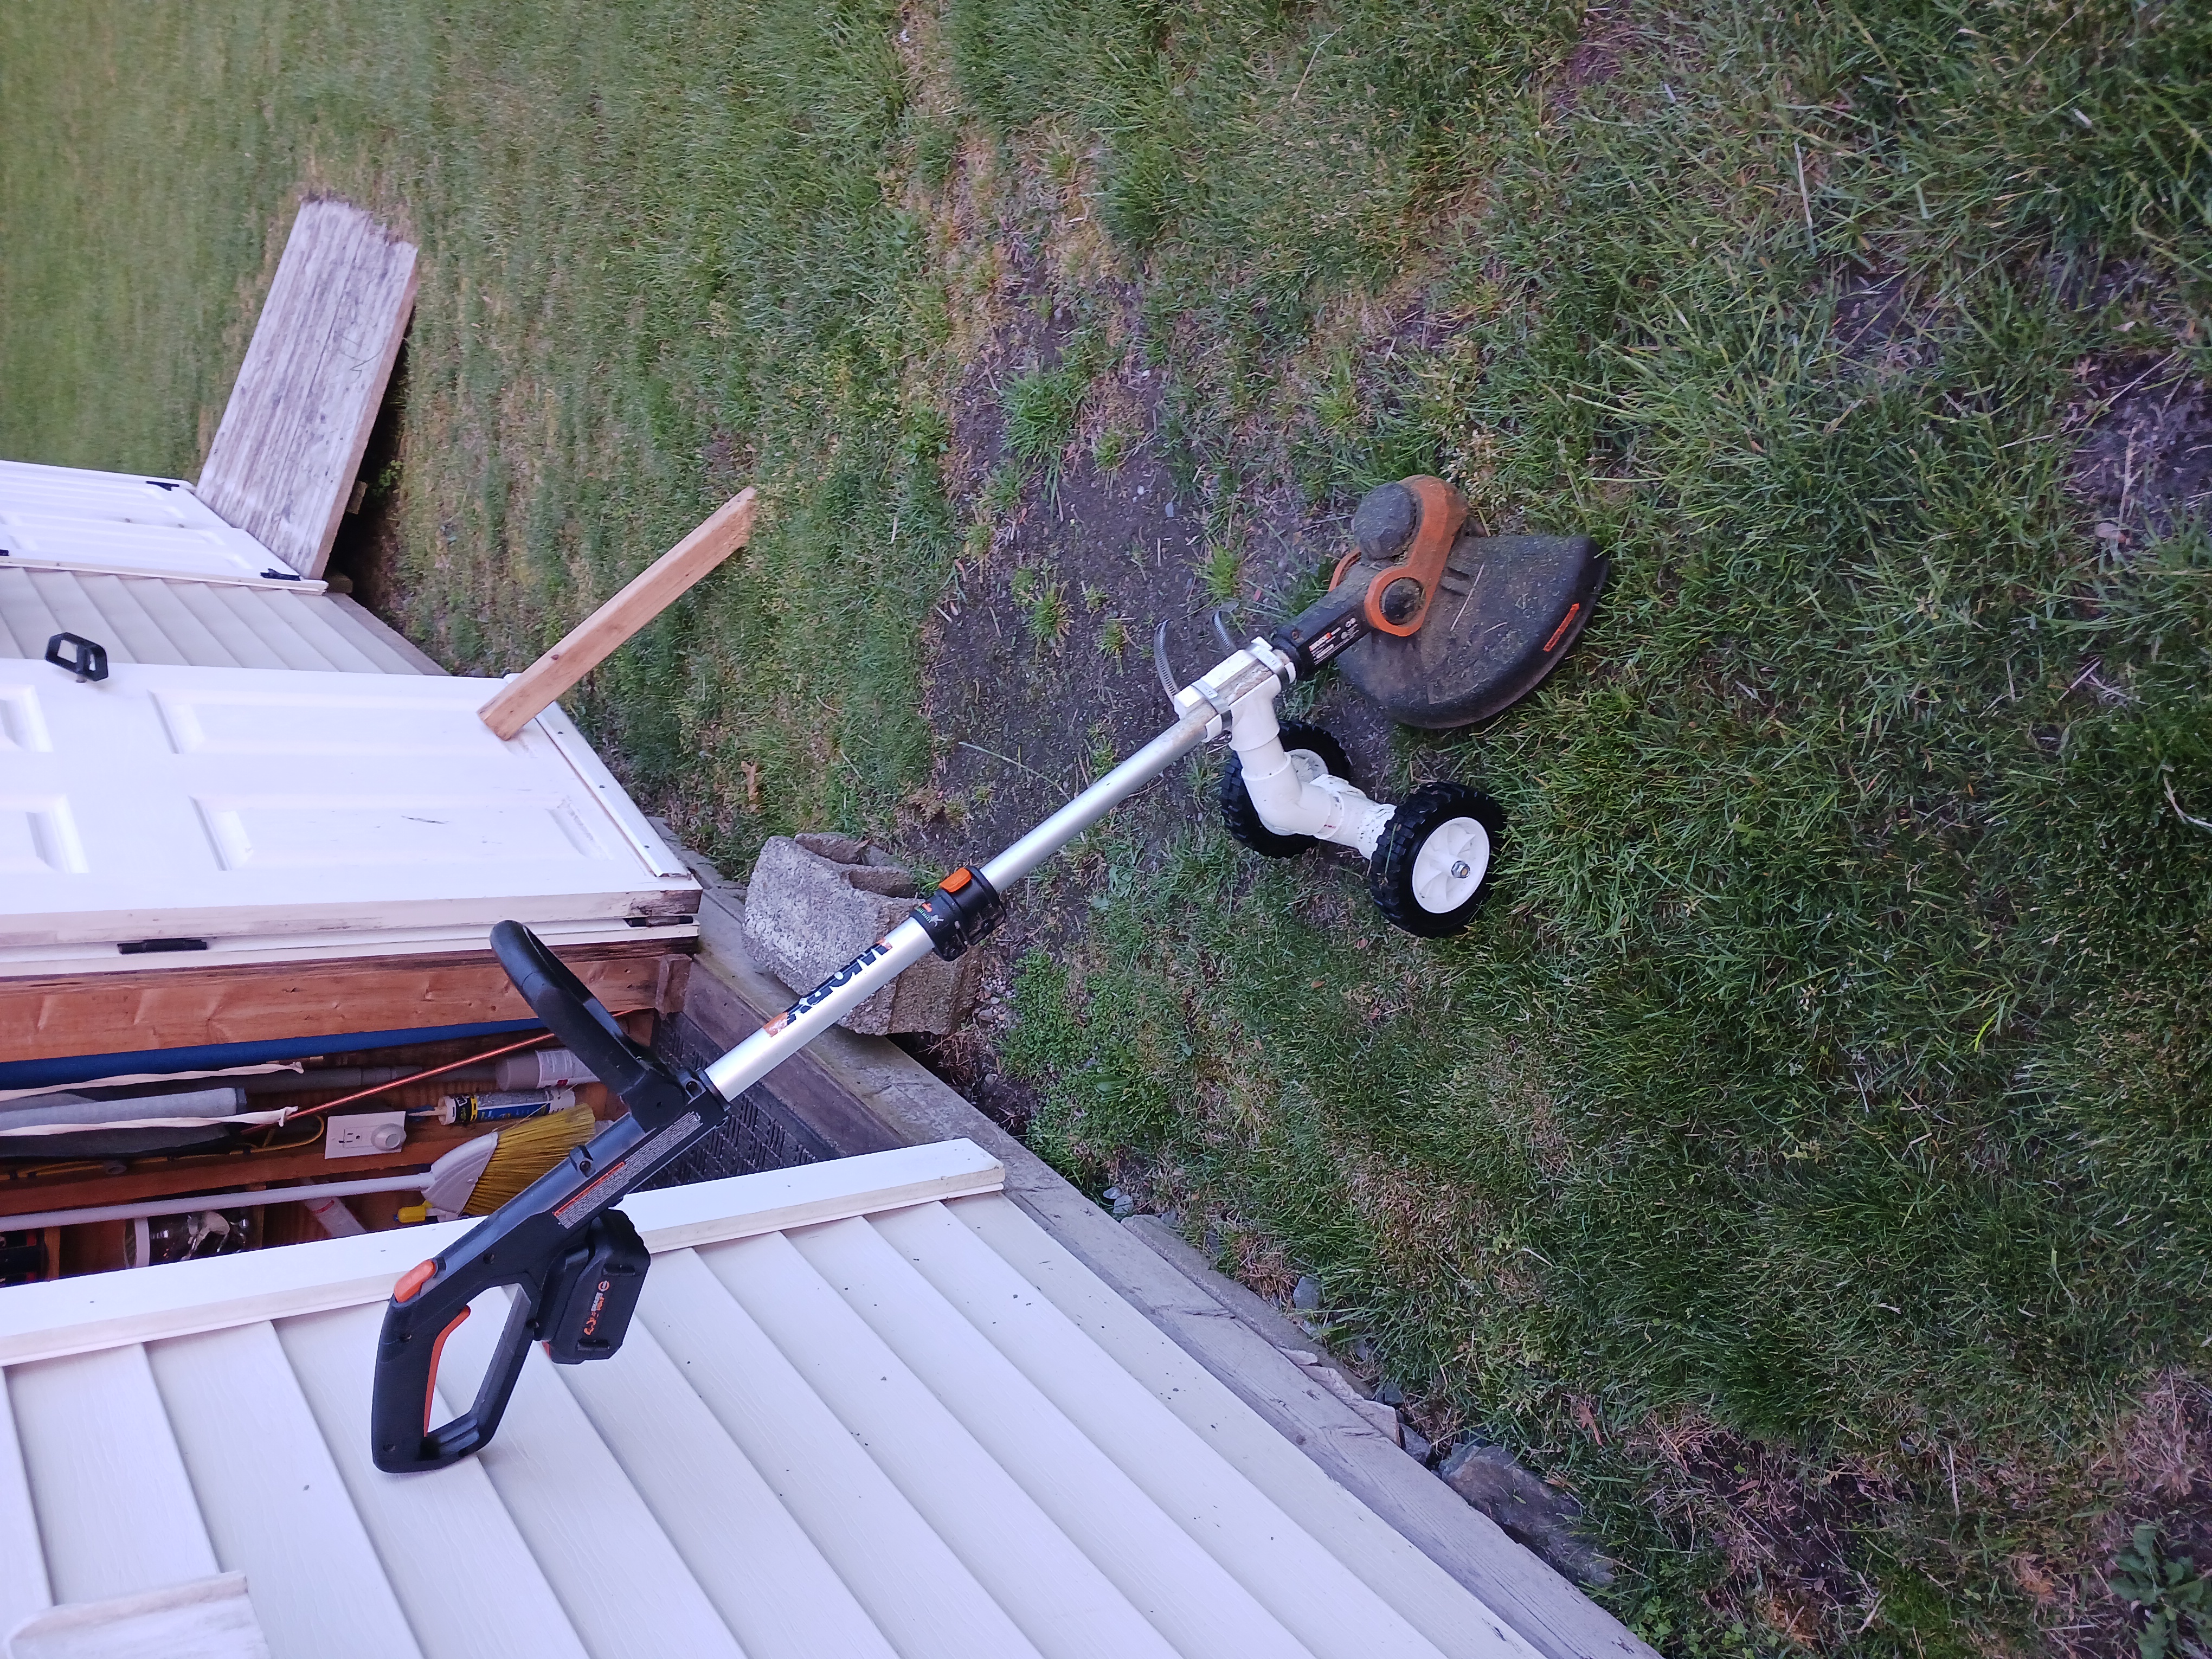
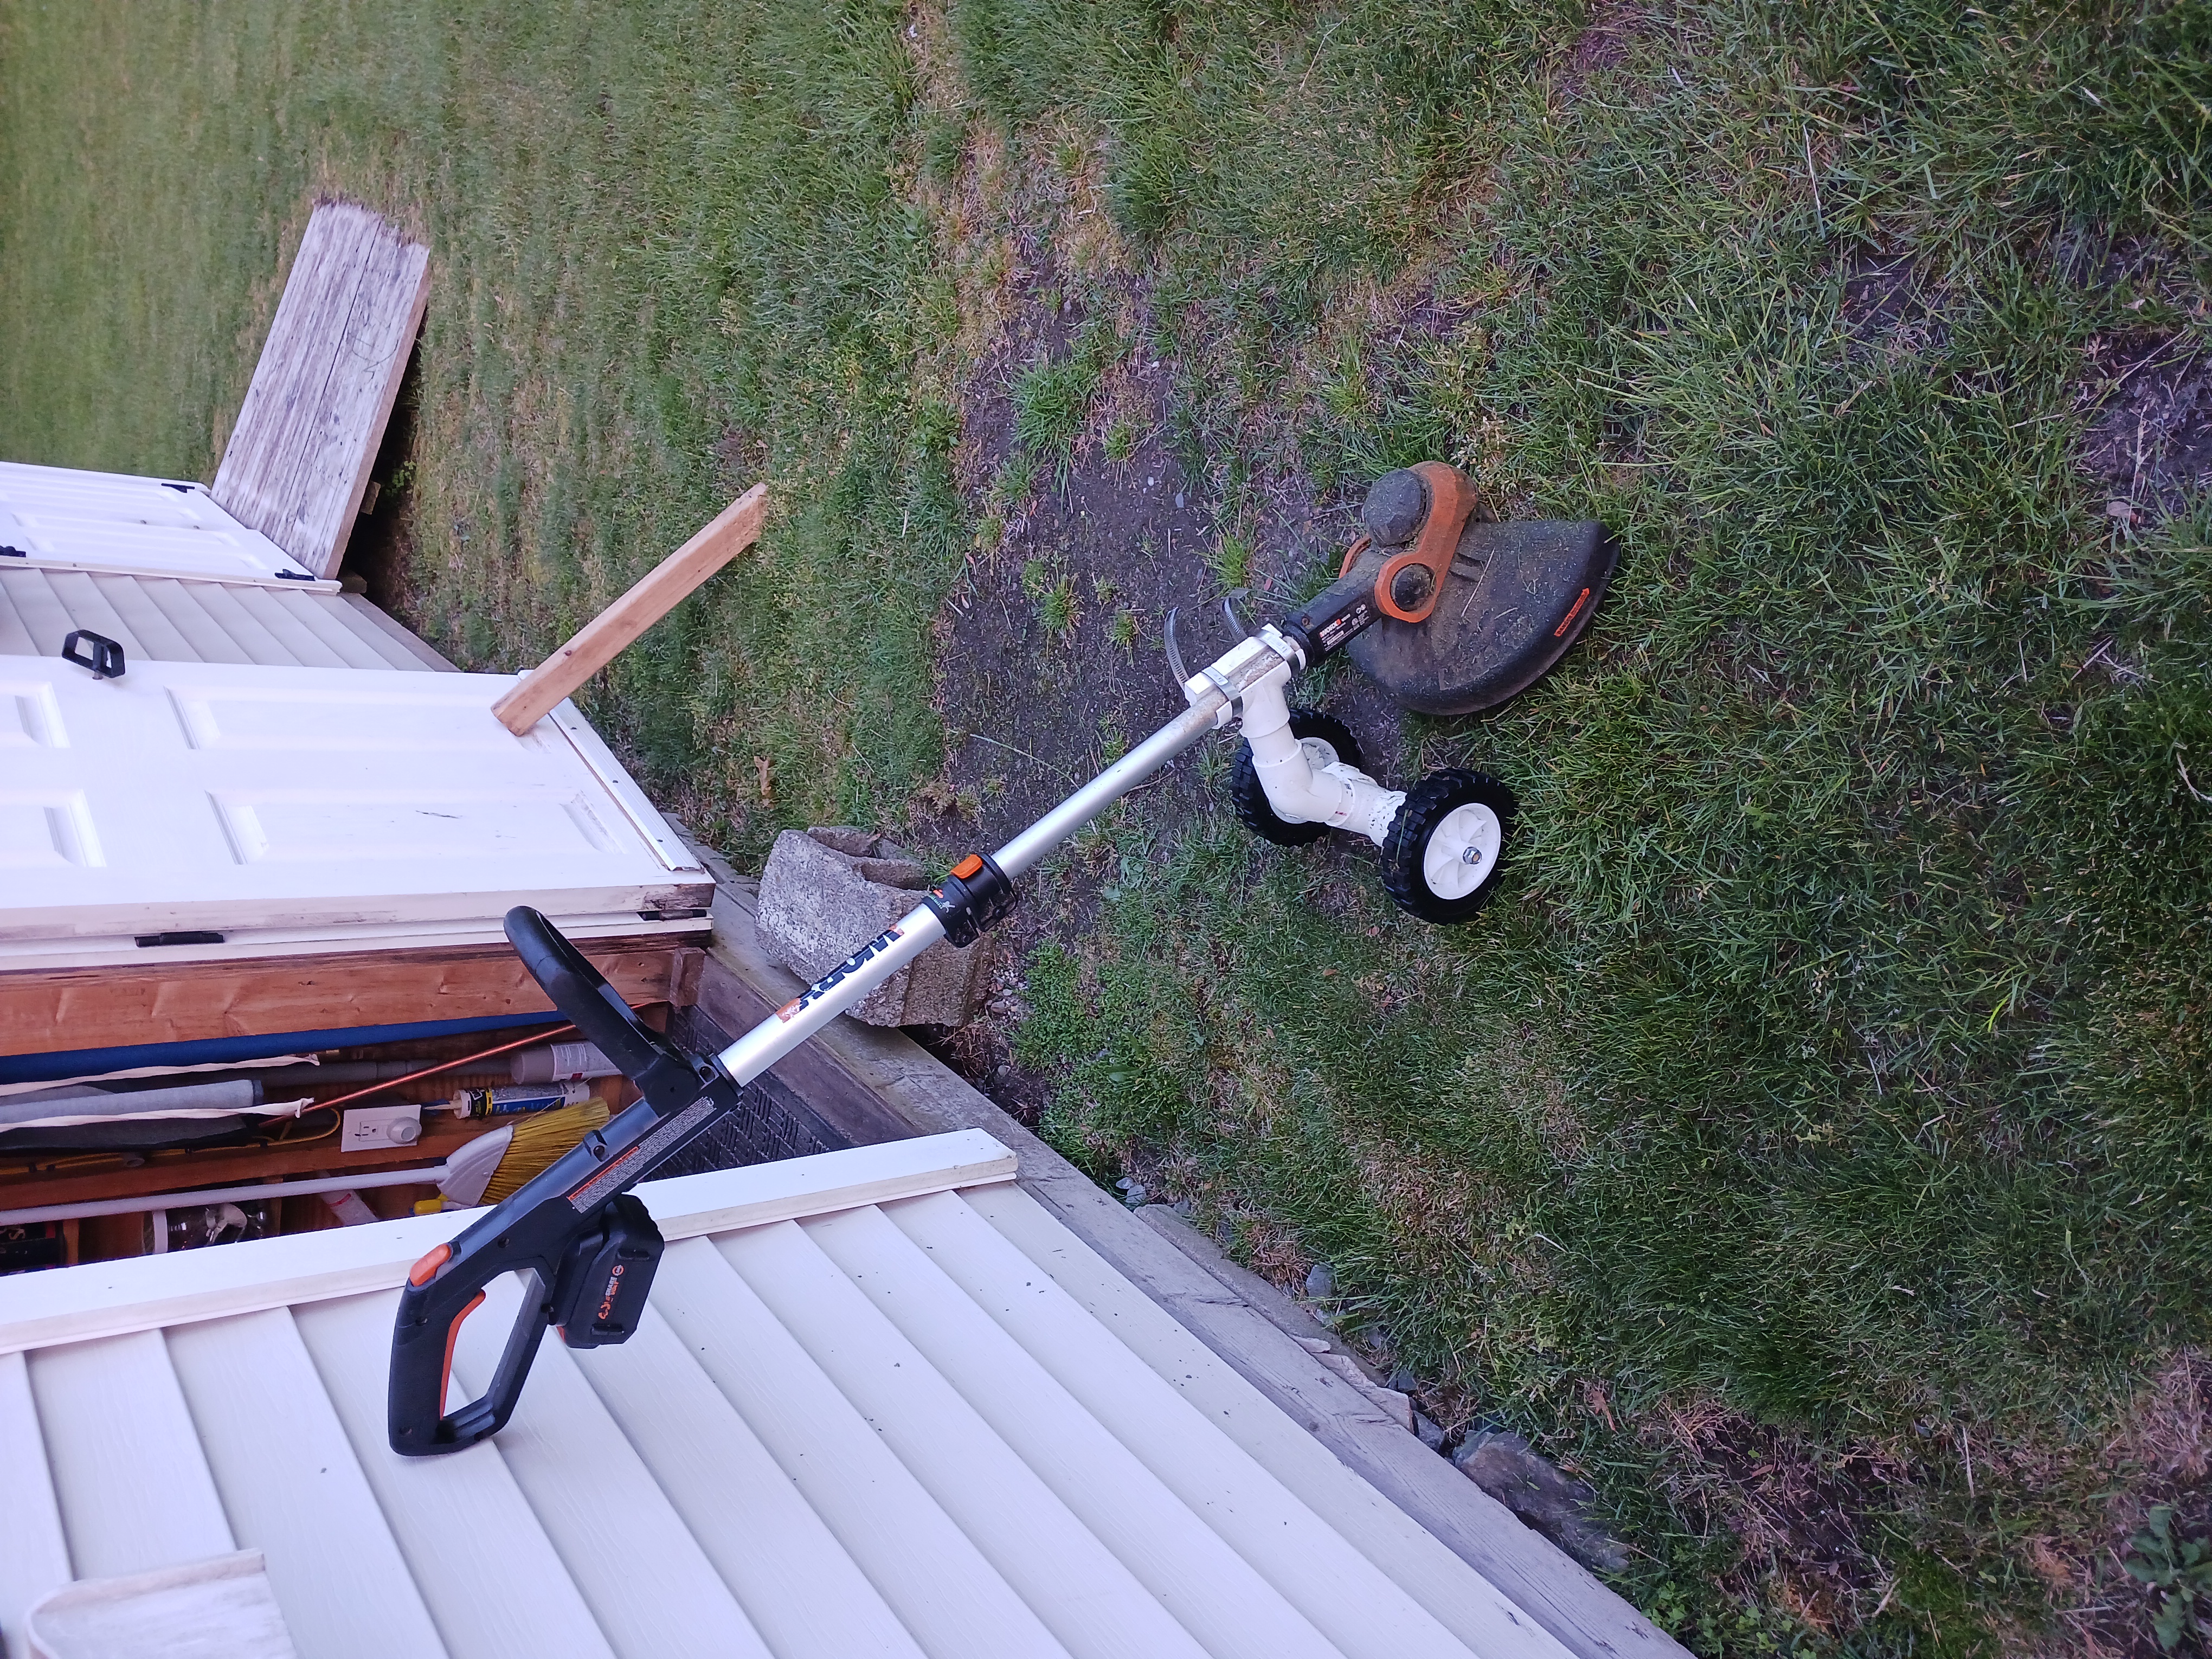


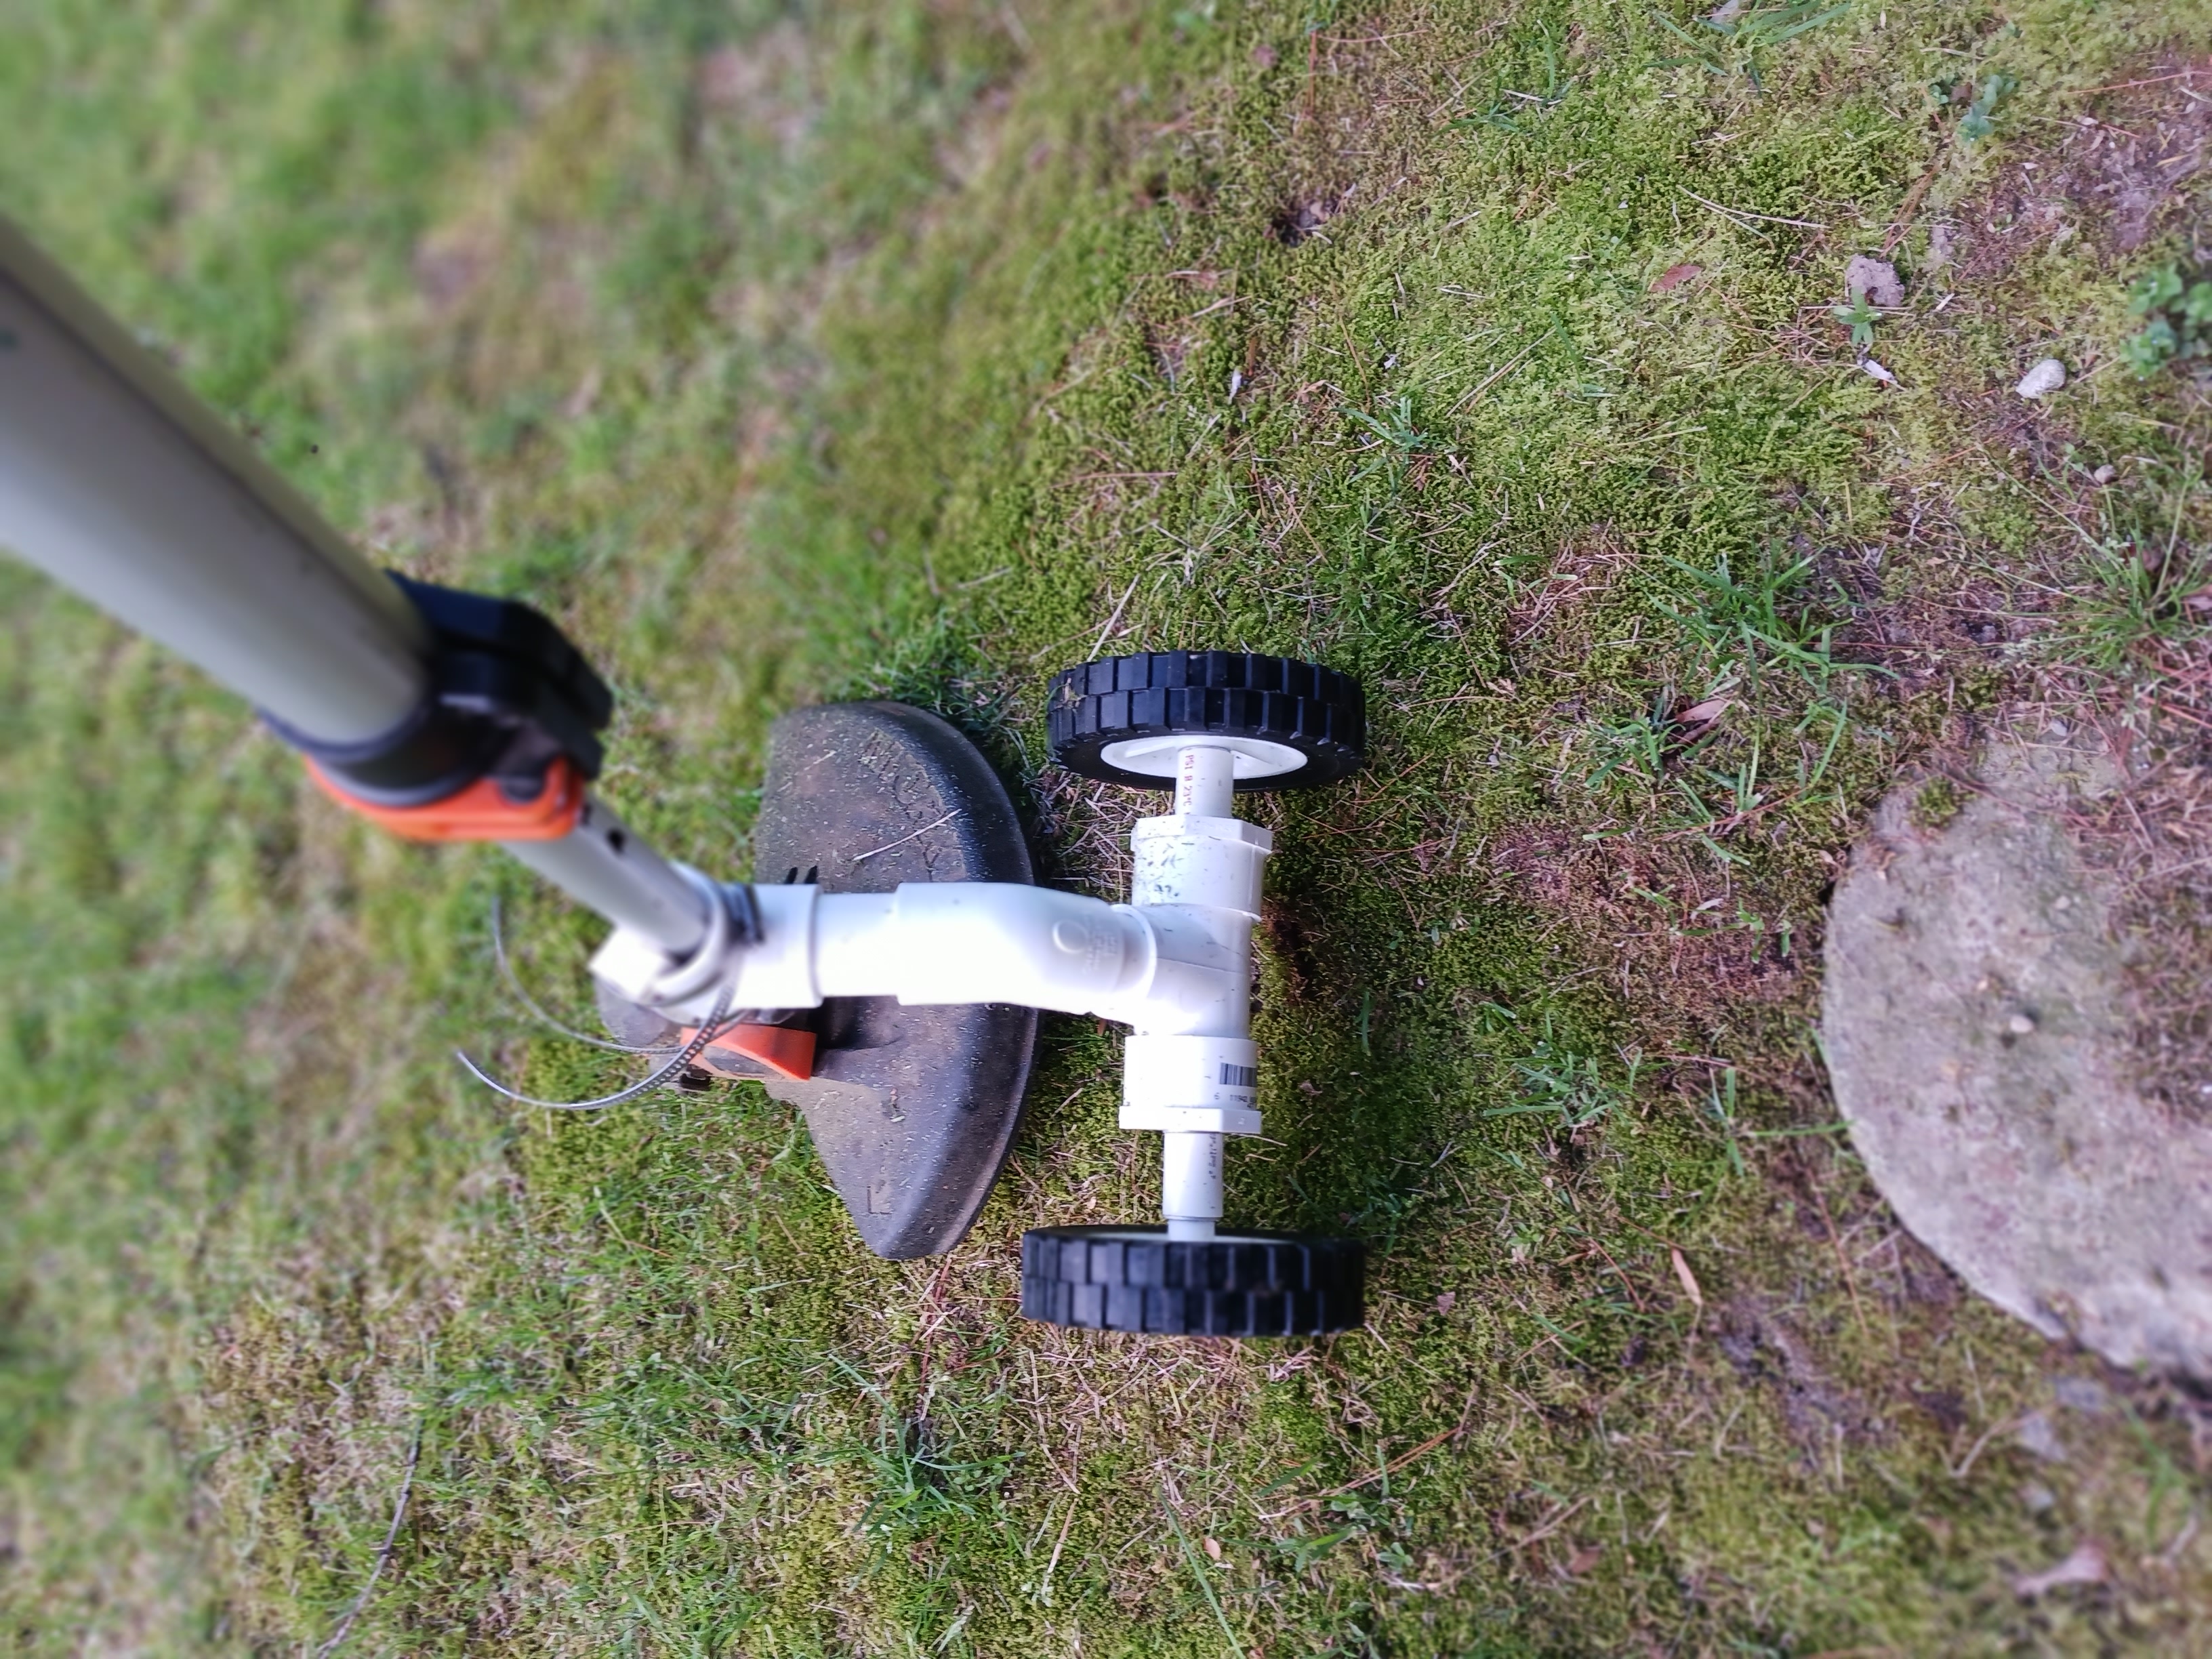
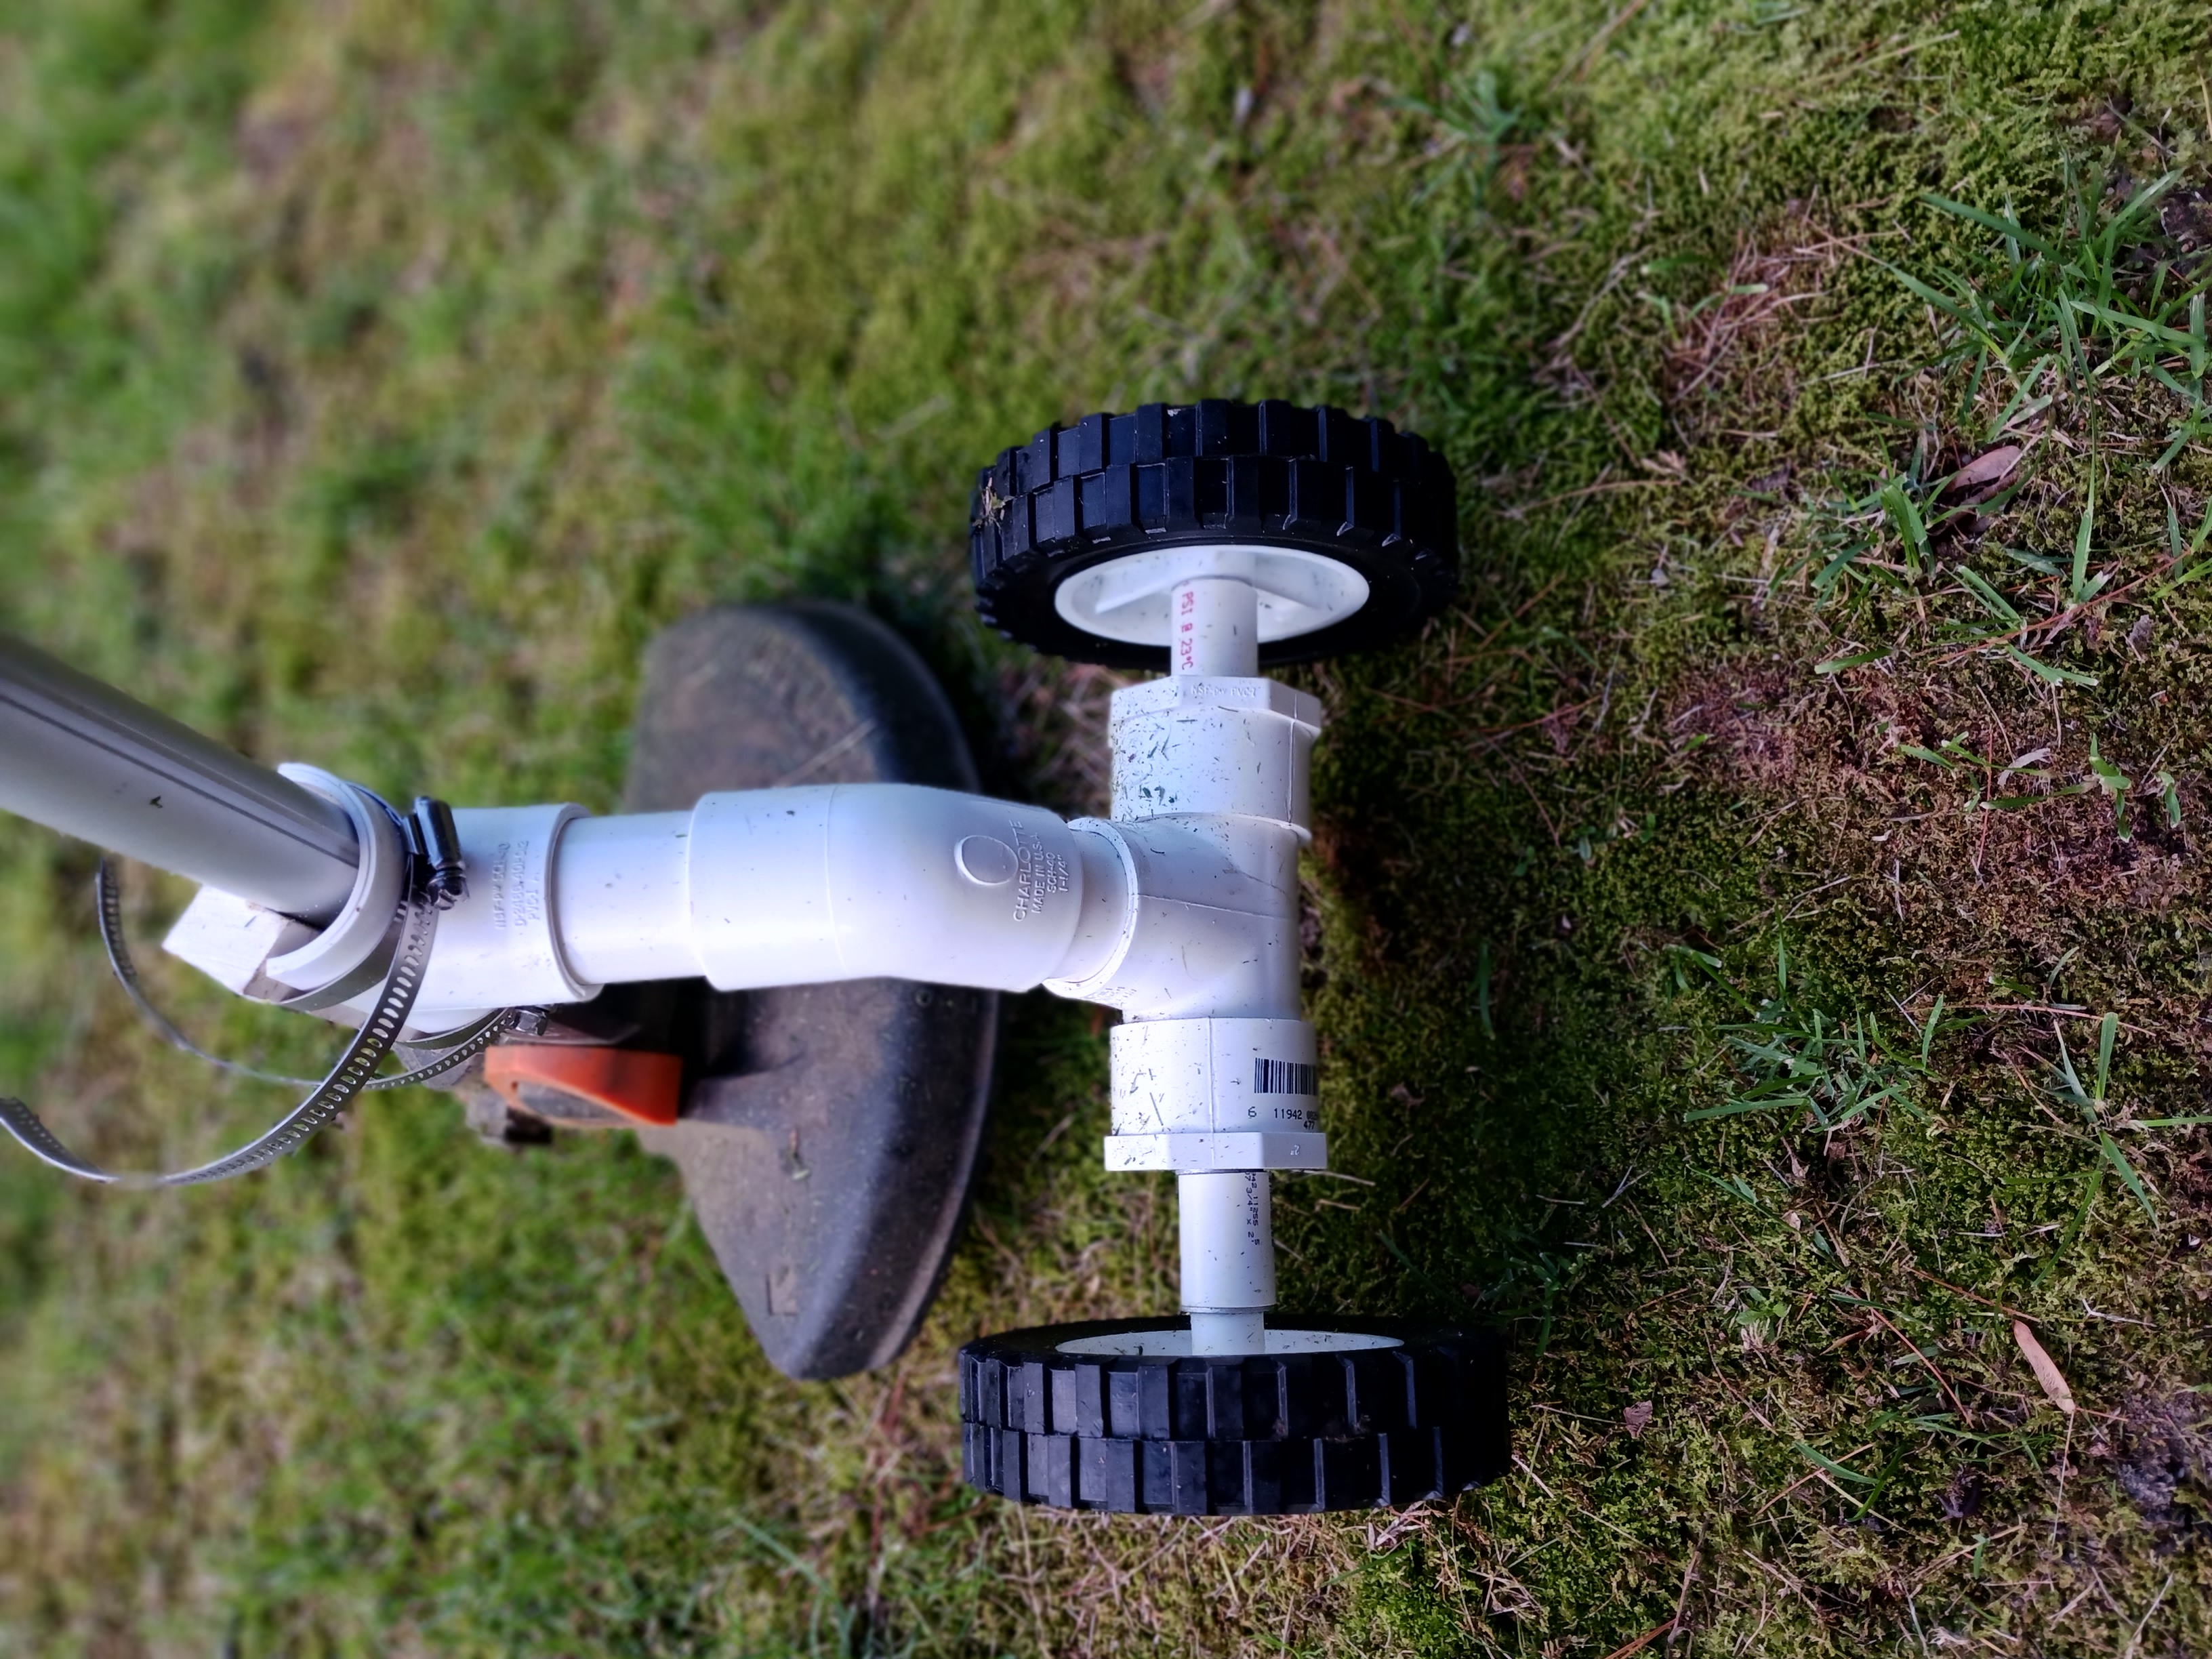
The "tee" that's strapped to the trimmer shaft has been cut to only a half-round, and the elbow fitting below it is angled at 45 degrees, not 90. I'm still refining it, but the general concept works well. I didn't even glue the PVC connections together, yet they're still sturdy enough with just a friction fit.
There's a 3/8" threaded rod through the bottom tee and its flat-top end caps. The end caps are drilled with a 3/8" hole in their centers. The 3/8" rod has a washer and nut at each end, which keeps the end caps tight against the tee. PVC spacers, which fit over the end-cap nuts, are next, followed by a washer and then the wheels. And finally, a pair of nylon-insert lock nuts over washers keep the wheels on the rod, Those outermost nyloc nuts aren't tightened too much, so as to let the wheels spin freely.
posted at: 6:37am on 20-Jun-2022
path: /Home_and_Garden | permalink | edit (requires password)
Primitive style sunshine
Furnished content.
(from Lumberjocks.com)
 Shadow box style using old window Shadow box style using old window
Read more here
posted at: 12:00am on 20-Jun-2022
path: /Woodworking | permalink | edit (requires password)
Corner Table in Walnut and Curly Maple
Furnished content.
(from Lumberjocks.com)
 This was for one of the few occasions when I build something for my own house. A new end/corner table was needed to sit at the ends of two couches that are positioned at right angles to each other. I was inspired by the floating top table that Leec posted here a few weeks ago, plus I had a 5/8” thick board of curly maple that had been sitting around for three years. That board was meant for a customer project, but he never seemed to be able to pony up the $100 down payment (a good practice when dealing with unknown clients so I can at least cover cost of materials if they ghost).The dark woods are black walnut, the top is the curly maple, and the cat feet are white maple. The curly maple has a lot of high angle grain, so a combination of a shelix carbide cutter in the planer, a drum sander, and some significant hand sanding afterwards got down to a smooth surface.I chose to use breadboard ends to stabilize the thin top board ends, and used (nearly) hidden 1/8” hard maple dowels to attach the walnut end to the curly maple. I wanted the strength of the maple for the dowels, and also did not want the dowels to show, so walnut dowels were out, and the maple dowels had to be on the maple side of the joint. This meant that the traditional breadboard mortise and tenon positions had to be reversed (tenon on the walnut side) so I could position the dowels on the maple side. The cat feet (last two photos) are attached with internal floating tenons to strengthen the otherwise end-grain glue joint. I could have done the top inlay with a template and hand router, but opted to use the CNC router with a 1/8” bit in a single pass. The 1.25 degree leg tapers are cut on the table saw. Finish is 5 coats of wipe on Minwax satin Tung oil varnish. This was for one of the few occasions when I build something for my own house. A new end/corner table was needed to sit at the ends of two couches that are positioned at right angles to each other. I was inspired by the floating top table that Leec posted here a few weeks ago, plus I had a 5/8” thick board of curly maple that had been sitting around for three years. That board was meant for a customer project, but he never seemed to be able to pony up the $100 down payment (a good practice when dealing with unknown clients so I can at least cover cost of materials if they ghost).The dark woods are black walnut, the top is the curly maple, and the cat feet are white maple. The curly maple has a lot of high angle grain, so a combination of a shelix carbide cutter in the planer, a drum sander, and some significant hand sanding afterwards got down to a smooth surface.I chose to use breadboard ends to stabilize the thin top board ends, and used (nearly) hidden 1/8” hard maple dowels to attach the walnut end to the curly maple. I wanted the strength of the maple for the dowels, and also did not want the dowels to show, so walnut dowels were out, and the maple dowels had to be on the maple side of the joint. This meant that the traditional breadboard mortise and tenon positions had to be reversed (tenon on the walnut side) so I could position the dowels on the maple side. The cat feet (last two photos) are attached with internal floating tenons to strengthen the otherwise end-grain glue joint. I could have done the top inlay with a template and hand router, but opted to use the CNC router with a 1/8” bit in a single pass. The 1.25 degree leg tapers are cut on the table saw. Finish is 5 coats of wipe on Minwax satin Tung oil varnish.
Read more here
posted at: 12:00am on 20-Jun-2022
path: /Woodworking | permalink | edit (requires password)
Box #1, Prototype
Furnished content.
(from Lumberjocks.com)
 Needed a box for the last batch of Layout Tools. So I searched my wood stash, found some Oak 1/4”x2-1/2”x48”, that would workout fine. The box size is 13-1/2” x 9” x 2-1/2” high. Oak sides, 1/4” Maple plywood.I chose to make this using finger joints and groves, after laying out the pieces, I milled everything up on the table saw, using a box joint jig with a stacked dado set, and used the same dado set for the groves. A little tweaking on the joints and fitting the panels, and everything was glued up. Needed a box for the last batch of Layout Tools. So I searched my wood stash, found some Oak 1/4”x2-1/2”x48”, that would workout fine. The box size is 13-1/2” x 9” x 2-1/2” high. Oak sides, 1/4” Maple plywood.I chose to make this using finger joints and groves, after laying out the pieces, I milled everything up on the table saw, using a box joint jig with a stacked dado set, and used the same dado set for the groves. A little tweaking on the joints and fitting the panels, and everything was glued up.
 Prior to gluing I sanded the panels and the inside faces. After glue up I sanded the excess fingers.Inside the box is a 1/8” grove set 5/8” from the top, so the fence on the table saw was set at 3/4” and the blade set at 1/8” in height. Cut the box open and I have a lip around the top of the lower section and a matching rabet on the bottom of the upper section. Prior to gluing I sanded the panels and the inside faces. After glue up I sanded the excess fingers.Inside the box is a 1/8” grove set 5/8” from the top, so the fence on the table saw was set at 3/4” and the blade set at 1/8” in height. Cut the box open and I have a lip around the top of the lower section and a matching rabet on the bottom of the upper section.
 The finish is 3 coats of Danish Oil and 2 coats of Howard's Wax then buffed. And if course carved my Makers Mark.During this build I am finding that I am using the table saw more and more over the chop saw.There is a blog series on this box, and the others that I have started. https://www.lumberjocks.com/EricFai/blog/series/23666Thanks for looking and comments are always welcome. The finish is 3 coats of Danish Oil and 2 coats of Howard's Wax then buffed. And if course carved my Makers Mark.During this build I am finding that I am using the table saw more and more over the chop saw.There is a blog series on this box, and the others that I have started. https://www.lumberjocks.com/EricFai/blog/series/23666Thanks for looking and comments are always welcome.
Read more here
posted at: 12:00am on 20-Jun-2022
path: /Woodworking | permalink | edit (requires password)
Some of it's wood
Furnished content.
(from Lumberjocks.com)
 This was my first and probably my last attempt at something like this. The GrandSon-In-Law ask if I could do a Turkey tail mount, said I don't know, never tried one before. Well, the tail feathers, wing feathers, beard and feet w/spurs showed up at the house, said let me know when your done. After a lot youtube searching and internet searching, the project is done. Now I know why taxidermist charge so much.Bobby This was my first and probably my last attempt at something like this. The GrandSon-In-Law ask if I could do a Turkey tail mount, said I don't know, never tried one before. Well, the tail feathers, wing feathers, beard and feet w/spurs showed up at the house, said let me know when your done. After a lot youtube searching and internet searching, the project is done. Now I know why taxidermist charge so much.Bobby
Louisiana
Read more here
posted at: 12:00am on 19-Jun-2022
path: /Woodworking | permalink | edit (requires password)
Monkey Pod/Mango Stashbox
Furnished content.
(from Lumberjocks.com)
 Monkeypod and Mango Stashbox Monkeypod and Mango Stashbox
I brought back a little wood from Kauai a couple of years ago, and finally got around to making this little box.
The legs and lift are mango, and the little tray slides and can be lifted out. Approx. 6×4x4 inches, finished with satin poly.
Read more here
posted at: 12:00am on 19-Jun-2022
path: /Woodworking | permalink | edit (requires password)
Cherry Pot
Furnished content.
(from Lumberjocks.com)
 This is a cherry pot I made for the doctor who put the new joint in my finger a few weeks ago. It is 6 1/2” diameter and 3 1/2” high. I finished it with Danish oil and then buffed and waxed it.He can keep it beside the operating table and drop the old joints in there that he removes!!Cheers, Jim This is a cherry pot I made for the doctor who put the new joint in my finger a few weeks ago. It is 6 1/2” diameter and 3 1/2” high. I finished it with Danish oil and then buffed and waxed it.He can keep it beside the operating table and drop the old joints in there that he removes!!Cheers, Jim
Read more here
posted at: 12:00am on 19-Jun-2022
path: /Woodworking | permalink | edit (requires password)
Steam box 3.0
Furnished content.
(from Lumberjocks.com)
 I'm sure there are others here who thought, You know, maybe I should try my hand as steam bending”. So maybe a test of the water is called for and we get the budget Rockler steam generator, hose, and miscellaneous fittings along with instructions to build your steam box. Having helped steam and place timbers while working on older PNW fishing schooners I figured I could get a good grip on this smaller version. Well, there's a reason the title of this is what it is. To put it simply, using the supplied box building instructions I was able to get good results from the process but, after using it for its intended purpose the drying out process twisted the components of my 1st two boxes into shapes that frankly were a bit too artistic. So, like so many of us have done in the past and no doubt will in future, I went back to the drawing board. I went back to my boat building roots and followed the principles of hollow spar building. One side of each of the 8 parts gets the “bird mouth” joint while the other remains at 90 degrees. So, after some glue along with 6 stainless hose clamps it was ready for a test drive. After 6 uses now with months to dry in between I feel that this is the design that will stand the test of time. We'll see how long it is before the next trip back to the drawing board. I'm sure there are others here who thought, You know, maybe I should try my hand as steam bending”. So maybe a test of the water is called for and we get the budget Rockler steam generator, hose, and miscellaneous fittings along with instructions to build your steam box. Having helped steam and place timbers while working on older PNW fishing schooners I figured I could get a good grip on this smaller version. Well, there's a reason the title of this is what it is. To put it simply, using the supplied box building instructions I was able to get good results from the process but, after using it for its intended purpose the drying out process twisted the components of my 1st two boxes into shapes that frankly were a bit too artistic. So, like so many of us have done in the past and no doubt will in future, I went back to the drawing board. I went back to my boat building roots and followed the principles of hollow spar building. One side of each of the 8 parts gets the “bird mouth” joint while the other remains at 90 degrees. So, after some glue along with 6 stainless hose clamps it was ready for a test drive. After 6 uses now with months to dry in between I feel that this is the design that will stand the test of time. We'll see how long it is before the next trip back to the drawing board.
Read more here
posted at: 12:00am on 18-Jun-2022
path: /Woodworking | permalink | edit (requires password)
Shocking Taste
Furnished content.
(from Popularwoodworking.com)
Shocking Taste I turned on my shop vac to clean up the pile of sawdust that had accumulated while I ripped some pine boards for a cabinet. I live in Colorado, where the air is always dry, and my shop …Source
Read more here
posted at: 12:00am on 18-Jun-2022
path: /Woodworking | permalink | edit (requires password)
Mahogany and white oak MCM magazine rack for the wife.
Furnished content.
(from Lumberjocks.com)
 The wife asked for a simple magazine rack for the bathroom and this is what I came up with. The wife asked for a simple magazine rack for the bathroom and this is what I came up with.
Read more here
posted at: 12:00am on 18-Jun-2022
path: /Woodworking | permalink | edit (requires password)
Clock with hidden storage
Furnished content.
(from Lumberjocks.com)
 Another clock box. Another clock box.
Walnut with about 10 coats of lacquer
12×7-1/2×6
Read more here
posted at: 12:00am on 18-Jun-2022
path: /Woodworking | permalink | edit (requires password)
Almost-Forgotten Handsaw Tricks
Furnished content.
(from Popularwoodworking.com)
Chris Schwarz shares some handy, nearly-forgotten handsaw tricks to use in the shop.Source
Read more here
posted at: 12:00am on 18-Jun-2022
path: /Woodworking | permalink | edit (requires password)
DeWalt 12v Drill Review
Furnished content.
(from Popularwoodworking.com)
Tool: 12v MAX Brushless Drill/Driver DCD701F2 Shop Now Manufacturer: DeWalt MSRP: $149 (Includes charger, case, and two 2ah batteries) I've written before about tools being unobtrusive during use, and the DeWalt DCD701F2 is an exemplary example of that philosophy. …Source
Read more here
posted at: 12:00am on 18-Jun-2022
path: /Woodworking | permalink | edit (requires password)
Automata Wave Action
Furnished content.
(from Lumberjocks.com)
 I have seen these on youtube and wanted to make one for a while. It is made almost completely from scraps in the shop. It has over 450 pieces in it. And those are just the parts that I used, there was a lot of trial and oops, do something different. Not sure what I am going to do with it. Might add some more details over time.https://www.youtube.com/shorts/_9o52LpVpFQ I have seen these on youtube and wanted to make one for a while. It is made almost completely from scraps in the shop. It has over 450 pieces in it. And those are just the parts that I used, there was a lot of trial and oops, do something different. Not sure what I am going to do with it. Might add some more details over time.https://www.youtube.com/shorts/_9o52LpVpFQ
Read more here
posted at: 12:00am on 17-Jun-2022
path: /Woodworking | permalink | edit (requires password)
Metabo HPT Bucks Trend, Lowers Prices
Furnished content.
(from Popularwoodworking.com)
Not a day seems to go by without something rising in price, so it was a bit surprising to hear that Metabo HPT was actually going to be lowering the prices of some of their 18V cordless nailers. One of …Source
Read more here
posted at: 12:00am on 17-Jun-2022
path: /Woodworking | permalink | edit (requires password)
Five Footed & Lidded Pecan Vessel
Furnished content.
(from Lumberjocks.com)
 Here is another recent piece.This vessel has five feet and is primarily pecan. There is a small ash collar on the main body. The lid is pecan and the finial is ash. The lid is friction fitted. I am really trying to focus on eliminating tool marks while turning. I am turning at a higher speed for the finish cut and using a negative rake scraper that I reshaped from a standard scraper. This is a new process for me. I am fairly happy with the results.I also wanted to show some of the hand tools I've started using while making the feet. I use a coping saw to remove the bulk of the waste and follow that with some rasps and files. My absolute favorite file (maybe favorite hand tool) is a Grobet USA Swiss Pattern File. I've had this tool for over 25 years. Its my go to shaping hand (and now foot) tool. Here is another recent piece.This vessel has five feet and is primarily pecan. There is a small ash collar on the main body. The lid is pecan and the finial is ash. The lid is friction fitted. I am really trying to focus on eliminating tool marks while turning. I am turning at a higher speed for the finish cut and using a negative rake scraper that I reshaped from a standard scraper. This is a new process for me. I am fairly happy with the results.I also wanted to show some of the hand tools I've started using while making the feet. I use a coping saw to remove the bulk of the waste and follow that with some rasps and files. My absolute favorite file (maybe favorite hand tool) is a Grobet USA Swiss Pattern File. I've had this tool for over 25 years. Its my go to shaping hand (and now foot) tool.  Once the feet are roughed in I sand through the grits up to 320 in this case. Once the feet are roughed in I sand through the grits up to 320 in this case.
The whole vessel is then sanded to 600 grit.The finish/sealer I've been using is a homemade Maloof type finish.Once cured I then buff with Tripoli which is about 800 -1000 grit followed by White Diamond which is about 1500-1800 grit. I then use Howard's Feed-N-Wax and then follow it by a final buffing with carnauba wax.This vessel was fairly straightforward and quick. I considered threading the lid but settled on a friction fit.
I see more threaded pieces in my future.The Five Footed & Lidded Pecan Vessel is 4 1/4 at its widest and 8 1/4” at its tallest with the lid.
It is 6” tall without the lid.Thanks for looking.
Read more here
posted at: 12:00am on 17-Jun-2022
path: /Woodworking | permalink | edit (requires password)
Beer Nut Dispensers
Furnished content.
(from Lumberjocks.com)
 A couple beer nut dispensers for son and son-in law for fathers day. They happened to mention this when I gave a couple dispensers to the mothers for their candy on mothers day so I'll keep things peaceful. (last pic made from honey locust). A couple beer nut dispensers for son and son-in law for fathers day. They happened to mention this when I gave a couple dispensers to the mothers for their candy on mothers day so I'll keep things peaceful. (last pic made from honey locust).
They work perfect for the peanuts and great for the cashews too. No problems jamming yet. These were made from a 6×6 x 6'' blanks from local trees around here and I used scraps for the smaller parts. The darker one is walnut and the other is slippery elm.
I have no plans for these since each one is custom made differently depending on the size of the top. Little rubber feet on the bottom keeps it from moving when dispensing. 9 1/2'' tall x 5'' D.
Anyway I just wanted to share a little fathers day cheer.
Hope you enjoy.
Read more here
posted at: 12:00am on 17-Jun-2022
path: /Woodworking | permalink | edit (requires password)
Deck railings
Furnished content.
(from Lumberjocks.com)
 My customer asked if I could make a replacement top and bottom deck railing. A 45” long segment was destroyed when a not too competent tree trimmer felled a palm tree. It didn't land where he expected it to land. The ten PVC balusters survived but the thin walled artificial railings didn't. I'm not sure what the material was. I suspect something similar to artificial decking. The replacements are shown next to the damaged originals. Both replacements were box beam constructed from 4 pieces of alder. The ten holes for the 1-1/8” PVC balusters required a router template. I rough cut the holes undersized on the 3/8” thick tops with a saber saw. Prior to the box beam glue up I attached the template and used a 3/8” diameter flush trim bit on the router table to size the baluster holes. I ruled out using 8/4 alder and mortising in the baluster holes with a mortising machine because the balusters had rounded edges. The mortising machine would have made square mortises. By using a router template and a 3/8 inch flush trim bit, the holes had corners with the perfect radius. My replacements probably won't withstand a another tree falling on them but they're a bit stronger than the originals. My customer asked if I could make a replacement top and bottom deck railing. A 45” long segment was destroyed when a not too competent tree trimmer felled a palm tree. It didn't land where he expected it to land. The ten PVC balusters survived but the thin walled artificial railings didn't. I'm not sure what the material was. I suspect something similar to artificial decking. The replacements are shown next to the damaged originals. Both replacements were box beam constructed from 4 pieces of alder. The ten holes for the 1-1/8” PVC balusters required a router template. I rough cut the holes undersized on the 3/8” thick tops with a saber saw. Prior to the box beam glue up I attached the template and used a 3/8” diameter flush trim bit on the router table to size the baluster holes. I ruled out using 8/4 alder and mortising in the baluster holes with a mortising machine because the balusters had rounded edges. The mortising machine would have made square mortises. By using a router template and a 3/8 inch flush trim bit, the holes had corners with the perfect radius. My replacements probably won't withstand a another tree falling on them but they're a bit stronger than the originals.
Read more here
posted at: 12:00am on 16-Jun-2022
path: /Woodworking | permalink | edit (requires password)
Choosing a Finish for Color
Furnished content.
(from Popularwoodworking.com)
Different finishes look different on different species. There are many reasons to choose one finish over another. Usually the most important is for protection and durability - how well a finish protects the wood from moisture and how resistant the …Source
Read more here
posted at: 12:00am on 16-Jun-2022
path: /Woodworking | permalink | edit (requires password)
Finial top lidded bowl - figured maple and sapele
Furnished content.
(from Lumberjocks.com)
 I had a chunk of figured maple that I knew was going to have awesome chatoyancy, and it was about the right size for a small bowl. I've never done a finial top lidded bowl, so I figured what the hell?I turned the bowl body first, then used a vacuum chuck to hold the lid blank well enough to cut a lip on it, then used the bowl body as a jam chuck to finish the lid. The cats eye is just awesome. The pics clearly don't do it justice, I had a piece of walnut for the finial, but it ended up being all checked when I got it turned down, so I found a really pretty piece of sapele. I feel like the finial is a bit chunky, but it's my first attempt at it, so I'm not too upset. Sanded to 600 then, finished with homemade friction polish and a little Renaissance wax.First time with this type of bowl, first time with the vacuum chuck and transfer tail stock insert (neat setup!). I did learn the limits of the vacuum chuck, which is probably a good thing too! I had a chunk of figured maple that I knew was going to have awesome chatoyancy, and it was about the right size for a small bowl. I've never done a finial top lidded bowl, so I figured what the hell?I turned the bowl body first, then used a vacuum chuck to hold the lid blank well enough to cut a lip on it, then used the bowl body as a jam chuck to finish the lid. The cats eye is just awesome. The pics clearly don't do it justice, I had a piece of walnut for the finial, but it ended up being all checked when I got it turned down, so I found a really pretty piece of sapele. I feel like the finial is a bit chunky, but it's my first attempt at it, so I'm not too upset. Sanded to 600 then, finished with homemade friction polish and a little Renaissance wax.First time with this type of bowl, first time with the vacuum chuck and transfer tail stock insert (neat setup!). I did learn the limits of the vacuum chuck, which is probably a good thing too!
Read more here
posted at: 12:00am on 16-Jun-2022
path: /Woodworking | permalink | edit (requires password)
Use Car Jacks in the Shop to Lift & Level
Furnished content.
(from Popularwoodworking.com)
I have long used my car's scissor jack for house and shop projects including lifting a settled deck and leveling workbenches. And when I needed to install a new set of cabinets in my shop, I realized that a pair …Source
Read more here
posted at: 12:00am on 16-Jun-2022
path: /Woodworking | permalink | edit (requires password)
Thor's hammers
Furnished content.
(from Lumberjocks.com)
 Just finished a run of 15 Thor's hammers made of various scraps, (redwood, Douglas fir, alder). The handles are 1-3/8” diameter round stock with a 2” diameter toy wheel glued and screwed to the bottom of the handle. The larger hammer is 4” X 4” X 10”. The custom laser engraving and colorful paracord “Navy fancywork” on the handle is added by my client. Just finished a run of 15 Thor's hammers made of various scraps, (redwood, Douglas fir, alder). The handles are 1-3/8” diameter round stock with a 2” diameter toy wheel glued and screwed to the bottom of the handle. The larger hammer is 4” X 4” X 10”. The custom laser engraving and colorful paracord “Navy fancywork” on the handle is added by my client.
Read more here
posted at: 12:00am on 16-Jun-2022
path: /Woodworking | permalink | edit (requires password)
My Fred Flintstone Sign
Furnished content.
(from Lumberjocks.com)
 Well if you followed my aborted attempt to be competent with my Milsescraft Signpro you would have seen the miserable attempt to use it.A friend Jannis was visiting from Mackay and I thought she may like a sign for her home spot place.After about 4 attempts to use my Signpro I gave up pulled out my scroll saw and set to work.A series of, ... “you should give away woodwork” ... occurred as a result.The reason being,1. My lack of skills with the Signpro Well if you followed my aborted attempt to be competent with my Milsescraft Signpro you would have seen the miserable attempt to use it.A friend Jannis was visiting from Mackay and I thought she may like a sign for her home spot place.After about 4 attempts to use my Signpro I gave up pulled out my scroll saw and set to work.A series of, ... “you should give away woodwork” ... occurred as a result.The reason being,1. My lack of skills with the Signpro
2. My ability to recognise a spelling error as I was making the Fred Flintstone version.
Anyway pressing on I eventually obtained a reasonable result.
Materials used:-
The backing timber is Silky Oak
The letters are Recycled pine form my ongoing 8 Drawer Beaded Cabinet I am struggling with, (yet another journey into the unknown)The tools used :-
first up my Milescraft SignPro.
Only to be packed back in its Mike Marvel Case for maybe another time.
My scroll saw
disk sander
holesaw for the edges
ROS for finishing, along with a little die grinder work.
Thicknesser to remove my Milescraft mess
some “Harvest” colour rattle can
and marine external finish poly.So eventually Jannys Pot became Jannys Place.So why do I keep persevering? ... well I enjoy the activity, it keeps me from getting too senile (I hope)
and I do get a sense of achievement and satisfaction from it all, even if some ends up in the Otto bin!Plus I get to post it on Lumberjocks so others may learn from my mistakes!
Read more here
posted at: 12:00am on 15-Jun-2022
path: /Woodworking | permalink | edit (requires password)
Four Footed & Lidded Ash and Sapele Vessel
Furnished content.
(from Lumberjocks.com)
 Almost another piece in the Three Legged Dog Series but this ash vessel has four feet.It is turned from ash and also has three piths/branches running through it. It is a very straight forward piece and the ash cut very easily. The sapele lid is topped with a small cap of spalted ash which in turn is topped with a sapele finial. This lid is friction fit. The original finial was larger/wider and was an extension of the spalted ash cap. I felt it needed to have more contrast and tie back in to the sapele lid. I also chose to make it much thinner and more in proportion to the lid and vessel. I am very happy with the design change.The feet were carved using rasps and files rather than using a sanding drum on a rotary tool. It went so much faster using hand tools and I had more control along with better results.I sanded the vessel to 600 grit and sealed it with a Maloof type finish.It was then buffed with Tripoli followed by White Diamond. I then used Howard's Feed-N-Wax and then followed it by a buffing with carnauba wax. This really brings out the grain of the wood.This piece is 6 1/4 at the tallest and 6 1/4 at its widest point.Here is a pic of the Four Footed & Lidded Ash Vessel without the lid. Almost another piece in the Three Legged Dog Series but this ash vessel has four feet.It is turned from ash and also has three piths/branches running through it. It is a very straight forward piece and the ash cut very easily. The sapele lid is topped with a small cap of spalted ash which in turn is topped with a sapele finial. This lid is friction fit. The original finial was larger/wider and was an extension of the spalted ash cap. I felt it needed to have more contrast and tie back in to the sapele lid. I also chose to make it much thinner and more in proportion to the lid and vessel. I am very happy with the design change.The feet were carved using rasps and files rather than using a sanding drum on a rotary tool. It went so much faster using hand tools and I had more control along with better results.I sanded the vessel to 600 grit and sealed it with a Maloof type finish.It was then buffed with Tripoli followed by White Diamond. I then used Howard's Feed-N-Wax and then followed it by a buffing with carnauba wax. This really brings out the grain of the wood.This piece is 6 1/4 at the tallest and 6 1/4 at its widest point.Here is a pic of the Four Footed & Lidded Ash Vessel without the lid.

Thanks for looking.
Read more here
posted at: 12:00am on 15-Jun-2022
path: /Woodworking | permalink | edit (requires password)
How to Turn a Live Edge Bowl
Furnished content.
(from Popularwoodworking.com)
Get clean cuts and a nice finish from a challenging piece of material. A live edge (or natural-edge) bowl is one of the iconic forms of modern woodturning, and it is still a great way to show off a beautiful …Source
Read more here
posted at: 12:00am on 15-Jun-2022
path: /Woodworking | permalink | edit (requires password)
Irregular Hexagon
Furnished content.
(from Lumberjocks.com)
 Thought I would mess around with the standard angles of a hexagon and threw in a 50 and 20 degree option to skew it a bit. Of course that changed the length and width of two of the legs. I love Geometry.Woods: Oak, Cherry and Walnut.Frame: Walnut.Finish: Tung Oil. Thought I would mess around with the standard angles of a hexagon and threw in a 50 and 20 degree option to skew it a bit. Of course that changed the length and width of two of the legs. I love Geometry.Woods: Oak, Cherry and Walnut.Frame: Walnut.Finish: Tung Oil.
Read more here
posted at: 12:00am on 15-Jun-2022
path: /Woodworking | permalink | edit (requires password)
Her other Dad
Furnished content.
(from Lumberjocks.com)
 Our daughter Sydney asked me to help make something for her other dad that she had seen on the internet. She was five when I married her mother, and has been a daughter ever since. Her dad re-married and she now has two half sisters. Our daughter Sydney asked me to help make something for her other dad that she had seen on the internet. She was five when I married her mother, and has been a daughter ever since. Her dad re-married and she now has two half sisters.
Syd came out to the shop and went through a lot of wood before she found the perfect piece. I tried to help her design the graphic in Corel Draw, but could not figure out how to cut out the part where the names would be. I had to give my son a call and he figured it out for us. Syd picked the fonts and the sizing of the names.The wood is a piece of curly red oak. When we lasered in the names the letters took on a life of their own. It looks even better in real life.We are so very happy with the way it turned out. You just do whatever it takes to make your children happy.
Read more here
posted at: 12:00am on 14-Jun-2022
path: /Woodworking | permalink | edit (requires password)
100 Toolboxes
Furnished content.
(from Lumberjocks.com)
 10 years ago my current shop opened for business. My big shop door opens onto an alley that parents and children use for various errands and what-not. Back then I started an endevour that has I believe come to a close. I felt that every child should have a tool box. Able to carry around tools, lego's, art and what-have-you. Always given, never sold. Each child in my neighborhood has one including 2 that weren't born at the time of their construction. It of course expanded beyond the few blocks that surround my shop. The children now have grown and new ones are not too frequent visitors anymore. What you see is #'s 99 & 100. A grand number to wrap up on. Hard maple, milled to 1/2”. Personalized with a routed in name and presented each time with a smile. My fondest memory is of the grand parent who asked for one as a christening gift. Who coming back 3 weeks later presented me with a picture of their new grand daughter swadled up and laying in the tray of her toolbox with her name proudly displayed. This folks is why we do what we do. 10 years ago my current shop opened for business. My big shop door opens onto an alley that parents and children use for various errands and what-not. Back then I started an endevour that has I believe come to a close. I felt that every child should have a tool box. Able to carry around tools, lego's, art and what-have-you. Always given, never sold. Each child in my neighborhood has one including 2 that weren't born at the time of their construction. It of course expanded beyond the few blocks that surround my shop. The children now have grown and new ones are not too frequent visitors anymore. What you see is #'s 99 & 100. A grand number to wrap up on. Hard maple, milled to 1/2”. Personalized with a routed in name and presented each time with a smile. My fondest memory is of the grand parent who asked for one as a christening gift. Who coming back 3 weeks later presented me with a picture of their new grand daughter swadled up and laying in the tray of her toolbox with her name proudly displayed. This folks is why we do what we do.
Read more here
posted at: 12:00am on 14-Jun-2022
path: /Woodworking | permalink | edit (requires password)
Bosch 12v Drill Review
Furnished content.
(from Popularwoodworking.com)
Tool: 12v Brushless Drill/Driver GSR12V-300B22 Shop Now Manufacturer: Bosch MSRP: $129 (Includes charger, case, and two 2ah batteries) Shopping for a drill is often an exercise in compromise. You have to choose between 12v or 18/20v, how many …Source
Read more here
posted at: 12:00am on 14-Jun-2022
path: /Woodworking | permalink | edit (requires password)
dovetailed white oak tool box
Furnished content.
(from Lumberjocks.com)
 Tried my hand at making a variation of the Matt Estlea dovetailed toolbox. Opted for two drawers at the bottom and a lift-off lid rather than hinged. All hand tools. A bunch of mistakes and some shortcuts I would not do over. But I learned a lot, and it is good enough for my shop, certainly. White oak, which is an insanely hard wood to work by hand. Maple drawer sides and bottoms. Tried my hand at making a variation of the Matt Estlea dovetailed toolbox. Opted for two drawers at the bottom and a lift-off lid rather than hinged. All hand tools. A bunch of mistakes and some shortcuts I would not do over. But I learned a lot, and it is good enough for my shop, certainly. White oak, which is an insanely hard wood to work by hand. Maple drawer sides and bottoms.
Read more here
posted at: 12:00am on 13-Jun-2022
path: /Woodworking | permalink | edit (requires password)
Layout Tools
Furnished content.
(from Lumberjocks.com)
 Been making some more Layout Tools. Small Square, Bevel Gauge, Marking Knifes, and Awl's. Most are made with Walnut, and Purpleheart endcaps. The blades for the bevel gauge and marking knife were ordered through Taylor Tools.The finish was 2 coats of Natural Danish Oil, and 6 coats of Shellac sanded with 220, 400 and finally 0000 Wool and buffed. The Awl's were finished on the lathe with a friction polish of Shellac an BLO.I made these up to have on hand to give to a few buddies. This is a great site, and many thanks to all who have helped out with comments.Thanks for viewing and comments always welcome. Been making some more Layout Tools. Small Square, Bevel Gauge, Marking Knifes, and Awl's. Most are made with Walnut, and Purpleheart endcaps. The blades for the bevel gauge and marking knife were ordered through Taylor Tools.The finish was 2 coats of Natural Danish Oil, and 6 coats of Shellac sanded with 220, 400 and finally 0000 Wool and buffed. The Awl's were finished on the lathe with a friction polish of Shellac an BLO.I made these up to have on hand to give to a few buddies. This is a great site, and many thanks to all who have helped out with comments.Thanks for viewing and comments always welcome.
Read more here
posted at: 12:00am on 13-Jun-2022
path: /Woodworking | permalink | edit (requires password)
cherry gall pens
Furnished content.
(from Lumberjocks.com)
 just a couple of manhattan pens i made from some beautiful cherry gall that my good friend van was kind enough to sell me some.it's a simple pen kit to make and the wood turned very easy.i just did a simple mylands friction polish.i know most do ca finish but i just dont care for the look of it.if i wanna turn plastic ill use that.the pens are laying on a piece of the gall. just a couple of manhattan pens i made from some beautiful cherry gall that my good friend van was kind enough to sell me some.it's a simple pen kit to make and the wood turned very easy.i just did a simple mylands friction polish.i know most do ca finish but i just dont care for the look of it.if i wanna turn plastic ill use that.the pens are laying on a piece of the gall.
Read more here
posted at: 12:00am on 13-Jun-2022
path: /Woodworking | permalink | edit (requires password)
Boring bar with Pistachio handle
Furnished content.
(from Lumberjocks.com)
 I made this boring bar for our shop in Az. It has an arm welded on to resist the torque when boring the inside of a piece. I had to make a piece to try it on so I picked one of the cherry pieces that was roughed out years ago. I found that the 1/2” carbide cutter with a very positive rake is really too aggressive in there. I'll be ordering some flat top carbide scraper discs.This was inspired by one I think LJ Zagreb has. The spring “feeler” is used to gage the wall thickness. When it straightens out, you are there!.The handle was made from 2 pieces of pistachio wood glued together and is finished with Kustom Grit and finally Shellawax.Cheers, Jim I made this boring bar for our shop in Az. It has an arm welded on to resist the torque when boring the inside of a piece. I had to make a piece to try it on so I picked one of the cherry pieces that was roughed out years ago. I found that the 1/2” carbide cutter with a very positive rake is really too aggressive in there. I'll be ordering some flat top carbide scraper discs.This was inspired by one I think LJ Zagreb has. The spring “feeler” is used to gage the wall thickness. When it straightens out, you are there!.The handle was made from 2 pieces of pistachio wood glued together and is finished with Kustom Grit and finally Shellawax.Cheers, Jim
Read more here
posted at: 12:00am on 12-Jun-2022
path: /Woodworking | permalink | edit (requires password)
Window Sash
Furnished content.
(from Lumberjocks.com)
 I needed to make three window sashes because the basement windows are toast. I guess they lasted for 104 years is not bad. The hardest part was the setup. You have to setup the table for the tenon. Then the drill press for the mortise which I have a mortising attachment. The setup the two router bits. The poplar was free leftovers from the table I sold. The glass was the most expensive part at $15 a pane. I needed to make three window sashes because the basement windows are toast. I guess they lasted for 104 years is not bad. The hardest part was the setup. You have to setup the table for the tenon. Then the drill press for the mortise which I have a mortising attachment. The setup the two router bits. The poplar was free leftovers from the table I sold. The glass was the most expensive part at $15 a pane.
Read more here
posted at: 12:00am on 12-Jun-2022
path: /Woodworking | permalink | edit (requires password)
Dan's Shower Base Mk 2
Furnished content.
(from Lumberjocks.com)
 No 2 Son asked for a new shower base for his camping getaways. No 2 Son asked for a new shower base for his camping getaways.
I made the original one in Jun 2015 from some spotted gum flooring left over from his house renos.
I cut the “slats” using my finger joint saw kit so 50% of them were against the grain creating a weak spot in the design and it eventually started to fail. (see picture 6)
As I had made him some Red Iron Bark camping mallets he asked for the same material.So being the dutiful father I set to work (see picture 5)
the slats were all cut and ended up being 9mm x 20mm (see picture 4)  I then spaced them out using the few defective slats that I cut for the purpose I then spaced them out using the few defective slats that I cut for the purpose Now the glue up posed a bit of a thinking exercise and I eventually used a few pavers as weights and my table saw top as a level datum base. Now the glue up posed a bit of a thinking exercise and I eventually used a few pavers as weights and my table saw top as a level datum base. The slat section was purposely made oversize as i didnt bother trying to find my original design plansUpon confirming the original dimensions cut the slat section to size. ( see picture 3)I then made the frame. The slat section was purposely made oversize as i didnt bother trying to find my original design plansUpon confirming the original dimensions cut the slat section to size. ( see picture 3)I then made the frame. I decided to use 45% miter joints and screw them together so later maintenance could be done, but this proved to be a fail as the timber split even after I pre drilled everything. I decided to use 45% miter joints and screw them together so later maintenance could be done, but this proved to be a fail as the timber split even after I pre drilled everything. So work stopped while I pondered a suitable fix.Eventually I figured out as I had pre drilled and countersunk everything the only way out of the botch up was to use a 10mm forstner bit clamp the frame and drill dowel holes to hide the mess.Finishing:- So work stopped while I pondered a suitable fix.Eventually I figured out as I had pre drilled and countersunk everything the only way out of the botch up was to use a 10mm forstner bit clamp the frame and drill dowel holes to hide the mess.Finishing:-
Another learning curve here …. never attempt to sand slats with a ROS!  So back inside I go to lick my wounds and figure a solution.Next day out came my drum sander. So back inside I go to lick my wounds and figure a solution.Next day out came my drum sander. The finished product got a series of external clear poly and was looking good at last (See picture 1) The finished product got a series of external clear poly and was looking good at last (See picture 1) BTW Its bloody cold here 3 to 8 deg over night so I am getting my flannelette sheets out and running the A/C to try and get the chill out of a morning! BTW Its bloody cold here 3 to 8 deg over night so I am getting my flannelette sheets out and running the A/C to try and get the chill out of a morning!
Read more here
posted at: 12:00am on 12-Jun-2022
path: /Woodworking | permalink | edit (requires password)
Flattening A Plane Sole, Part 2
Furnished content.
(from Popularwoodworking.com)
Last week I talked about the diamond stone technique for lapping the soles of small block planes. This week I will talk about another popular method – using abrasive tapes over a flat surface. Sometimes the condition of the plane's …Source
Read more here
posted at: 12:00am on 11-Jun-2022
path: /Woodworking | permalink | edit (requires password)
Plywood Tipper
Furnished content.
(from Popularwoodworking.com)
Hoisting heavy sheets of plywood and MDF onto my tablesaw is not my idea of workshop fun. That's why I devised this pivoting rack and began storing my sheet stock vertically. The rack's frame fits around the two base uprights …Source
Read more here
posted at: 12:00am on 11-Jun-2022
path: /Woodworking | permalink | edit (requires password)
Mini pallet coasters
Furnished content.
(from Lumberjocks.com)
 I made this set of palette coasters with various types of wood, having in mind a collection of wood samples that could also be usful somewhere. I made this set of palette coasters with various types of wood, having in mind a collection of wood samples that could also be usful somewhere.
The types of wood are pretty much all the types that I have used so far. Left to right:
Bottom row: white ash, walnut, pine, elm
middle row: beech, oak, olive, orange
top row: european oak, birch, judas tree, orangeCoaster case: walnut with white ash stripes
Read more here
posted at: 12:00am on 11-Jun-2022
path: /Woodworking | permalink | edit (requires password)
5 Favorite Shaker Projects
Furnished content.
(from Popularwoodworking.com)
Shaker furniture is known for it's clean, simple lines and quality construction. There's been no shortage of Shaker woodworking projects in the pages of Popular Woodworking over the years, and We've gathered five of our favorite ones for woodworkers of …Source
Read more here
posted at: 12:00am on 10-Jun-2022
path: /Woodworking | permalink | edit (requires password)
Birdseye Maple Clock with storage
Furnished content.
(from Lumberjocks.com)
 I completed this clock today. That birdseye board just kept staring at me (those birdseye's will do that occasionally) and gave me the feeling it wanted to be a clock… I completed this clock today. That birdseye board just kept staring at me (those birdseye's will do that occasionally) and gave me the feeling it wanted to be a clock…
The interior size is 6-1/2”x10”x3-1/2” and has a thin rubber mat on the bottom to protect valuables.
The clock is 6” in diameter.
Finish is lacquer.
Now, I have numerous other boards in the shop that have decided that they also want to be a clock.
Read more here
posted at: 12:00am on 10-Jun-2022
path: /Woodworking | permalink | edit (requires password)
Lamp turned from unknown spalted wood
Furnished content.
(from Lumberjocks.com)
 Lamp turned from unknown spalted wood (found on the roadside) with Bolivian Rosewood top. Lamp turned from unknown spalted wood (found on the roadside) with Bolivian Rosewood top.
Read more here
posted at: 12:00am on 10-Jun-2022
path: /Woodworking | permalink | edit (requires password)
Modern Planter Boxes with Hide a Key Storage
Furnished content.
(from Lumberjocks.com)
 We have lived in our house for almost 10 years now, so it was time to give our front porch a much-needed upgrade – And what better way to start than with planters and the house numbers.I made these from sapele and canarywood which contrast really well and will hold up to the elements. Plus the canarywood is a nice complement to our front door. I used stopped double rabbets and stopped dados for the joinery so its definitely built to last. The upper planter box also has an inconspicuous hiding spot for those of you who lock yourself out of the house (you know who you are). It is also a really nice way to improve that curb appeal. And for those who are concerned, those are not my actual house numbers..Watch the Build Video Here We have lived in our house for almost 10 years now, so it was time to give our front porch a much-needed upgrade – And what better way to start than with planters and the house numbers.I made these from sapele and canarywood which contrast really well and will hold up to the elements. Plus the canarywood is a nice complement to our front door. I used stopped double rabbets and stopped dados for the joinery so its definitely built to last. The upper planter box also has an inconspicuous hiding spot for those of you who lock yourself out of the house (you know who you are). It is also a really nice way to improve that curb appeal. And for those who are concerned, those are not my actual house numbers..Watch the Build Video Here
Read more here
posted at: 12:00am on 10-Jun-2022
path: /Woodworking | permalink | edit (requires password)
Tree-Hugging Shop
Furnished content.
(from Popularwoodworking.com)
After designing and building custom furniture in southern California for 24 years, I finally got to build my dream workshop. Inspired by the Craftsman style and the designs of the brothers Green, my shop cradles a 100-year-old eucalyptus tree in …Source
Read more here
posted at: 12:00am on 09-Jun-2022
path: /Woodworking | permalink | edit (requires password)
A place for her stuff & cat. Bookcase for our nieces daughter. Quarter sawn red oak.
Furnished content.
(from Lumberjocks.com)
 8 June 2022 8 June 2022
Here's Scamper The-Cat on his bookcase. Another epic opus of a post.A fun project with a nice surprise. Cleaning up my shop/garage, after many years, I uncovered a plank of red oak that was true 8/4 by six inches and 8ft long. Well this was something long forgotten and covered with a fine coat of dust. With nice long even grain I milled out some 1×2's for the legs and milled the rest for rails and slats. The end results were quarter sawn pieces. With nice long even grain I milled out some 1×2's for the legs and milled the rest for rails and slats. The end results were quarter sawn pieces. The bookcase is similar to a couple I've made over the past years. The plan was originally from www.plansnow.com I made changes to the design appearance, no drawers (Aria hides food), sized to 30W 14D & 46H with 3 fixed and 2 adjustable shelfs. The bookcase is similar to a couple I've made over the past years. The plan was originally from www.plansnow.com I made changes to the design appearance, no drawers (Aria hides food), sized to 30W 14D & 46H with 3 fixed and 2 adjustable shelfs. The part I really like about this design is the routed dado's in the back and side rails. This really adds a lot to the strength of the case.The sides were a true 4/4. All pieces mortise and tenon. The part I really like about this design is the routed dado's in the back and side rails. This really adds a lot to the strength of the case.The sides were a true 4/4. All pieces mortise and tenon.  A 3/4×1/2 rabbit was cut on the rear of the legs to receive the back rails. The back rails were routed to fit snug with the legs and allow back panels to be added. A length wise dado was cut to fit the fixed shelfs. A 3/4×1/2 rabbit was cut on the rear of the legs to receive the back rails. The back rails were routed to fit snug with the legs and allow back panels to be added. A length wise dado was cut to fit the fixed shelfs. The side pieces were dry clamped and a stop dado cut from the rear to and inch from the front. I cut a length of oak to act as spacing guides where the side and back rails will connect. This really helps in the gluing up phase. The side pieces were dry clamped and a stop dado cut from the rear to and inch from the front. I cut a length of oak to act as spacing guides where the side and back rails will connect. This really helps in the gluing up phase. Did layouts for the shelf supports and locking pins for the rails. Assembled dry for fit. The back panels were 1/2 inch sanded plywood. All pieces were sanded to 600 and finished with multiple coats of Waterlux high gloss varnish. Did layouts for the shelf supports and locking pins for the rails. Assembled dry for fit. The back panels were 1/2 inch sanded plywood. All pieces were sanded to 600 and finished with multiple coats of Waterlux high gloss varnish. Delivered in pieces and final assembly. It's a heavy piece but it can come apart. She now has her own case. Her brother, made him one years back, now wants another bigger case. Delivered in pieces and final assembly. It's a heavy piece but it can come apart. She now has her own case. Her brother, made him one years back, now wants another bigger case. thanks for viewing. thanks for viewing.
Read more here
posted at: 12:00am on 09-Jun-2022
path: /Woodworking | permalink | edit (requires password)
Kalimba #2
Furnished content.
(from Lumberjocks.com)
 I made this for an old friend who wanted something to reflect his Aztec heritage. I made this for an old friend who wanted something to reflect his Aztec heritage.
Read more here
posted at: 12:00am on 09-Jun-2022
path: /Woodworking | permalink | edit (requires password)
Symposium Award
Furnished content.
(from Lumberjocks.com)
 As simple as this project is, it has taken me almost 6 weeks to make it. A friend who is somewhat aware of my TBI asked me if this project was within my abilities. Being optimistic, I said sure and started on it right away. I almost didn't make the deadline because we had a severe weather event that took out the power to our house for 8+ days.I started with just the digital image shown as the last photo. I displayed it on my phone and used a variety of tricks to lay out a cardboard pattern for it. These shapes were then cut out in some salvaged 1970s vintage plywood panelling; this is an ideal use for that wood. I made the plywood pieces to use as patterns for future copies of this project. There may be a few more of them someday.All of the stock was resawn and hand planed to finished dimensions. The pieces were all trimmed and fit together using hand tools. A custom glue-up jig helped a lot with this part. The only electrons used in the project were for the hot-glue gun that I used to hold the fiddly little pieces while I was fitting them to each other. The smallest of the pieces are just over 3/4” of 5/16” stock.There were the mandatory mistakes and learning moments along the way and I did manage to bleed on it a little, but I like how it turned out and I really enjoyed making this one. As simple as this project is, it has taken me almost 6 weeks to make it. A friend who is somewhat aware of my TBI asked me if this project was within my abilities. Being optimistic, I said sure and started on it right away. I almost didn't make the deadline because we had a severe weather event that took out the power to our house for 8+ days.I started with just the digital image shown as the last photo. I displayed it on my phone and used a variety of tricks to lay out a cardboard pattern for it. These shapes were then cut out in some salvaged 1970s vintage plywood panelling; this is an ideal use for that wood. I made the plywood pieces to use as patterns for future copies of this project. There may be a few more of them someday.All of the stock was resawn and hand planed to finished dimensions. The pieces were all trimmed and fit together using hand tools. A custom glue-up jig helped a lot with this part. The only electrons used in the project were for the hot-glue gun that I used to hold the fiddly little pieces while I was fitting them to each other. The smallest of the pieces are just over 3/4” of 5/16” stock.There were the mandatory mistakes and learning moments along the way and I did manage to bleed on it a little, but I like how it turned out and I really enjoyed making this one.
Read more here
posted at: 12:00am on 09-Jun-2022
path: /Woodworking | permalink | edit (requires password)
Use Light To Spot Finish Imperfections
Furnished content.
(from Popularwoodworking.com)
Nobody likes wrapping up the last bit of finishing on a project and suddenly catching a run or imperfection you missed earlier. You can either ignore it, or more likely sand it down and fix the blemish. Thankfully, it's easy …Source
Read more here
posted at: 12:00am on 09-Jun-2022
path: /Woodworking | permalink | edit (requires password)
Fairy house
Furnished content.
(from Lumberjocks.com)
 Fairy house I finished this morning. Trying to keep these under 3 hours in order to sell them at the local farmers market for 30$. Fairy house I finished this morning. Trying to keep these under 3 hours in order to sell them at the local farmers market for 30$.
Read more here
posted at: 12:00am on 08-Jun-2022
path: /Woodworking | permalink | edit (requires password)
Sycamore Jewellery Box
Furnished content.
(from Lumberjocks.com)
 Just Finished the jewellery box for a friend involved with the Girl Guides. Didn't turn out too bad although I wish I had finished the Sycamore a bit darker, but it should darken a bit naturally after a while. Just Finished the jewellery box for a friend involved with the Girl Guides. Didn't turn out too bad although I wish I had finished the Sycamore a bit darker, but it should darken a bit naturally after a while.
I inlaid the Girl Guides logo on the top in dyed blue Tulip and the rest of the box is figured Sycamore veneer with Wenge edges. The tray is Sycamore with Wenge splines and I found a girl guide badge on eBay for 50p which I inlaid into the tray, helps lift it out. It's all lined out in blue velvet, hope you like it….
Alan
Read more here
posted at: 12:00am on 08-Jun-2022
path: /Woodworking | permalink | edit (requires password)
More cheese slicers
Furnished content.
(from Lumberjocks.com)
 A few mor 7×5-1/2 cheese slicer boards to replenish the gallery. 2 Spalted maple and walnut. And another of assorted scraps. A few mor 7×5-1/2 cheese slicer boards to replenish the gallery. 2 Spalted maple and walnut. And another of assorted scraps.
Read more here
posted at: 12:00am on 08-Jun-2022
path: /Woodworking | permalink | edit (requires password)
Neckyoke for a 2 horse hitch
Furnished content.
(from Lumberjocks.com)
 A new piece of ash for an old Neckyoke used when hitching up a team of heavy work horses to a plow or wagon. I'm going to let my customer install the centre ring as per his request. First time doing a long turn, 42 inches. It was the full of my lathe plus the bed extension. A new piece of ash for an old Neckyoke used when hitching up a team of heavy work horses to a plow or wagon. I'm going to let my customer install the centre ring as per his request. First time doing a long turn, 42 inches. It was the full of my lathe plus the bed extension.
Read more here
posted at: 12:00am on 07-Jun-2022
path: /Woodworking | permalink | edit (requires password)
Maple Urn
Furnished content.
(from Lumberjocks.com)
 I'm not in any hurry to take up occupancy but it's ready for when the time comes. Maple from a tree close to home. Single coat of tung oil and paste wax (i like the flat finish) I'm not in any hurry to take up occupancy but it's ready for when the time comes. Maple from a tree close to home. Single coat of tung oil and paste wax (i like the flat finish)
Read more here
posted at: 12:00am on 07-Jun-2022
path: /Woodworking | permalink | edit (requires password)
Chinaberry Footed Natural Edge Bowl
Furnished content.
(from Lumberjocks.com)
 Another quick and simple once turned bowl. Another quick and simple once turned bowl.
I love this Chinaberry and only have a few more pieces left to turn. I expect it to darken a bit but it is gorgeous when freshly cut. This blank was not quite cut from a crotch piece but just above the fork and the piece had a very flat side where the two branches were almost grown together. I think the compressed grain is one of the reasons the wood has so much chatoyance.
 I had a little tearout where the grain was so figured. The grain is so squirrelly and wild it runs in many different directions. I experimented with a negative rake scraper I reground from a regular round nose scraper and got so so results. I tried scraping with a razor (by hand) to smooth it out and was happy with the process. Then a lot of hand sanding on that area up to 600 grit.The whole piece was sanded from 150 grit to 600 grit, polished with tripoli and then white diamond compound. Tripoli is about 800 -1000 grit. White Diamond is about 1500-1800 grit. I then used Howard's Feed-N-Wax and then followed it by a buffing with carnauba wax. This process really allows the chatoyance to show in the wild grain.Thanks for looking everyone. I had a little tearout where the grain was so figured. The grain is so squirrelly and wild it runs in many different directions. I experimented with a negative rake scraper I reground from a regular round nose scraper and got so so results. I tried scraping with a razor (by hand) to smooth it out and was happy with the process. Then a lot of hand sanding on that area up to 600 grit.The whole piece was sanded from 150 grit to 600 grit, polished with tripoli and then white diamond compound. Tripoli is about 800 -1000 grit. White Diamond is about 1500-1800 grit. I then used Howard's Feed-N-Wax and then followed it by a buffing with carnauba wax. This process really allows the chatoyance to show in the wild grain.Thanks for looking everyone.
Read more here
posted at: 12:00am on 07-Jun-2022
path: /Woodworking | permalink | edit (requires password)
Tornado Table
Furnished content.
(from Popularwoodworking.com)
One afternoon - start to finish - is all it takes, even for a new woodworker. This may be the easiest (and coolest) table you'll ever build. If mid-20th century modern furniture design were as popular as the Arts …Source
Read more here
posted at: 12:00am on 07-Jun-2022
path: /Woodworking | permalink | edit (requires password)
Cut Flat Dados on a Round Surface
Furnished content.
(from Popularwoodworking.com)
I needed to cut stopped grooves on a round surface - and while I could have cut them on the stock while it was square, then proceed to turn it on the lathe, I didn't want to worry about catching …Source
Read more here
posted at: 12:00am on 07-Jun-2022
path: /Woodworking | permalink | edit (requires password)
Saw Sled Addition
Furnished content.
(from Lumberjocks.com)
 I added this addition to the saw sled I made up recently. The hardest thing about the walnut flip stop was finding a hinge mechanism without a ton of play in the rotator spacing. I also flipped the 45 degree to the other side of the adjustable fence, making it easier to set by putting it against the main fence. I am working on a way to hold the flip stop back, maybe a magnet in the flipper.Thank you Eric for the thought starter on this. I added this addition to the saw sled I made up recently. The hardest thing about the walnut flip stop was finding a hinge mechanism without a ton of play in the rotator spacing. I also flipped the 45 degree to the other side of the adjustable fence, making it easier to set by putting it against the main fence. I am working on a way to hold the flip stop back, maybe a magnet in the flipper.Thank you Eric for the thought starter on this.
Read more here
posted at: 12:00am on 06-Jun-2022
path: /Woodworking | permalink | edit (requires password)
Record Player Stand
Furnished content.
(from Lumberjocks.com)
 When my niece announced she was getting married the ideas on what to get/make for a gift started to flow. I landed on building a custom record player stand when I saw that she had a record player on her registry. I built this one from a reclaimed wood framed window and some scraps of barn wood from another project. The barn wood was oak and it was never painted, instead they had charred the outside surface to seal it. Not only did it look awesome, but it also had an excellent smoky smell.To retain the age and the char on the wood I only planned or sanded down the boards as necessary to removed splinters and rough surfaces. Once done I just did a few clear coats on all surfaces.The cabinet was made to support the record player on top. The lid as a small track to slide in the dust jacket for the current record. There are two shelves under the player; one is for 12 inch records and a shelf for 7 inch 45s. The cabinet is also equipped with casters to easily move it around. When my niece announced she was getting married the ideas on what to get/make for a gift started to flow. I landed on building a custom record player stand when I saw that she had a record player on her registry. I built this one from a reclaimed wood framed window and some scraps of barn wood from another project. The barn wood was oak and it was never painted, instead they had charred the outside surface to seal it. Not only did it look awesome, but it also had an excellent smoky smell.To retain the age and the char on the wood I only planned or sanded down the boards as necessary to removed splinters and rough surfaces. Once done I just did a few clear coats on all surfaces.The cabinet was made to support the record player on top. The lid as a small track to slide in the dust jacket for the current record. There are two shelves under the player; one is for 12 inch records and a shelf for 7 inch 45s. The cabinet is also equipped with casters to easily move it around.
Read more here
posted at: 12:00am on 06-Jun-2022
path: /Woodworking | permalink | edit (requires password)
Garden Bench
Furnished content.
(from Lumberjocks.com)
 I recently replaced the back frame and slats of this garden bench for a client. He provided me with Ipe for the job. It was my first time working with Ipe and I found it easy to rip using a freshly sharpened Woodworker II blade. All routing was done using Fried router bits. The client applied five coats of General Finishes Exterior 450. I recently replaced the back frame and slats of this garden bench for a client. He provided me with Ipe for the job. It was my first time working with Ipe and I found it easy to rip using a freshly sharpened Woodworker II blade. All routing was done using Fried router bits. The client applied five coats of General Finishes Exterior 450.
Read more here
posted at: 12:00am on 06-Jun-2022
path: /Woodworking | permalink | edit (requires password)
Storage Cubbies and Coat Rack for Mud Room
Furnished content.
(from Lumberjocks.com)
 My wife got tired of storing our outdoor shoes in plastic milk crates and wanted storage cubbies and a new set of coat racks for our mud room. My wife got tired of storing our outdoor shoes in plastic milk crates and wanted storage cubbies and a new set of coat racks for our mud room.
I designed the cubby units-one large under the coat rack, and one small for the back door area of the mud room entrance.Used 3/4 birch ply from home depot for the carcasses and shelves, and Tamarack (Western Larch) for the shelf edging, cubby tops, and coat rack. The Tamarack is locally sourced in North Idaho and available at the local beam and millwork lumber yard. The shelf and top/bottom edging is 3/8 inch thick, and the tops and coat rack and shelf are 3/4 Tamarack glued up panels.Joinery is biscuits and screws, no glue. I opted to use this joinery for the carcasses as it worked well in previous projects. Joints are strong without glue, and using this method eliminated what would have been a huge “clamp, glue up, and fidget with” process with the number of shelves, top and bottom of the larger unit. I countersunk the screw holes, and used a plug cutter on the drill press to create plugs for the holes out of maple. Once the plugs were glued in, I used my Japanese flush trim saw to cut off the ends and sanded them smooth. The maple matched the birch very closely, and the plugs all but disappeared.All shelves and interior pieces were pre-finished before joinery with Minwax Polycrylic-3 coats brushed on.
The coat rack and shelf unit was joined with biscuits and glue, and the joint strengthened with 2” finish nails driven into the back from the top part of the shelf.The Tamarack will redden and darken over time-much like cherry-and give a nice contrast to the birch.Only change I would make if doing this type of casework again is to spend more $'s on a better quality of cabinet ply. The Home Depot birch ply has a “rice paper thin” veneer, which is easily damaged in milling. I had to glue little chips to fix the dings along edges where they occurred-a pain in the neck!
Read more here
posted at: 12:00am on 05-Jun-2022
path: /Woodworking | permalink | edit (requires password)
Natural Edge Three Footed Buggy Bowl
Furnished content.
(from Lumberjocks.com)
This post has two different bowls.#1~ Natural Edge Three Footed Buggy Bowl.This bowl was turned from a piece of birch I found recently.
It was very dry and hard. I could see the beetle tracks before I even started but I wanted to see what I could make with it. I decided before I even started that I would not patch holes with epoxy or crushed stone.As it developed I really liked the character of the piece. I felt that removing part of the mortise I used to turn as three feet would add another great visual element to this bowl.There is no knowing how the bug tracks lay beneath the bark but I really like this little bowl as they were revealed.I sanded it to 400 grit before applying a Maloof style wipe-on finish I've been using lately. That was followed with a couple of coats of Howard's Feed n Wax before buffing it out with a mop head bowl buff. I stayed away from the Beall Polishing process I've been using because of the potential to get lint/fuzzys in all the bug holes.This bowl is 3 at it's highest point and 6 at its widest.This was a test piece for me to decide if I wanted to collect more of the birch. I have a couple of pieces but I did not get a large cache of it.
Read more here
posted at: 12:00am on 05-Jun-2022
path: /Woodworking | permalink | edit (requires password)
Vacuum cart
Furnished content.
(from Lumberjocks.com)
 Submitted for your delectation is my version of the ubiquitous vacuum cart. Last year on Black Friday I bought a Clear Vue cyclone on sale. Dragging it around the shop with my vacuum for all of 10 minutes was enough to drive me to making the cart. As with most things I design, I built the main concept first, and after a bit of use I engineered out some of the bigger annoyances and added some features I determined were useful. You can see it in the pictures in its 'naked' state when I finished it back in February, and again in its blue livery after it warmed up sufficiently to spray the paint outdoors. Submitted for your delectation is my version of the ubiquitous vacuum cart. Last year on Black Friday I bought a Clear Vue cyclone on sale. Dragging it around the shop with my vacuum for all of 10 minutes was enough to drive me to making the cart. As with most things I design, I built the main concept first, and after a bit of use I engineered out some of the bigger annoyances and added some features I determined were useful. You can see it in the pictures in its 'naked' state when I finished it back in February, and again in its blue livery after it warmed up sufficiently to spray the paint outdoors.   A couple features I added after v1.0 are the handle in the front so I can pull the cart if I am in front of it (I got tired of waking around to the back to push it). In order to facilitate the handle I had to stiffen it by tying it to the main vacuum platform with those 45 degree angle pieces, and I added a piece that prevents the hinged portion from lifting up when I pull on the handle. When I need to empty the bucket, I can just slide the piece out and lift up the hinged part. I also added a small aluminum piece onto which I can hook the end of the hose so it's all nice and neat. The hook on the hose was made by bending a piece of solid copper wire around the hose, forming the ends into a J-shape, and soldering the ends together. A couple features I added after v1.0 are the handle in the front so I can pull the cart if I am in front of it (I got tired of waking around to the back to push it). In order to facilitate the handle I had to stiffen it by tying it to the main vacuum platform with those 45 degree angle pieces, and I added a piece that prevents the hinged portion from lifting up when I pull on the handle. When I need to empty the bucket, I can just slide the piece out and lift up the hinged part. I also added a small aluminum piece onto which I can hook the end of the hose so it's all nice and neat. The hook on the hose was made by bending a piece of solid copper wire around the hose, forming the ends into a J-shape, and soldering the ends together.  I suppose some day I will get around to making a shelf and hangers for hoses under the vacuum, but for now it is plenty functional as is, and I will be moving on to other projects.I'm really happy having a cyclone on the vacuum. As many of you that have cyclones can attest to, it really keeps you from having to blow dust out of your vacuum filter every other day. I'm amazed at the fineness of the dust it captures in the bucket.The cart was made from a piece of 1/2 plywood that came as part of a pallet, and some white oak I had lying around. So I have nothing into it cost-wise except the 4 casters and blue paint. The plywood was quite warped, so I had to make a bunch of…scaffolding underneath the main platform to straighten it out. But it all came around to my will in the end. I suppose some day I will get around to making a shelf and hangers for hoses under the vacuum, but for now it is plenty functional as is, and I will be moving on to other projects.I'm really happy having a cyclone on the vacuum. As many of you that have cyclones can attest to, it really keeps you from having to blow dust out of your vacuum filter every other day. I'm amazed at the fineness of the dust it captures in the bucket.The cart was made from a piece of 1/2 plywood that came as part of a pallet, and some white oak I had lying around. So I have nothing into it cost-wise except the 4 casters and blue paint. The plywood was quite warped, so I had to make a bunch of…scaffolding underneath the main platform to straighten it out. But it all came around to my will in the end.
Read more here
posted at: 12:00am on 05-Jun-2022
path: /Woodworking | permalink | edit (requires password)
Humidor
Furnished content.
(from Lumberjocks.com)
 Our latest humidor build in the newly built shop. A 150 count American black walnut and Wenge unit , eight coat lacquer finish with a pumice and rotten stone levelling and rub out. Our latest humidor build in the newly built shop. A 150 count American black walnut and Wenge unit , eight coat lacquer finish with a pumice and rotten stone levelling and rub out.
Read more here
posted at: 12:00am on 04-Jun-2022
path: /Woodworking | permalink | edit (requires password)
Flattening A Plane Sole, Part 1
Furnished content.
(from Popularwoodworking.com)
Much has been written about the importance of a true and flat plane sole as a key to achieving optimal results during planning. Premium planes come with a very flat sole, do not need any interventions, and are ready for …Source
Read more here
posted at: 12:00am on 04-Jun-2022
path: /Woodworking | permalink | edit (requires password)
round magnetic dice
Furnished content.
(from Lumberjocks.com)
 My only regret with this project is that I didn't think of it first. Gotta give credit to Oliveir Gomis. Stumbled upon his https://www.youtube.com/watch?v=_pDTXd8wZ80 and was determined to have one for myself. My first sphere was a fail (we'll call it a practice piece) but I learned from it and the second time around was much better. And since my tools were inferior to his, (old craftsman 12” lathe) I was forced to come up with a different method to make the dish. For that I made a jig/sled for my angle grinder. Mounted a long threaded rod to center of disc so that I could spin it to raise higher as I dug out the center. Roughed it with an arbortech turbo plane disc and finished with sanding disc, then fine finished sanded with ros.Didn't have any dimensions so I had to guess. Looks like my size ratio between ball/dish varies from his. My sphere is 5” dia. and dish is 19” dia. here's minehttps://www.youtube.com/watch?v=myrST41Rci4 My only regret with this project is that I didn't think of it first. Gotta give credit to Oliveir Gomis. Stumbled upon his https://www.youtube.com/watch?v=_pDTXd8wZ80 and was determined to have one for myself. My first sphere was a fail (we'll call it a practice piece) but I learned from it and the second time around was much better. And since my tools were inferior to his, (old craftsman 12” lathe) I was forced to come up with a different method to make the dish. For that I made a jig/sled for my angle grinder. Mounted a long threaded rod to center of disc so that I could spin it to raise higher as I dug out the center. Roughed it with an arbortech turbo plane disc and finished with sanding disc, then fine finished sanded with ros.Didn't have any dimensions so I had to guess. Looks like my size ratio between ball/dish varies from his. My sphere is 5” dia. and dish is 19” dia. here's minehttps://www.youtube.com/watch?v=myrST41Rci4
Read more here
posted at: 12:00am on 04-Jun-2022
path: /Woodworking | permalink | edit (requires password)
Box for miter saw
Furnished content.
(from Lumberjocks.com)
 I've got two miter box saws, one of them somewhat dull, and the other pretty dull, and I need to ship them off for sharpening (still haven't found someone here in Santa Fe), one at a time, and rather than wrap the saw in bubble-wrap and cardboard, and have the USPS try hard to destroy it, I figured I'd make a box. A few pieces of pine later, and I've got a shipping box that should hold up pretty well, though it is probably twice as heavy as the saw.The saw fits into the box with the blade guard on, and the handle to the left (and spine down – guess I should've rotated that picture the other way). The cutout in one side of the box allows room for the blade guard in the box. Then the lid (which has breadboard ends just because I didn't have a long enough ten-inch-wide board in the leftovers pile) will get screwed on with a dozen or so screws. I'll tape on a label, and away it'll go.Constructed of 3/4 pine. Final (closed) dimensions are about 36×10x3 inches (90×25 x 8 cm). Joinery is just butt joints, glued and screwed. The screws that are meant to be removed to open the box are slotted. The rest are Robertson drive.Finished with a coat of linseed oil.Guess I really should set up my saw vise and get to sharpening my own saws one of these days I've got two miter box saws, one of them somewhat dull, and the other pretty dull, and I need to ship them off for sharpening (still haven't found someone here in Santa Fe), one at a time, and rather than wrap the saw in bubble-wrap and cardboard, and have the USPS try hard to destroy it, I figured I'd make a box. A few pieces of pine later, and I've got a shipping box that should hold up pretty well, though it is probably twice as heavy as the saw.The saw fits into the box with the blade guard on, and the handle to the left (and spine down – guess I should've rotated that picture the other way). The cutout in one side of the box allows room for the blade guard in the box. Then the lid (which has breadboard ends just because I didn't have a long enough ten-inch-wide board in the leftovers pile) will get screwed on with a dozen or so screws. I'll tape on a label, and away it'll go.Constructed of 3/4 pine. Final (closed) dimensions are about 36×10x3 inches (90×25 x 8 cm). Joinery is just butt joints, glued and screwed. The screws that are meant to be removed to open the box are slotted. The rest are Robertson drive.Finished with a coat of linseed oil.Guess I really should set up my saw vise and get to sharpening my own saws one of these days
Read more here
posted at: 12:00am on 04-Jun-2022
path: /Woodworking | permalink | edit (requires password)
Father's Day Gift Guide
Furnished content.
(from Popularwoodworking.com)
Does your Dad love woodworking? Here are some great gift options for him this upcoming Father's Day. Travel Mug Turning Kit $13.99 Remember when you were real little and made your Dad a coffee mug for father's day? Same …Source
Read more here
posted at: 12:00am on 03-Jun-2022
path: /Woodworking | permalink | edit (requires password)
Amrosia Maple Ornaments
Furnished content.
(from Lumberjocks.com)
 Several weeks ago I found some Ambrosia Maple in a cleared section of woods near my house. A neighbor kindly helped me cut a bunch of it up and haul it out of the gully.Hopefully I'll make some bigger things out of it, but meanwhile here are a couple of ornaments made from smaller branches and some scrap walnut I had lying around.About 5 inches by 2”. Completely hollowed inside. One is finsihed with wipe-on poly, the other some 2X Painters touch acrylic. I prefer the poly – the painters touch raised the grain something awful! Several weeks ago I found some Ambrosia Maple in a cleared section of woods near my house. A neighbor kindly helped me cut a bunch of it up and haul it out of the gully.Hopefully I'll make some bigger things out of it, but meanwhile here are a couple of ornaments made from smaller branches and some scrap walnut I had lying around.About 5 inches by 2”. Completely hollowed inside. One is finsihed with wipe-on poly, the other some 2X Painters touch acrylic. I prefer the poly – the painters touch raised the grain something awful!
Read more here
posted at: 12:00am on 03-Jun-2022
path: /Woodworking | permalink | edit (requires password)
Aspen boot
Furnished content.
(from Lumberjocks.com)
 Had some aspen fire wood sitting in my wood cache. Carves easy but is more troublesome to finish. Had some aspen fire wood sitting in my wood cache. Carves easy but is more troublesome to finish.
Enjoy.
Read more here
posted at: 12:00am on 03-Jun-2022
path: /Woodworking | permalink | edit (requires password)
Trash can cabinet
Furnished content.
(from Lumberjocks.com)
 Made from ambrosia maple. Door sits flush, just not pushed in all the way for picture. Minwax oil base stain and 2 coats of oil base poly to finish. I have found ambrosia to be tricky. I had some that I got a while back from one supplier and some more that I picked up recently. Made the drawer face out of the old stuff, used the exact same stain on it and it looked completely different, unusable together. Had to remake the face panel. Turned out great, dog hates it! She can no longer drag trash all over the house. Made from ambrosia maple. Door sits flush, just not pushed in all the way for picture. Minwax oil base stain and 2 coats of oil base poly to finish. I have found ambrosia to be tricky. I had some that I got a while back from one supplier and some more that I picked up recently. Made the drawer face out of the old stuff, used the exact same stain on it and it looked completely different, unusable together. Had to remake the face panel. Turned out great, dog hates it! She can no longer drag trash all over the house.
Read more here
posted at: 12:00am on 03-Jun-2022
path: /Woodworking | permalink | edit (requires password)
Yellow Cedar and Cherry Bowls
Furnished content.
(from Lumberjocks.com)
 Yellow Cedar Burl Bowl. 7.5” X 1.5”. I thought I'd better post this and find somewhere to store it, my wife says the wood has too strong a fragrance.A little Cherry Bowl. 3.5” X 1.5”. Nice wood to work with, fun to do little bowls.Both have food safe finish. Yellow Cedar Burl Bowl. 7.5” X 1.5”. I thought I'd better post this and find somewhere to store it, my wife says the wood has too strong a fragrance.A little Cherry Bowl. 3.5” X 1.5”. Nice wood to work with, fun to do little bowls.Both have food safe finish.
Read more here
posted at: 12:00am on 02-Jun-2022
path: /Woodworking | permalink | edit (requires password)
Outdoor Finishes
Furnished content.
(from Popularwoodworking.com)
Simple to Super Durable Outdoor finishes have one thing in common; they all require maintenance. Of course, paint is unequaled at protecting the wood from its two biggest enemies: moisture and ultraviolet (UV) light. Moisture causes the wood to rot, …Source
Read more here
posted at: 12:00am on 02-Jun-2022
path: /Woodworking | permalink | edit (requires password)
Low Boy Urn
Furnished content.
(from Lumberjocks.com)
 This is number 3 in my recent Urn builds. This is number 3 in my recent Urn builds.
I'm enjoying this series because it really challenges me to stretch my technical skills and try many different ways to remounting pieces and sizing them to fit together. With wood that wants to move this is difficult. I find myself having to re-turn certain parts that have warped while drying so these pieces take a lot more time the the quick and simple once turned pieces.This piece moved and warped quite a bit. It was turned into face grain rather than end grain and the wood has a tendency to shrink and warp much more when stablizing in this orientation.This urn has a body of pecan with a sapele collar that has the female threads for the lid. The lid and collar have 16 t.p.i. (teeth per inch) that are hand cut with Crown threading tools. The male threaded post is made of oak. It is fitted into a lid made of ash topped with a spalted ash finial. The sapele and the oak threads are reinforced with C.A. glue then recut and waxed. This seems to help the threads from crumbling or failing.The Low Boy Urn is 5 1/2” at the widest part and 5” tall without the lid. With the lid and finial it is 8” tall. The sapele and the ash of the lid have a high sheen and show a lot of chatoyance. This is enhanced by the finishing process.   I sanded this urn to 400 grit then used the Beall polishing process with tripoli and white diamond. I then used a Maloof homemade wipe on finish followed by carnauba wax. I sanded this urn to 400 grit then used the Beall polishing process with tripoli and white diamond. I then used a Maloof homemade wipe on finish followed by carnauba wax. Thanks for looking and C & C welcome. Thanks for looking and C & C welcome.
Read more here
posted at: 12:00am on 02-Jun-2022
path: /Woodworking | permalink | edit (requires password)
Infinity Ring Holder
Furnished content.
(from Lumberjocks.com)
 Carved ring holder meant for wedding bands. A little lumpy but not too bad for my first greenwood carving project using seagrape.Finish is 3 coats of satin poly.Inserts are dark brown chrome-tanned leather.Not sure why the image is rotated 90 degrees counter-clockwise, looks fine on my computer (shrug). Carved ring holder meant for wedding bands. A little lumpy but not too bad for my first greenwood carving project using seagrape.Finish is 3 coats of satin poly.Inserts are dark brown chrome-tanned leather.Not sure why the image is rotated 90 degrees counter-clockwise, looks fine on my computer (shrug). 
Read more here
posted at: 12:00am on 02-Jun-2022
path: /Woodworking | permalink | edit (requires password)
Chester County Style
Furnished content.
(from Popularwoodworking.com)
This Pennsylvania area developed unique and recognizable furniture. From its green rolling hills in the south and plains-like farmland in its middle to the nearly mountainous terrain in the north, the topography of Chester County, Penn., is as diverse …Source
Read more here
posted at: 12:01am on 01-Jun-2022
path: /Woodworking | permalink | edit (requires password)
Deep Drawer Organizer
Furnished content.
(from Popularwoodworking.com)
I built a deep drawer for my workbench so I would have lots of storage, but it created another problem. The tools I wanted were always at the bottom of the heap. I solved my frustration by adding an …Source
Read more here
posted at: 12:01am on 01-Jun-2022
path: /Woodworking | permalink | edit (requires password)
Birthday gift thanks to LJ!
Furnished content.
(from Lumberjocks.com)
 This is a “full-circle” project, even though the circle is pretty small. About a month ago I saw a box on Pinterest that caught my attention. After a few clicks, I found myself on the Lumberjocks website, (which I promptly joined). My daughter's birthday was last week and I decided to try my own take on that box as a gift for her just to see if I could make it. (Thanks Klaus for the inspiration!!) I was very pleased with the result and she loved it.I really appreciate this community for sharing designs and projects that can spark interest and get us to think outside the box (even if it is in making a box!)Glad to be part of the group.Solid oak sides, walnut accents, and the top has a beauty that the camera can't capture. Almost looks alive as the light catches it from different angles. Beautiful piece of wood. This is a “full-circle” project, even though the circle is pretty small. About a month ago I saw a box on Pinterest that caught my attention. After a few clicks, I found myself on the Lumberjocks website, (which I promptly joined). My daughter's birthday was last week and I decided to try my own take on that box as a gift for her just to see if I could make it. (Thanks Klaus for the inspiration!!) I was very pleased with the result and she loved it.I really appreciate this community for sharing designs and projects that can spark interest and get us to think outside the box (even if it is in making a box!)Glad to be part of the group.Solid oak sides, walnut accents, and the top has a beauty that the camera can't capture. Almost looks alive as the light catches it from different angles. Beautiful piece of wood.
Read more here
posted at: 12:01am on 01-Jun-2022
path: /Woodworking | permalink | edit (requires password)
Upgraded Tablesaw Sled with Miter attachment.
Furnished content.
(from Lumberjocks.com)
 I have had my original sled for over 12 yrs. I saw this idea by Nick Ferry on YouTube and Loved it.A good friend was in town from Vegas so we built 2 of them. The hardware and supplies add up quickly as far as costs, but what a great tool for the shop. Used Kreg hardware throughout, did the five cut method and got the fence at .0002 at 24 inches.Miters are dead on 90 degees making picture frames effortless. Baltic birch, sprayed with lacquer and waxed bottom. I'll keep older sled for dadoes. Here is the link, Thx for looking.https://m.youtube.com/watch?v=ZtwK9X8o1Gw&list=PLu1gFi0JQnkZjDx1q9VTEtDHAr93o2Kiw&index=12 I have had my original sled for over 12 yrs. I saw this idea by Nick Ferry on YouTube and Loved it.A good friend was in town from Vegas so we built 2 of them. The hardware and supplies add up quickly as far as costs, but what a great tool for the shop. Used Kreg hardware throughout, did the five cut method and got the fence at .0002 at 24 inches.Miters are dead on 90 degees making picture frames effortless. Baltic birch, sprayed with lacquer and waxed bottom. I'll keep older sled for dadoes. Here is the link, Thx for looking.https://m.youtube.com/watch?v=ZtwK9X8o1Gw&list=PLu1gFi0JQnkZjDx1q9VTEtDHAr93o2Kiw&index=12
Read more here
posted at: 12:01am on 01-Jun-2022
path: /Woodworking | permalink | edit (requires password)
Othello game board
Furnished content.
(from Lumberjocks.com)
 This is a board for playing Othello. I was playing Othello with one of my twin grandsons and he accidently bumped the board and the pieces shifted. I told him that I would make him a board that it wouldn't happen again. So by adding 1/8 inch strips into the saw kerfs I made an all purpose board that is bump proof. The piece holders has their nicknames on them. We haven't had the opportunity to try the new improved board out yet. This is a board for playing Othello. I was playing Othello with one of my twin grandsons and he accidently bumped the board and the pieces shifted. I told him that I would make him a board that it wouldn't happen again. So by adding 1/8 inch strips into the saw kerfs I made an all purpose board that is bump proof. The piece holders has their nicknames on them. We haven't had the opportunity to try the new improved board out yet.
Al
Read more here
posted at: 12:01am on 01-Jun-2022
path: /Woodworking | permalink | edit (requires password)
Promoted by Feed Shark
|