Laundry Hamper
Furnished content.
(from Lumberjocks.com)
 I made this cherry laundry hamper for my kids at the request of my wife. It features curved rails and book-matched panels. The side rails are lower and the bottom has holes in order to facilitate air flow to clear out the funk.I filmed the build and you can view it here if you'd like: I made this cherry laundry hamper for my kids at the request of my wife. It features curved rails and book-matched panels. The side rails are lower and the bottom has holes in order to facilitate air flow to clear out the funk.I filmed the build and you can view it here if you'd like:
http://www.garagewoodworks.com/video.php?video=245Subscribe on YouTube
Read more here
posted at: 12:00am on 31-Jul-2019
path: /Woodworking | permalink | edit (requires password)
End vise anti-racking jig
Furnished content.
(from Lumberjocks.com)
 I'm posting this as an easy possible solution for those that use their end vise to either clamp a component on one side, or as I do – clamp along the from edge of the bench for sticking molding or planing long narrow boards. Hopefully this will benefit some others, especially if there is no wagon vise.Picture two shows all the needed materials I used: a 1/4” poplar dowel, a 3/4” oak dowel, a small block of cherry to be used for center drilling the oak dowel, and a block of hard maple to extend my vise jaw.Picture 3 shows a dowel drilling block as described somewhere on the web, can't remember where I saw it, but basically: I drilled a 3/4” hole through the block for the larger dowel, and a 1/4” hole – centered on the first & on the top, to guide the drill bit to the center of the larger dowel.Number 4 picture shows the drilled dowel & centering block.Picture 5 shows the drilling spacing on the dowel. I used 1/4” holes with 1/4” between the circumferences or edges of the holes – which equals 1/2” center to center. Then I drilled another series of holes directly in between the first set, at 90 degrees from the first. This yields 1/4” increments for rack adjustments. So far I have found this to be sufficient to my needs, with some experimentation yielding a maximum vice rack or distortion at about 1/8”. I'm posting this as an easy possible solution for those that use their end vise to either clamp a component on one side, or as I do – clamp along the from edge of the bench for sticking molding or planing long narrow boards. Hopefully this will benefit some others, especially if there is no wagon vise.Picture two shows all the needed materials I used: a 1/4” poplar dowel, a 3/4” oak dowel, a small block of cherry to be used for center drilling the oak dowel, and a block of hard maple to extend my vise jaw.Picture 3 shows a dowel drilling block as described somewhere on the web, can't remember where I saw it, but basically: I drilled a 3/4” hole through the block for the larger dowel, and a 1/4” hole – centered on the first & on the top, to guide the drill bit to the center of the larger dowel.Number 4 picture shows the drilled dowel & centering block.Picture 5 shows the drilling spacing on the dowel. I used 1/4” holes with 1/4” between the circumferences or edges of the holes – which equals 1/2” center to center. Then I drilled another series of holes directly in between the first set, at 90 degrees from the first. This yields 1/4” increments for rack adjustments. So far I have found this to be sufficient to my needs, with some experimentation yielding a maximum vice rack or distortion at about 1/8”.
If this is too course for others, I believe that the oak dowel can be drilled three ways or directions, by rotating 60 degrees each time, to yield much closer spacing. I've not attempted this though.Picture 6 shows how the dowel will resist against the added maple block, in my case. This was only done because I have no space to drill a 3/4” hole directly behind the jaw due to the factory screws between each of the stabilizers and the adjustment screw, as shown in this photo from below the bench:
 As for the oak dowel, I made it long enough to reach as far as possible when in & flush with vise face, with drilling enough quarter inch holes to permit use with the vise open as far as it goes. Opening or extracting the dowel when in flush is very easy by reaching under the bench, it is very loose in the hole, but stable due to the length – it doesn't fall out.Also, needing some lather time, I decided to make a pin to replace the dowel, with a cap copied from a brass adjustment screw from my antique plow plane. As for the oak dowel, I made it long enough to reach as far as possible when in & flush with vise face, with drilling enough quarter inch holes to permit use with the vise open as far as it goes. Opening or extracting the dowel when in flush is very easy by reaching under the bench, it is very loose in the hole, but stable due to the length – it doesn't fall out.Also, needing some lather time, I decided to make a pin to replace the dowel, with a cap copied from a brass adjustment screw from my antique plow plane.
 Time has shown this set up to work very well, and the pin allows a great deal of vise pressure to be applied, with the pin exposed top & bottom of the dowel. The shearing force to break it is much greater than any I've applied. I have clamped a 3/8” board at about 24” long on the front of the bench between the vise dog & a bench dog to the point where it bowed up.Hopefully this will benefit someone else, and should there be any questions, please contact me. Time has shown this set up to work very well, and the pin allows a great deal of vise pressure to be applied, with the pin exposed top & bottom of the dowel. The shearing force to break it is much greater than any I've applied. I have clamped a 3/8” board at about 24” long on the front of the bench between the vise dog & a bench dog to the point where it bowed up.Hopefully this will benefit someone else, and should there be any questions, please contact me.
Read more here
posted at: 12:00am on 31-Jul-2019
path: /Woodworking | permalink | edit (requires password)
mixed hardwood coffee table
Furnished content.
(from Lumberjocks.com)
 here is my mixed hardwood coffee table I just finished its made from left over cherry hickory ash and red oak I had left over from making my full size bed frame its finished with a boiled linseed oil finish it was made using kreg screws for all the construction hope you enjoy here is my mixed hardwood coffee table I just finished its made from left over cherry hickory ash and red oak I had left over from making my full size bed frame its finished with a boiled linseed oil finish it was made using kreg screws for all the construction hope you enjoy
Read more here
posted at: 12:00am on 31-Jul-2019
path: /Woodworking | permalink | edit (requires password)
Illusion
Furnished content.
(from Lumberjocks.com)
 When viewed from the front, this looks like an ordinary mosaic. Viewed at an angle and it acquires a magical depth – wood colors and grain flipping. Woods: Wenge, Bloodwood, Sepele, Poplar, Butternut, Walnut and Mahogany. When viewed from the front, this looks like an ordinary mosaic. Viewed at an angle and it acquires a magical depth – wood colors and grain flipping. Woods: Wenge, Bloodwood, Sepele, Poplar, Butternut, Walnut and Mahogany.
Read more here
posted at: 12:00am on 30-Jul-2019
path: /Woodworking | permalink | edit (requires password)
Trash and Recycling Cabinet
Furnished content.
(from Lumberjocks.com)
 Here is my first finished woodworking project.My wife has been asking for over a year to get a cabinet for the Trash and Recycling bins. We use large bins since we have five kids and accumulated a lot of trash, so instead of the flip down version I see everywhere I put the doors on slides. Used 3/4 plywood with Douglas Fir “butcher” block style top. I trimmed it with white oak and finished it with Boiled Linseed oil and poly. Painted the base to match the rest of the kitchen (next project)Learned a ton and cannot wait to start something else now…. I got the bug bad!! Here is my first finished woodworking project.My wife has been asking for over a year to get a cabinet for the Trash and Recycling bins. We use large bins since we have five kids and accumulated a lot of trash, so instead of the flip down version I see everywhere I put the doors on slides. Used 3/4 plywood with Douglas Fir “butcher” block style top. I trimmed it with white oak and finished it with Boiled Linseed oil and poly. Painted the base to match the rest of the kitchen (next project)Learned a ton and cannot wait to start something else now…. I got the bug bad!!
Read more here
posted at: 12:00am on 30-Jul-2019
path: /Woodworking | permalink | edit (requires password)
Slab sided floating top river table desk
Furnished content.
(from Lumberjocks.com)
 This one has a ton of first for me:1) epoxy as finish (Stonecoat Countertop epoxy) This one has a ton of first for me:1) epoxy as finish (Stonecoat Countertop epoxy)
2) gouge texturing
3) sliding dovetail battens
4) shou sugi ban
5) TransTint dye
6) black dye
7) floating top
8) slabs that have only dried six months, paired with kiln dried lumber (It's okay, I accounted for wood movement)
9) fuming oak
10) Dark Tung OilThe top is made from quarter sawn Southern Yellow Pine (from the big blue box), tinted with TransTint Dye and finished with Stonecoat Countertop Epoxy.
The stretchers are Southern Yellow Pine, hand textured with a gouge. Dyed with black RIT dye and finished with rattlecan shellac.
The legs are hand cut red oak (water oak) that has been fumed in ammonia and finished with Milk Paint brand Dark Tung Oil.Other than the glue holding the desktop boards together, all the other joinery is non-glued dovetails, condor tails, and sliding dovetails.For way more detail and photos, jump to the parts that interest you. It is a long story with a lot of parts:
A) Intro – Floating top river desk planning
B) Epoxy river desktop with islands
C) Textured stretchers
D) Live edge slab legs
E) Assembly completeHow do I account for wood movement? The battens fit into sliding dovetails on the underside of the desk. These float free within the dovetail as the top expands and contracts. The battens also have another long dovetail that slides into the stretchers (not glued in) which fit into dovetails in the slab sides. As the slab sides contract (they were only 6 months off the tree when I made cut them) it will bring the stretchers closer to each other, but they are free to slide along the battens. Everything is free floating, when it comes to wood movement, but not so free floating that it will move apart by pushing on it.
Read more here
posted at: 12:00am on 30-Jul-2019
path: /Woodworking | permalink | edit (requires password)
Entertainment center
Furnished content.
(from Lumberjocks.com)
 Largest project I have done so far. It was made with 3/4 flame cherry plywood, 1/4 cherry plywood, spalted maple, and ambrosia ribbon maple. Largest project I have done so far. It was made with 3/4 flame cherry plywood, 1/4 cherry plywood, spalted maple, and ambrosia ribbon maple.
Read more here
posted at: 12:00am on 29-Jul-2019
path: /Woodworking | permalink | edit (requires password)
Huon Slice coffee table
Furnished content.
(from Lumberjocks.com)
 A very simple project this one , no real skill needed but it may inspire someoneThe only finish ever used on this piece is Bees waxI am looking for a huon stump to make a base A very simple project this one , no real skill needed but it may inspire someoneThe only finish ever used on this piece is Bees waxI am looking for a huon stump to make a base
but thats been the case for 10 + years so for now its finished
Read more here
posted at: 12:00am on 29-Jul-2019
path: /Woodworking | permalink | edit (requires password)
Rustic Footstool
Furnished content.
(from Lumberjocks.com)
 Hi all,My wife Heather wanted a footstool so I used some scrap hardwood I had in the shed for the top cutting out a gum leaf, inserting some gum nuts and carving her initial in to it.I found some old figured Turpentine hardwood for the legs and morticed it all together using some Purple Heart for the wedges. I didn't use any glue or fixings in the process of assembling it, just held together by wedges and angles.It's a solid little beast and should last many lifetimes.there is a blog here https://www.lumberjocks.com/icemanhank/blog/129957 if anyone is interested.Be kind to each other, Dave Hi all,My wife Heather wanted a footstool so I used some scrap hardwood I had in the shed for the top cutting out a gum leaf, inserting some gum nuts and carving her initial in to it.I found some old figured Turpentine hardwood for the legs and morticed it all together using some Purple Heart for the wedges. I didn't use any glue or fixings in the process of assembling it, just held together by wedges and angles.It's a solid little beast and should last many lifetimes.there is a blog here https://www.lumberjocks.com/icemanhank/blog/129957 if anyone is interested.Be kind to each other, Dave
Read more here
posted at: 12:00am on 29-Jul-2019
path: /Woodworking | permalink | edit (requires password)
A Pair of Patio Lighthouses
Furnished content.
(from Lumberjocks.com)
 This project started out as a gift for someone. However halfway through I realized the relative sizes were wrong (out of scale) between the first two pieces built, so I split the project in two and built an additional tower to fit the original house, and a new house to fit the original tower – more or less. The end result became two separate projects. The problem is now my wife wants both of them, but I had promised the original to someone else. My wife however, did most of the painting of the windows, doors, etc., so she is entitled to at least one of therm I think – her choice! She even painted in cats lying on window sills in each building. One is just barely visible in the next to the last photo if you look closely. I think she had fun too.The structures are mounted on a heavy hardwood planks which have been fiberglassed 360 degrees all around, then painted for weather protection. The towers and the roofs of the buildings are also covered with one layer of fiberglass cloth for the same reason. The towers are hollow to keep the weight down, with the cylindrical tower being made of tapered and beveled staves glued to round discs top and bottom. The discs are fixed to a round wooden dowel to keep everything plumb and aligned. After the glue set, the tower was put in the lathe for the final rounding and trueing up & was fun to build. Each tower has 'handrails' around the top made from copper nails with fine copper wire soldered to each nail. Fussy, but that made a lot of difference to the end product's appearance.The tallest tower tops out at 32 and the shorter one around 20. I think the biggest challenge was getting the painted spirals right on the round tapered tower so they come out right from top to bottom. I believe mine are now pretty close, but there was some amount of head-scratching and trial and error involvedThe solar lights were ordered online and work great. They automatically turn off in daylight and light up after dark. The last picture shows them glowing brightly during my test. This project started out as a gift for someone. However halfway through I realized the relative sizes were wrong (out of scale) between the first two pieces built, so I split the project in two and built an additional tower to fit the original house, and a new house to fit the original tower – more or less. The end result became two separate projects. The problem is now my wife wants both of them, but I had promised the original to someone else. My wife however, did most of the painting of the windows, doors, etc., so she is entitled to at least one of therm I think – her choice! She even painted in cats lying on window sills in each building. One is just barely visible in the next to the last photo if you look closely. I think she had fun too.The structures are mounted on a heavy hardwood planks which have been fiberglassed 360 degrees all around, then painted for weather protection. The towers and the roofs of the buildings are also covered with one layer of fiberglass cloth for the same reason. The towers are hollow to keep the weight down, with the cylindrical tower being made of tapered and beveled staves glued to round discs top and bottom. The discs are fixed to a round wooden dowel to keep everything plumb and aligned. After the glue set, the tower was put in the lathe for the final rounding and trueing up & was fun to build. Each tower has 'handrails' around the top made from copper nails with fine copper wire soldered to each nail. Fussy, but that made a lot of difference to the end product's appearance.The tallest tower tops out at 32 and the shorter one around 20. I think the biggest challenge was getting the painted spirals right on the round tapered tower so they come out right from top to bottom. I believe mine are now pretty close, but there was some amount of head-scratching and trial and error involvedThe solar lights were ordered online and work great. They automatically turn off in daylight and light up after dark. The last picture shows them glowing brightly during my test.
Read more here
posted at: 12:00am on 28-Jul-2019
path: /Woodworking | permalink | edit (requires password)
Basement Reno
Furnished content.
(from Lumberjocks.com)
 Our basement needed some extra storage so I built these cabinets out of pine. Able to hide all the kid's toys in them. Wall treatment is rescued pine boards from a house that was being torn down. I prefered the brown side instead of the gray side in this case. The countertop is just painted plywood, is I had always wanted it white to showcase the wood around it. Took some time to build, but very pleased with the result. Our basement needed some extra storage so I built these cabinets out of pine. Able to hide all the kid's toys in them. Wall treatment is rescued pine boards from a house that was being torn down. I prefered the brown side instead of the gray side in this case. The countertop is just painted plywood, is I had always wanted it white to showcase the wood around it. Took some time to build, but very pleased with the result.
Read more here
posted at: 12:00am on 28-Jul-2019
path: /Woodworking | permalink | edit (requires password)
Bathroom Fish Mirror
Furnished content.
(from Lumberjocks.com)
 I looked everywhere for a round mirror and could not find any that I liked, and if they were somewhat okay, it was at least $300. I ended up buying a 36” mirror and then cutting out the fish shape using 3/4” plywood (found a design I liked online and drew it out on butcher paper) . Routed the rabbet and opening with a router circle jig. The frame was painted with milk paint. Made this for my father-in-law! I looked everywhere for a round mirror and could not find any that I liked, and if they were somewhat okay, it was at least $300. I ended up buying a 36” mirror and then cutting out the fish shape using 3/4” plywood (found a design I liked online and drew it out on butcher paper) . Routed the rabbet and opening with a router circle jig. The frame was painted with milk paint. Made this for my father-in-law!
Read more here
posted at: 12:00am on 28-Jul-2019
path: /Woodworking | permalink | edit (requires password)
Use for leftover turning nubbins
Furnished content.
(from Lumberjocks.com)
 I had a little over 2 inches of a turning leftover and decided that I liked the figure enough to find a use for it. I have more than enough awls, so I was originally thinking about a ceiling fan pull. Then I realized I need a knob on my lathe tool rest. It's just a friction fit, but it's made a huge improvement. No more rattling and the slide handle is no longer constantly in the way of moving the banjo. It's now the nicest thing about the lathe! I had a little over 2 inches of a turning leftover and decided that I liked the figure enough to find a use for it. I have more than enough awls, so I was originally thinking about a ceiling fan pull. Then I realized I need a knob on my lathe tool rest. It's just a friction fit, but it's made a huge improvement. No more rattling and the slide handle is no longer constantly in the way of moving the banjo. It's now the nicest thing about the lathe!
Read more here
posted at: 12:00am on 27-Jul-2019
path: /Woodworking | permalink | edit (requires password)
Bellamy eagle
Furnished content.
(from Lumberjocks.com)
 Carved eagle based on a carving by John Haly Bellamy, Kittery, Maine 1870. Carved eagle based on a carving by John Haly Bellamy, Kittery, Maine 1870.
4 feet x 4 feet; basswood (Apologies that 2 of the photos uploaded sideways – not sure why b/c originals were OK and I cannot see any way to rotate them with LJ editing)
Read more here
posted at: 12:00am on 27-Jul-2019
path: /Woodworking | permalink | edit (requires password)
Recent pen order
Furnished content.
(from Lumberjocks.com)
 I was asked a while back if I could make pens with Steelers and cowboys logos…. took me a while to find someone that had blanks (I've yet to try casting my own) but I finally found some here that are made of alumilite. I'd never turned alumilte before but it was great to work with! As you see in the second picture it can be fragile… my own fault I got overly confident after three pens when perfect and tried going to fast making deeper cuts.Highly recommend these pen blanks and encourage you to check out the Etsy shop in the link if your interested in different blanks! Amazing response time, great service and quick shipping. I was asked a while back if I could make pens with Steelers and cowboys logos…. took me a while to find someone that had blanks (I've yet to try casting my own) but I finally found some here that are made of alumilite. I'd never turned alumilte before but it was great to work with! As you see in the second picture it can be fragile… my own fault I got overly confident after three pens when perfect and tried going to fast making deeper cuts.Highly recommend these pen blanks and encourage you to check out the Etsy shop in the link if your interested in different blanks! Amazing response time, great service and quick shipping.
Read more here
posted at: 12:00am on 27-Jul-2019
path: /Woodworking | permalink | edit (requires password)
Air Cleaner for Workshop
Furnished content.
(from Lumberjocks.com)
 Air cleaner finished. 20×20x1 air filters, 2 pre and 1 post. 20” Lasko box fan. Extended speed knob through top. Made with 5/8” MDO plywood. Works very well! Air cleaner finished. 20×20x1 air filters, 2 pre and 1 post. 20” Lasko box fan. Extended speed knob through top. Made with 5/8” MDO plywood. Works very well!
Read more here
posted at: 12:00am on 26-Jul-2019
path: /Woodworking | permalink | edit (requires password)
Miter saw dust collection hood.
Furnished content.
(from Lumberjocks.com)
 Easy but effective hood for DeWalt miter saw. Can't cut 45s but it slips out if I need too, only so much room to work with. The 4” dust collector hose hooks in below bench in box and 1.5” hose come through bench on right side of saw and connects into saw port. Built with 5/8” MDO, love this stuff cause it smooth on face, seals great and looks nice. Easy but effective hood for DeWalt miter saw. Can't cut 45s but it slips out if I need too, only so much room to work with. The 4” dust collector hose hooks in below bench in box and 1.5” hose come through bench on right side of saw and connects into saw port. Built with 5/8” MDO, love this stuff cause it smooth on face, seals great and looks nice.
Read more here
posted at: 12:00am on 26-Jul-2019
path: /Woodworking | permalink | edit (requires password)
Bandsaw circle cutting jig finished.
Furnished content.
(from Lumberjocks.com)
 Bandsaw circle cutting jig finished. Used 3/4” MDO for the top with 2 coats of Shellac clear spray followed with 1 brushed on coat of Polyurethane oil based Gloss. Bandsaw circle cutting jig finished. Used 3/4” MDO for the top with 2 coats of Shellac clear spray followed with 1 brushed on coat of Polyurethane oil based Gloss.
Read more here
posted at: 12:00am on 26-Jul-2019
path: /Woodworking | permalink | edit (requires password)
hickory cherry and ash full size bed frame
Furnished content.
(from Lumberjocks.com)
 here is my most recent full size bed I made for myself the bed consist of sold 3×3 cherry post a red oak top cap custom made cherry corbels I made myself the headboard is a mixture of hickory and cherry with ash and white cedar trim the bed rails are 6/x4×6inch ash with a 2×3 ash top cap I also made my own red oak post caps for the corners of my foot board the bed is put together with all hidden fasteners the finish is a boiled linseed oil 3 coats I must say this was a challenge for me with my shop and having limited tools but I think it turned out great most of all my wife loves it hope you all I enjoy I posted before and after pics thanks here is my most recent full size bed I made for myself the bed consist of sold 3×3 cherry post a red oak top cap custom made cherry corbels I made myself the headboard is a mixture of hickory and cherry with ash and white cedar trim the bed rails are 6/x4×6inch ash with a 2×3 ash top cap I also made my own red oak post caps for the corners of my foot board the bed is put together with all hidden fasteners the finish is a boiled linseed oil 3 coats I must say this was a challenge for me with my shop and having limited tools but I think it turned out great most of all my wife loves it hope you all I enjoy I posted before and after pics thanks
Read more here
posted at: 12:00am on 25-Jul-2019
path: /Woodworking | permalink | edit (requires password)
Tawa wood ring with European ash veneer core
Furnished content.
(from Lumberjocks.com)
 I was recently given a very pretty length of New Zealand tawa, with a lot of flecking. Turned a ring from a small piece and two flecks positioned themselves perfectly :)I'm also getting a lot better at putting veneer cores inside turned rings hurrah! I was recently given a very pretty length of New Zealand tawa, with a lot of flecking. Turned a ring from a small piece and two flecks positioned themselves perfectly :)I'm also getting a lot better at putting veneer cores inside turned rings hurrah!
Read more here
posted at: 12:00am on 25-Jul-2019
path: /Woodworking | permalink | edit (requires password)
Maple Goblet
Furnished content.
(from Lumberjocks.com)
 This weekend a brand broke off my daughter's maple tree and took out the power line. I cut it up on Monday and brought back a branch and turned this goblet for her to remember the storm !It is maple, 7 1/2” high and 3” in diameter and has 3 captured rings.It is unfinished because it is still pretty wet.Cheers, Jim This weekend a brand broke off my daughter's maple tree and took out the power line. I cut it up on Monday and brought back a branch and turned this goblet for her to remember the storm !It is maple, 7 1/2” high and 3” in diameter and has 3 captured rings.It is unfinished because it is still pretty wet.Cheers, Jim
Read more here
posted at: 12:00am on 25-Jul-2019
path: /Woodworking | permalink | edit (requires password)
Spiraling Fish Carving
Furnished content.
(from Lumberjocks.com)
 This relief carving is based on a wood engraving done by M. C. Escher in Nov. 1956. The original was only 3-1/4” square and featured rings of fish diminishing in size toward the center. I had to decide how small I could go with carving the “nested” rings, and it looks like six will be it.The carving is 9-1/2” square in 2” thick Alaskan Yellow Cedar. In the second photo you see a tab of wood I've left attached to clamp the piece to my workbench. The yellow cedar carves nicely, very much like basswood. This relief carving is based on a wood engraving done by M. C. Escher in Nov. 1956. The original was only 3-1/4” square and featured rings of fish diminishing in size toward the center. I had to decide how small I could go with carving the “nested” rings, and it looks like six will be it.The carving is 9-1/2” square in 2” thick Alaskan Yellow Cedar. In the second photo you see a tab of wood I've left attached to clamp the piece to my workbench. The yellow cedar carves nicely, very much like basswood.
Read more here
posted at: 12:00am on 24-Jul-2019
path: /Woodworking | permalink | edit (requires password)
Neapolitan Box
Furnished content.
(from Lumberjocks.com)
 Box number 15 in my box building venture. Box number 15 in my box building venture.
I'm calling this one Neapolitan like the three flavored ice cream.
This box is almost totally mystery wood reclaimed from a pallet. It was mostly yellow/green and very tight grained except for the figuring in the front panel. I also am not certain about the panel for the lid… hickory or maybe even pine. I used what I think is maybe walnut and cedar for the laminated “stripes” on the base and the lid.Before I put the finish on the box, there was a really cool green, orange and purple color scheme going on but I knew that they would darken or change colors with the oil based finish I used. All the reclaimed wood was planed by hand and a L.V. smoothing plane then cut to size with a japanese pull saw. The miters were cut with the same plane but I used the 45 degree miter shooting board I built for that plane. I thought about using splines for the miters but the base and the top have rabbets that the box sits in and will prevent joint failure. I really like the lid on this piece. It shows all the contrasting woods very well. This is the first decorative box or gift box that I've used hinges on. I used them on the tool boxes I've recently made for my chisels. I'm not sure how I like them on this box.Finished with an oil based wipe on blend of equal parts tung oil, boiled linseed and oil based poly. I then applied clear shellac and rubbed it with #0000 steel wool and buffed it out with Johnsons Paste Wax.It is about 8 1/2 inches long by 4 1/2 inches deep and 5 1/2 inches tall.
Thanks for looking.
Mr Wolfe
Read more here
posted at: 12:00am on 24-Jul-2019
path: /Woodworking | permalink | edit (requires password)
Barn door table
Furnished content.
(from Lumberjocks.com)
 My wife wanted an rustic old table top paired with modern legs. She found a picture online and this was my attempt and building it. I got a barn door from a 100byr old farm that was falling in. Got these 2-10 oak boards that were used in a factory as baseboards ripped and planed the 2-10 boards to make the box legs. Pressure washed the yrs of dirt and manure off of the barn door then had to use the mix of vinegar and steel wool to oxidize the door back to the way I found it. then some light sanding to smooth it. I used paste wax applied with a scrub brush since after testing many other finishes it changed the color the least. My wife was looking for the grey color we'll see how the wax works never done it like that before. Used anchor bolts to attach the legs to the top. Even left the door latch on the top for accent. My wife wanted an rustic old table top paired with modern legs. She found a picture online and this was my attempt and building it. I got a barn door from a 100byr old farm that was falling in. Got these 2-10 oak boards that were used in a factory as baseboards ripped and planed the 2-10 boards to make the box legs. Pressure washed the yrs of dirt and manure off of the barn door then had to use the mix of vinegar and steel wool to oxidize the door back to the way I found it. then some light sanding to smooth it. I used paste wax applied with a scrub brush since after testing many other finishes it changed the color the least. My wife was looking for the grey color we'll see how the wax works never done it like that before. Used anchor bolts to attach the legs to the top. Even left the door latch on the top for accent.
Read more here
posted at: 12:00am on 24-Jul-2019
path: /Woodworking | permalink | edit (requires password)
PAUL BUNION BOOT - Douglas Fir, Old House Salvage Wood
Furnished content.
(from Lumberjocks.com)
 A couple of summers ago while finishing a home renovation for a friend, one of the painters knew that I dabbled in boot carving, brought me a a chunk of Douglas fir that was once a main beam in the house they were working on. This house was old and the beam was a good 6 inches by 6 inches. The other clue as to its age was it's friability. A couple of summers ago while finishing a home renovation for a friend, one of the painters knew that I dabbled in boot carving, brought me a a chunk of Douglas fir that was once a main beam in the house they were working on. This house was old and the beam was a good 6 inches by 6 inches. The other clue as to its age was it's friability.
As I cut out the boot blanks i knew things had to be handled with care. The wood was quite porous. The carving was like carving butter but I did not quit as I had too much respect for the wood and this over-sized work boot is a monument to the tree that produced this wood some 100 years passed.The boot is for the right foot and a swelling on the big toe gave it's name.Enjoy!
The Bootman!
Read more here
posted at: 12:00am on 23-Jul-2019
path: /Woodworking | permalink | edit (requires password)
End Table With Wireless charging
Furnished content.
(from Lumberjocks.com)
 Here is my submission for the builders challenge season 7 : an end table from spalted poplar with wireless charging and an epoxy inlay. I had fun FINALLY using epoxy in a woodworking project. I was very standoffish when it came to the epoxy playing such a large role in the woodworking world, because i am an old soul and i feel that woodworking should be done with WOOD. But i put my prejudices aside and gave it a shot and i'm pretty happy with the results. If you would like to see the full build you can click the link here : http://bit.ly/wirelessendtableSpoiler alert, i didnt win the challenge ;) but i always enjoy entering and learning new things! Here is my submission for the builders challenge season 7 : an end table from spalted poplar with wireless charging and an epoxy inlay. I had fun FINALLY using epoxy in a woodworking project. I was very standoffish when it came to the epoxy playing such a large role in the woodworking world, because i am an old soul and i feel that woodworking should be done with WOOD. But i put my prejudices aside and gave it a shot and i'm pretty happy with the results. If you would like to see the full build you can click the link here : http://bit.ly/wirelessendtableSpoiler alert, i didnt win the challenge ;) but i always enjoy entering and learning new things!
Read more here
posted at: 12:00am on 23-Jul-2019
path: /Woodworking | permalink | edit (requires password)
Ahead of the season
Furnished content.
(from Lumberjocks.com)
 A “Dollar Tree” Boot and a little scrap from around the shop. The pine cone thig is also a rescue.This is 9 inches long and 6 inches tall. I put stick-on felt feet on the bottom too.Getting ready for a craft show in Aug. I will take Halloween and Christmas things with me too, maybe a few items for a Thanksgiving dcor too.Suggestions and Ideas VERY WELCOME—Pricing advice also appreciated! Thanks all. A “Dollar Tree” Boot and a little scrap from around the shop. The pine cone thig is also a rescue.This is 9 inches long and 6 inches tall. I put stick-on felt feet on the bottom too.Getting ready for a craft show in Aug. I will take Halloween and Christmas things with me too, maybe a few items for a Thanksgiving dcor too.Suggestions and Ideas VERY WELCOME—Pricing advice also appreciated! Thanks all.
Read more here
posted at: 12:00am on 23-Jul-2019
path: /Woodworking | permalink | edit (requires password)
Leaning kitchen Spice Rack/shelf
Furnished content.
(from Lumberjocks.com)
 Born of necessity. All the lowers in this kitchen are deep, dark cupboards. Since I don't own the house I needed a better place to access spices more easily that did not attach to the wall. Hence a leaning tower shelf.Made of Mahogany. All the timber was dimensioned by hand (see blog posts on woodworking in Nairobi on why).It needed to be dyed (using aniline dyes from Lee Valley) to get closer to the kitchen colour. Finished with polyurethane. Born of necessity. All the lowers in this kitchen are deep, dark cupboards. Since I don't own the house I needed a better place to access spices more easily that did not attach to the wall. Hence a leaning tower shelf.Made of Mahogany. All the timber was dimensioned by hand (see blog posts on woodworking in Nairobi on why).It needed to be dyed (using aniline dyes from Lee Valley) to get closer to the kitchen colour. Finished with polyurethane.
Read more here
posted at: 12:00am on 22-Jul-2019
path: /Woodworking | permalink | edit (requires password)
Frame for bulletin board
Furnished content.
(from Lumberjocks.com)
 So, my wife tacked up a 3 part bulletin board. Of course it was glued to the wallpaper. So, I could complain, or I could frame it. So I ripped an old 2×4, cut some lap joints, sanded it flush, stained, varnished, and tacked it up. Now it looks like it belongs. So, my wife tacked up a 3 part bulletin board. Of course it was glued to the wallpaper. So, I could complain, or I could frame it. So I ripped an old 2×4, cut some lap joints, sanded it flush, stained, varnished, and tacked it up. Now it looks like it belongs.
Read more here
posted at: 12:00am on 22-Jul-2019
path: /Woodworking | permalink | edit (requires password)
Starting on my power sculpting journey
Furnished content.
(from Lumberjocks.com)
 Hey, LJ's!Been working and practicing on power sculpting.Apparently my phone pictures get put into landscape mode here. Not sure about correction. If Tony checks this posting he might fix it? LOL!Greg the Cajun wood-sculptor sent me to Johnathan Whitiker's home page on YouTube. Now attempting to acquire the skills and tools.Posted a YouTube videoView on YouTubeURL: https://www.youtube.com/watch?v=XOziGRMWnBc&t=13sIt's made up of smaller Instagram videos relating to this journey.Thanks for checking it out. Embedding a video here requires a number of steps.As always comments and critiques welcome Hey, LJ's!Been working and practicing on power sculpting.Apparently my phone pictures get put into landscape mode here. Not sure about correction. If Tony checks this posting he might fix it? LOL!Greg the Cajun wood-sculptor sent me to Johnathan Whitiker's home page on YouTube. Now attempting to acquire the skills and tools.Posted a YouTube videoView on YouTubeURL: https://www.youtube.com/watch?v=XOziGRMWnBc&t=13sIt's made up of smaller Instagram videos relating to this journey.Thanks for checking it out. Embedding a video here requires a number of steps.As always comments and critiques welcome
Read more here
posted at: 12:00am on 22-Jul-2019
path: /Woodworking | permalink | edit (requires password)
Illuminated Lettering Part 2
Furnished content.
(from Lumberjocks.com)
 Last year I started this project, but got pulled away LOL. Last year I started this project, but got pulled away LOL.
Well I got back to it and finished a few of the letters.
These letters are based on the designs of Owen Jones (1809-1874) 'One Thousand and One Initial Letters' Dover Publications
I also launched my online store JaffaRoad at etsy.com. Please visit and see more pictures of the letters, Thanks.
This Fall I will also be opening the Chattanooga Carving CO-OP. A place for trading tools and carving classes.
Happy Summer,
Dan
Read more here
posted at: 12:00am on 21-Jul-2019
path: /Woodworking | permalink | edit (requires password)
120 MM projectile
Furnished content.
(from Lumberjocks.com)
 Although there's a Jet mini lathe in my shop it belongs to my wife. She got hooked on making pens and small bowls a few years ago. It was a great excuse to buy a lathe, a bunch of turning tools and accessories for her. She took lessons too but the thrill has passed. It mostly gathers dust.A Navy buddy of mine needed a projectile turned for his 120 MM shell casing. He gave me a long chunk of a white birch tree trunk that he had carved on thinking he could make it without benefit of a lathe. It didn't go well. You can see his efforts on one half of the trunk in the second photo.The mini lathe bed wasn't long enough to turn the projectile with a slightly smaller diameter base for insertion into the casing. I turned the projectile as one piece using a face plate and live center. I then turned a maple base which was attached to the projectile turning. My portion of the trunk still had all its bark. It flew every where when I hit it with my 1” roughing gouge.His efforts didn't go to waste. I used his half to fix a three legged chair ! Although there's a Jet mini lathe in my shop it belongs to my wife. She got hooked on making pens and small bowls a few years ago. It was a great excuse to buy a lathe, a bunch of turning tools and accessories for her. She took lessons too but the thrill has passed. It mostly gathers dust.A Navy buddy of mine needed a projectile turned for his 120 MM shell casing. He gave me a long chunk of a white birch tree trunk that he had carved on thinking he could make it without benefit of a lathe. It didn't go well. You can see his efforts on one half of the trunk in the second photo.The mini lathe bed wasn't long enough to turn the projectile with a slightly smaller diameter base for insertion into the casing. I turned the projectile as one piece using a face plate and live center. I then turned a maple base which was attached to the projectile turning. My portion of the trunk still had all its bark. It flew every where when I hit it with my 1” roughing gouge.His efforts didn't go to waste. I used his half to fix a three legged chair !
Read more here
posted at: 12:00am on 21-Jul-2019
path: /Woodworking | permalink | edit (requires password)
Picture frame
Furnished content.
(from Lumberjocks.com)
 So my cabinet maker friend says to me, “You want the end grain too? What are you going to do with end grain?” This is my answer. A picture frame with pictures of my family to hang up at my day job so I can be reminded why I go to work. So my cabinet maker friend says to me, “You want the end grain too? What are you going to do with end grain?” This is my answer. A picture frame with pictures of my family to hang up at my day job so I can be reminded why I go to work.
I took the end cuts he had after he made butcher block counters. I milled them up and then I took 4 squares of Walnut to put in the corners. I finished it with wipe-on poly and used picture frame wire hardware for the back. It's going to look good in the office.
Thanks for looking!
Read more here
posted at: 12:00am on 21-Jul-2019
path: /Woodworking | permalink | edit (requires password)
Vintage Tractor key rack
Furnished content.
(from Lumberjocks.com)
 Made from shop scrap-except the hooks which are new. Measures 12 inches wide -10-1/2 inches tall.Pattern of the tractor is a free use silhouette from the internet. Slightly modified to be just a black-out, instead of a scroll saw pattern.The trim is actually wood and again—rescued, mostly pine—a little of “Your guess is better than mine” in there too.This is again a T & E special.The barn pattern is 100% rjR with a lot of help from T & E design again too Made from shop scrap-except the hooks which are new. Measures 12 inches wide -10-1/2 inches tall.Pattern of the tractor is a free use silhouette from the internet. Slightly modified to be just a black-out, instead of a scroll saw pattern.The trim is actually wood and again—rescued, mostly pine—a little of “Your guess is better than mine” in there too.This is again a T & E special.The barn pattern is 100% rjR with a lot of help from T & E design again too
Read more here
posted at: 12:00am on 20-Jul-2019
path: /Woodworking | permalink | edit (requires password)
Maple Oilfield Beams
Furnished content.
(from Lumberjocks.com)
 A friend of mine in Rockport Tx has a saw mill. He was offered all these beams if he would haul them himself. They are about fifteen feet long and either 6×6 or 8×8. They are used at drilling rigs. They are laid down around the rig to form a foundation so the trucks and equipment will not get stuck in the mud. It gets really wet around drilling rigs. As you can imagine they stay in mud and water for a long time. They are Maple so that they will last longer. Eventually they must be replaced. We don't know how the guy that gave them to him got them, and I'm not sure why my buddy was crazy enough to spend a whole week hauling them to his place. I'm sure glad he did though. When we put one on the mill and sliced it we both nearly fainted. I guess being wet for so long is what caused the massive spalting. He gave me a few of chunks to bring back home and the bowl and box is what I made from those pieces. I carved the bowl and decided to inlay a deer antler into the edge of it and inlayed crushed turquoise in the voids. The box is a Lois Ventura band saw box pattern and the drawer pulls are made from Padauk. I thought the color went well with the spalt. By the way, a good way to crush turquoise is to use a bean grinder. Get a cheap one and use it untill the blades wear off. Then get another cheap one. A friend of mine in Rockport Tx has a saw mill. He was offered all these beams if he would haul them himself. They are about fifteen feet long and either 6×6 or 8×8. They are used at drilling rigs. They are laid down around the rig to form a foundation so the trucks and equipment will not get stuck in the mud. It gets really wet around drilling rigs. As you can imagine they stay in mud and water for a long time. They are Maple so that they will last longer. Eventually they must be replaced. We don't know how the guy that gave them to him got them, and I'm not sure why my buddy was crazy enough to spend a whole week hauling them to his place. I'm sure glad he did though. When we put one on the mill and sliced it we both nearly fainted. I guess being wet for so long is what caused the massive spalting. He gave me a few of chunks to bring back home and the bowl and box is what I made from those pieces. I carved the bowl and decided to inlay a deer antler into the edge of it and inlayed crushed turquoise in the voids. The box is a Lois Ventura band saw box pattern and the drawer pulls are made from Padauk. I thought the color went well with the spalt. By the way, a good way to crush turquoise is to use a bean grinder. Get a cheap one and use it untill the blades wear off. Then get another cheap one.
Read more here
posted at: 12:00am on 20-Jul-2019
path: /Woodworking | permalink | edit (requires password)
Floating Walnut Mirror Frame
Furnished content.
(from Lumberjocks.com)
 For this build the client wanted a custom walnut mirror frame built that would look like it is floating off the wall. To accomplish this I made an inset inner frame on the back to make it stand out. For this build the client wanted a custom walnut mirror frame built that would look like it is floating off the wall. To accomplish this I made an inset inner frame on the back to make it stand out.
I wish I had a better picture of this but the lighting was subpar, along with my subpar photography skills, this is what I got.
Watch me build this floating mirror Frame Thanks for watching Thanks for watching
See more Custom Furniture
Read more here
posted at: 12:00am on 20-Jul-2019
path: /Woodworking | permalink | edit (requires password)
Carved Mesquite Bowl
Furnished content.
(from Lumberjocks.com)
 I have had this chunk of Mesquite laying around for quite a while. Wasn't sure what I was going to do with it. I finally started carving on it and was surprised at how beautiful the grain was when I was finished. You never know what might be inside of Mesquite. I have had this chunk of Mesquite laying around for quite a while. Wasn't sure what I was going to do with it. I finally started carving on it and was surprised at how beautiful the grain was when I was finished. You never know what might be inside of Mesquite.
Read more here
posted at: 12:00am on 19-Jul-2019
path: /Woodworking | permalink | edit (requires password)
Kitchen renovation
Furnished content.
(from Lumberjocks.com)
 This is by far my biggest project to date. We bought a fixer-upper for our daughter and grandchildren and did a lot of work on the bedrooms and exterior. However the kitchen was in really rough shape. We priced out prefab cabinets but even the high dollar ones were particle board crap. We made cabinets, shelves, countertops, and a hutch from scratch. Along the way we had to do some major plumbing, electrical, and subfloor work. In the attached pics you can see my wife helping with the demo. She also did all the painting of the cabinets. Cabinets are made out of maple-faced plywood for casework and solid maple for doors and face frames. This was the first time I had ever used a Kreg pocket hole jig and I was very impressed with how fast it was to make strong joints. Countertops and shelves are birch. We put in a subway tile backsplash, clapboard wall covering and boxed-in above where old cabinets where removed. Topped it off with a farmhouse style sink and viola. All in all this was a fun project. This is by far my biggest project to date. We bought a fixer-upper for our daughter and grandchildren and did a lot of work on the bedrooms and exterior. However the kitchen was in really rough shape. We priced out prefab cabinets but even the high dollar ones were particle board crap. We made cabinets, shelves, countertops, and a hutch from scratch. Along the way we had to do some major plumbing, electrical, and subfloor work. In the attached pics you can see my wife helping with the demo. She also did all the painting of the cabinets. Cabinets are made out of maple-faced plywood for casework and solid maple for doors and face frames. This was the first time I had ever used a Kreg pocket hole jig and I was very impressed with how fast it was to make strong joints. Countertops and shelves are birch. We put in a subway tile backsplash, clapboard wall covering and boxed-in above where old cabinets where removed. Topped it off with a farmhouse style sink and viola. All in all this was a fun project.
Read more here
posted at: 12:00am on 19-Jul-2019
path: /Woodworking | permalink | edit (requires password)
Pepper Grinder
Furnished content.
(from Lumberjocks.com)
 Tall pepper grinder 600 mm (24 in ) high turned from Miro. Ideal for use at barbeques, can also be used for grinding salt.Comments welcome.r Tall pepper grinder 600 mm (24 in ) high turned from Miro. Ideal for use at barbeques, can also be used for grinding salt.Comments welcome.r
Read more here
posted at: 12:00am on 19-Jul-2019
path: /Woodworking | permalink | edit (requires password)
Hanging Compressor Project
I saw this pic in a magazine...
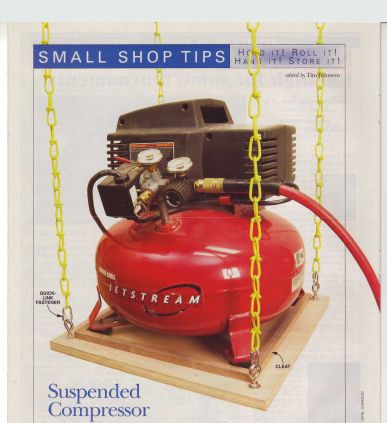
... and it got me thinking.
I wanted a dedicated place to finally put my compressor in the shop... - while allowing it to be removed quickly to use away from the shop
- without taking up valuable floor space in my small shop
- with an attached 5 gallon tank
- with a connection to a retractable air hose reel
- without screwing anything directly to the ceiling (to avoid puncturing the roof shingles, and inviting leaks)
- and with a copper pipe manifold that has connections before and after an air filter
I ended up with all of these, and more. Read part two here.
posted at: 9:10am on 18-Jul-2019
path: /Shop_Improvements | permalink | edit (requires password)
Hanging Compressor Project, Part 2
In the first post on this project, I said...
I wanted a dedicated place to finally put my compressor in the shop... - while allowing it to be removed quickly to use away from the shop
- without taking up valuable floor space in my small shop
- with an attached 5 gallon tank
- with a connection to a retractable air hose reel
- without screwing anything directly to the ceiling (to avoid puncturing the roof shingles, and inviting leaks)
- and with a copper pipe manifold that has connections before and after an air filter
Here's what I to put together... 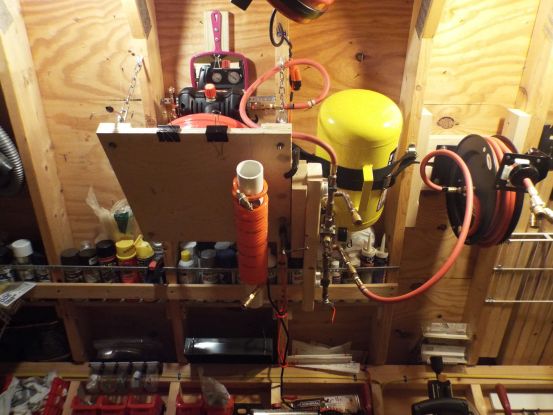 Now I know it looks sort of busy, and part of that is due to my jam packed shop, but let me go through all the pieces that make up this total compressed air solution, that I am VERY happy with, and maybe when I'm done, it'll inspire you to do something similar. Let's start with the compressor platform... 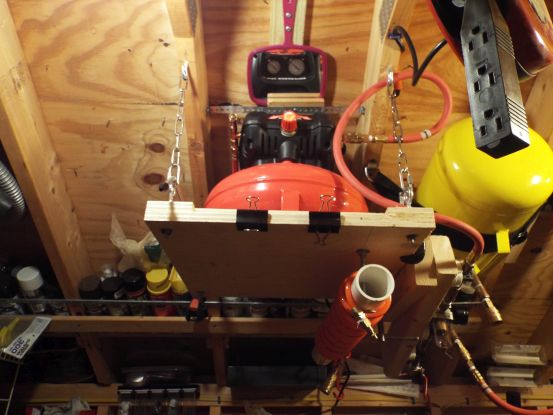 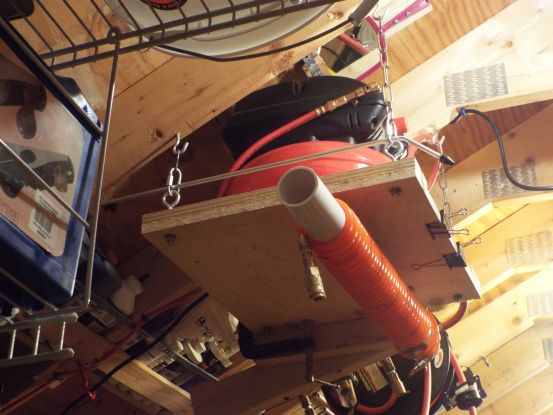 You can see the pivoting, 2" PVC coiled hose keeper that's mounted under the platform, the T-fitting I replaced the compressor's release valve with, and even the tilted arm the copper manifold is mounted to, but more on those later. The mirror mounted above the compressor allows me to see the gauges without having to climb up there. Here's the platform before I hung it up, without anything on it...  I put cleats on three sides, and glued those small, angled cleats in place too. The compressor's front foot rests in the half-circle drilled into the front cleat, and its back two feet rest in the half-circles drilled into those two angled back cleats. The cleats serve to keep the compressor in place, during any vibration while it's running. But as it turns out, there's actually very little vibration, and I think it's because the platform is hanging from chains, and that might dampen most of the vibration, along with the compressor's rubber feet. The platform is hanging from the angled ceiling joists of my workshop, so it's pretty clear the stainless steel chains had to be shorter in the back than in the front, so as to level the platform. Part 3 in a few days...
posted at: 9:10am on 18-Jul-2019
path: /Shop_Improvements | permalink | edit (requires password)
Small limbert inspired table
Furnished content.
(from Lumberjocks.com)
 I made one of these but sold it when moving to a new state and lifestyle. Decided to build another. This time experience helped a great deal. I made one of these but sold it when moving to a new state and lifestyle. Decided to build another. This time experience helped a great deal.
Read more here
posted at: 12:00am on 18-Jul-2019
path: /Woodworking | permalink | edit (requires password)
Rocking chair for balcony
Furnished content.
(from Lumberjocks.com)
 My first effort at building in cedar. My own design with a nod to Limbert. Keyed-pin tenons for IKEA like assembly and disassembly. My first effort at building in cedar. My own design with a nod to Limbert. Keyed-pin tenons for IKEA like assembly and disassembly.
Read more here
posted at: 12:00am on 18-Jul-2019
path: /Woodworking | permalink | edit (requires password)
Another test ring.
Furnished content.
(from Lumberjocks.com)
 Not the best picture but here is another test I made practicing to make my best friends wedding ring. Ring is made from walnut, maple and bocote..This was the result of me attempting to make a bentwood ring, gluing my fingers together, having a horrible looking ring that I threw across the room (this was probably my 5th attempt) and said hell with this I'm doing something different tonight…haha Not the best picture but here is another test I made practicing to make my best friends wedding ring. Ring is made from walnut, maple and bocote..This was the result of me attempting to make a bentwood ring, gluing my fingers together, having a horrible looking ring that I threw across the room (this was probably my 5th attempt) and said hell with this I'm doing something different tonight…haha
Read more here
posted at: 12:00am on 18-Jul-2019
path: /Woodworking | permalink | edit (requires password)
Macro Bowl
Furnished content.
(from Lumberjocks.com)
 Haven't posted for a while been a little to cold out in my shed must be getting old, here is Macrocarpa bowl 150 mm in diameter x 90 mm high.Comments welcome Haven't posted for a while been a little to cold out in my shed must be getting old, here is Macrocarpa bowl 150 mm in diameter x 90 mm high.Comments welcome
Read more here
posted at: 12:00am on 17-Jul-2019
path: /Woodworking | permalink | edit (requires password)
Wood brooch with flower
Furnished content.
(from Lumberjocks.com)
 One more wood brooch for women. I made it of beech wood and inlaid with silver wire, mother of pearl, pearls, coral, serpentine. 1.1×2.5 in. One more wood brooch for women. I made it of beech wood and inlaid with silver wire, mother of pearl, pearls, coral, serpentine. 1.1×2.5 in.
Read more here
posted at: 12:00am on 17-Jul-2019
path: /Woodworking | permalink | edit (requires password)
More Chisel Boxes with Box Joints
Furnished content.
(from Lumberjocks.com)
 Last of my recent chisel boxes with handcut finger/box joints. I made all three at the same time. These are all poplar sides with plywood bottoms and lids and poplar inserts. I've tried to make them all visually different with stains so that I can easily tell them apart. They have three different kinds of specialty chisels.I decided to stick with the upside down hasps that I put on the first two chisel boxes. It seems to work for me.The smallest is for some Narex dovetail chisels and two fishtail chisels I ground down from full size chisels. Its finished with a wipe on mix of tung oil, b.l.o. and poly then finished with clear shellac and wax. Last of my recent chisel boxes with handcut finger/box joints. I made all three at the same time. These are all poplar sides with plywood bottoms and lids and poplar inserts. I've tried to make them all visually different with stains so that I can easily tell them apart. They have three different kinds of specialty chisels.I decided to stick with the upside down hasps that I put on the first two chisel boxes. It seems to work for me.The smallest is for some Narex dovetail chisels and two fishtail chisels I ground down from full size chisels. Its finished with a wipe on mix of tung oil, b.l.o. and poly then finished with clear shellac and wax.
 The light colored larger box is for the Narex skew chisels (I use these SO much when cutting and cleaning up dovetails). The light colored larger box is for the Narex skew chisels (I use these SO much when cutting and cleaning up dovetails).
The finish is another wipe on blend of Provencial stain, mineral spirits and poly followed by clear shellac and wax.
 The last is for the Narex mortise chisels I bought last year. It has a wipe on mix of jacobean/ebony mix stain, mineral spirits and poly followed by amber shellac and wax. The last is for the Narex mortise chisels I bought last year. It has a wipe on mix of jacobean/ebony mix stain, mineral spirits and poly followed by amber shellac and wax.
 The last six or seven boxes I've made have been tool cases for chisels and planes that have been rattliing around loose in drawers of my bench or in cardboard boxes. Making custom tool cases feels like killing two birds with one stone… cool box and a cool place to keep your tools. It also felt a little like a break from the decorative box series I started a couple of months ago. I am ready to get back to dovetails and miters with splines and maybe get a little more creative. Still… I'll probably have these boxes for many years to come so its time well spent.Big Thanks to LittleBlackDuck for the tips on making chisel booties. I was buying those silicon guards online and he suggested Plastidip and paper tape. I had to watch a youtube video to really get it but I made soooo many chisel guards and I still have half a can of the Plastidip left. Thanks LBD. The last six or seven boxes I've made have been tool cases for chisels and planes that have been rattliing around loose in drawers of my bench or in cardboard boxes. Making custom tool cases feels like killing two birds with one stone… cool box and a cool place to keep your tools. It also felt a little like a break from the decorative box series I started a couple of months ago. I am ready to get back to dovetails and miters with splines and maybe get a little more creative. Still… I'll probably have these boxes for many years to come so its time well spent.Big Thanks to LittleBlackDuck for the tips on making chisel booties. I was buying those silicon guards online and he suggested Plastidip and paper tape. I had to watch a youtube video to really get it but I made soooo many chisel guards and I still have half a can of the Plastidip left. Thanks LBD. Guess you've figured out that I like Narex chisels. Its hard for me to compare them to anything but the beater chisels I've had but after flattening the backs (not much work) and sharpening, they work great and keep an edge. I do strop often while using but I hardly have to mess with the primary bevels. First two sets I bought (not any of these) I reground the bevels to 20 degrees on one set and 35 degrees on the other. The 20's are for chopping dovetails in softwood and the 35's are for hardwood.Narex is affordable and seems to offer great quality. Guess you've figured out that I like Narex chisels. Its hard for me to compare them to anything but the beater chisels I've had but after flattening the backs (not much work) and sharpening, they work great and keep an edge. I do strop often while using but I hardly have to mess with the primary bevels. First two sets I bought (not any of these) I reground the bevels to 20 degrees on one set and 35 degrees on the other. The 20's are for chopping dovetails in softwood and the 35's are for hardwood.Narex is affordable and seems to offer great quality.
Thanks for looking.
Jon
Read more here
posted at: 12:01am on 16-Jul-2019
path: /Woodworking | permalink | edit (requires password)
Oh My Stars! (Or are they snowflakes?)
Furnished content.
(from Lumberjocks.com)
 Good Day LJs,Its time to replenish my fall craft show inventory, so I decided to explore the world of snowflakes.I used soft maple and Spanish cedar leftover from a previous project. I built a small sled to cut the 6 parallelogram sticks from the wide stock at 30 degrees, checking the sawblade angle frequently with a digital angle guide (Wixey).For the decorative cuts on each stick, I set the tablesaw blade to various depths and distances away from the fence. I glued the sticks together, alternating the maple and cedar to make a long 6-point blank.In previous builds, I had used the miter saw to cut the flakes from the blank, but was losing a lot of product due to the saw blade's width.I finally figured out how to “safely” use my bandsaw to slice them, using a 1/4” thick plywood base to make a zero-clearance base for the bandsaw blade. This way the flakes slide though on a solid surface and do not get jammed in the gap surrounding the blade as the blank is pushed through using 2×4 push blocks.All told, about 200 snowflakes were born in a long afternoon, but it was well worth the time and effort. Good Day LJs,Its time to replenish my fall craft show inventory, so I decided to explore the world of snowflakes.I used soft maple and Spanish cedar leftover from a previous project. I built a small sled to cut the 6 parallelogram sticks from the wide stock at 30 degrees, checking the sawblade angle frequently with a digital angle guide (Wixey).For the decorative cuts on each stick, I set the tablesaw blade to various depths and distances away from the fence. I glued the sticks together, alternating the maple and cedar to make a long 6-point blank.In previous builds, I had used the miter saw to cut the flakes from the blank, but was losing a lot of product due to the saw blade's width.I finally figured out how to “safely” use my bandsaw to slice them, using a 1/4” thick plywood base to make a zero-clearance base for the bandsaw blade. This way the flakes slide though on a solid surface and do not get jammed in the gap surrounding the blade as the blank is pushed through using 2×4 push blocks.All told, about 200 snowflakes were born in a long afternoon, but it was well worth the time and effort.
Read more here
posted at: 12:01am on 16-Jul-2019
path: /Woodworking | permalink | edit (requires password)
Trivet
Furnished content.
(from Lumberjocks.com)
 Made from scrap pieces and some wine corks that I had around Made from scrap pieces and some wine corks that I had around
Read more here
posted at: 12:01am on 16-Jul-2019
path: /Woodworking | permalink | edit (requires password)
Cattle cars all finished up
Furnished content.
(from Lumberjocks.com)
 These were cattle cars made for my Gatto Reading Train. These were cattle cars made for my Gatto Reading Train.
 Walnut and Maple with Danish oil finish. Walnut and Maple with Danish oil finish.
Scratch build from a picture.
Read more here
posted at: 12:00am on 15-Jul-2019
path: /Woodworking | permalink | edit (requires password)
Backyard Bat Boxes
Furnished content.
(from Lumberjocks.com)
 My son and his buddy each made a bat box out of a cedar fence board. They learned about rabbits and dadoes. We used Titebond II and 4d galvanized nails to assemble. My son and his buddy each made a bat box out of a cedar fence board. They learned about rabbits and dadoes. We used Titebond II and 4d galvanized nails to assemble.
Read more here
posted at: 12:00am on 15-Jul-2019
path: /Woodworking | permalink | edit (requires password)
Faithful Execution
Furnished content.
(from Lumberjocks.com)
 This is from The Woodsmith Shop, although I think the basic concept predates their show. Marc Spagnuolo has some interesting boxes with similar design and I think he credits Dave Knipfer. I made this one a bit larger than the Woodsmith plans. I also used their joinery approach with dowels, although I think there is a much easier and more accurate way using tongue and groove cut with the same set up as the bottom. I used Brusso JB-103 stop hinges and lined this one in black felt, but now I wish I had used green. This was a prototype of sorts as I plan to make a bunch of them and also incorporate photo transfers on the bottom of the lid. Stay tuned and thanks for watching. This is from The Woodsmith Shop, although I think the basic concept predates their show. Marc Spagnuolo has some interesting boxes with similar design and I think he credits Dave Knipfer. I made this one a bit larger than the Woodsmith plans. I also used their joinery approach with dowels, although I think there is a much easier and more accurate way using tongue and groove cut with the same set up as the bottom. I used Brusso JB-103 stop hinges and lined this one in black felt, but now I wish I had used green. This was a prototype of sorts as I plan to make a bunch of them and also incorporate photo transfers on the bottom of the lid. Stay tuned and thanks for watching.  
Read more here
posted at: 12:00am on 15-Jul-2019
path: /Woodworking | permalink | edit (requires password)
The best smelling coffee table.
Furnished content.
(from Lumberjocks.com)
 Hello to all its been quit sometime since a posted project,but this was one I wanted to share. Our local brewery can only use these whiskey barrel for one batch of barley wine then they just sell them to the general public. I happen to pick one up and commence to recycling into two coffee tables. Cutting the barrel vertically and releasing the angel share aroma into the garage that lasted for days to come was quit a change from wood cutting smells ha ha. The next big hurdle was cleaning the charcoal interior of the barrel, what a mess, but once clean and seal it made for a striking interior storage compartment. My recommendation is to use a wine barrel instead the interior will have a pre-stain red or natural oak finish with out the hassle sanding charcoal burnt wood. The rest is straight forward as the pictures may indicate. Thanks for viewing my woodworking community, it's coffee time. Hello to all its been quit sometime since a posted project,but this was one I wanted to share. Our local brewery can only use these whiskey barrel for one batch of barley wine then they just sell them to the general public. I happen to pick one up and commence to recycling into two coffee tables. Cutting the barrel vertically and releasing the angel share aroma into the garage that lasted for days to come was quit a change from wood cutting smells ha ha. The next big hurdle was cleaning the charcoal interior of the barrel, what a mess, but once clean and seal it made for a striking interior storage compartment. My recommendation is to use a wine barrel instead the interior will have a pre-stain red or natural oak finish with out the hassle sanding charcoal burnt wood. The rest is straight forward as the pictures may indicate. Thanks for viewing my woodworking community, it's coffee time.
Read more here
posted at: 12:00am on 14-Jul-2019
path: /Woodworking | permalink | edit (requires password)
3 in 1
Furnished content.
(from Lumberjocks.com)
 New Adventure: 3 in 1. woodturning, art work and painting all in one flat vase. 30 cm in diameter. New Adventure: 3 in 1. woodturning, art work and painting all in one flat vase. 30 cm in diameter.
Read more here
posted at: 12:00am on 14-Jul-2019
path: /Woodworking | permalink | edit (requires password)
Shelfie- 18 feet long with soffit lighting
Furnished content.
(from Lumberjocks.com)
 What made this a fun and challenging project was the size- 18ft long by 13.5 inches deep and 2 inches thick, placement (8 ft off the ground) and the need for it to be sufficiently strong to hold art books vinyl records through its length and house soffit lights. Also look presentable enough for DW. Bonus is that the rail works well as a pull-up bar. What made this a fun and challenging project was the size- 18ft long by 13.5 inches deep and 2 inches thick, placement (8 ft off the ground) and the need for it to be sufficiently strong to hold art books vinyl records through its length and house soffit lights. Also look presentable enough for DW. Bonus is that the rail works well as a pull-up bar.
The longer story- devil is in the detail is this blog link
https://smortegav.blogspot.com/2019/07/shelfie-18-feet-long-and-with-soffit.html
Read more here
posted at: 12:00am on 14-Jul-2019
path: /Woodworking | permalink | edit (requires password)
Glue Mat "Garage"
Furnished content.
(from Lumberjocks.com)
 I have a couple silicone gluing mats that I use and needed someplace to store them when not in use. I bought some PVC pipe and used scrap wood to make this quick project. It works great and get the mats out of the way but handy. Thanks, Mitch I have a couple silicone gluing mats that I use and needed someplace to store them when not in use. I bought some PVC pipe and used scrap wood to make this quick project. It works great and get the mats out of the way but handy. Thanks, Mitch
Read more here
posted at: 12:00am on 13-Jul-2019
path: /Woodworking | permalink | edit (requires password)
Big Green Egg Grill Table
Furnished content.
(from Lumberjocks.com)
 I finally got around to making a new table for my egg, to replace the “temporary stand” I threw together 6 years ago from 2×4s and cedar boards I had laying around. LONG overdue! Like most of my projects LOLI went with southern yellow pine for the frame, all M&T joinery glued with Epoxy. Didn't want to invest a lot into it as I might end up making another frame with drawers, no rush though! That's all coated with solid body stain.I wanted to be able to move it but didn't want to see wheels really, so I got some 5” casters and tossed the mounts, then used a piece of stainless rod between the legs on the left end. The axle is drilled for cotter pins to keep the wheels in position but as seen in the picture on sawhorses they can slide from side to side without the pins for painting. And repainting.The wheels hold the legs slightly off the ground and the other legs have plastic nail-on furniture sliders to do the same. It shouldn't ever be sitting in water this way.The top is deadhead cypress (aka sinker aka river recovered) from a local river and sawyer. ended up just over an inch thick. I used Penofin Blue Label on the top. I decided to make it the same size as the commercial offerings (60×30) so I could use an off-the-shelf cover, you can see that in one picture.Now I've got to cut some of the same wood to replace the tired handle on the egg too! That and figure out if I want to add a drawer on the bottom, it would be handy! I finally got around to making a new table for my egg, to replace the “temporary stand” I threw together 6 years ago from 2×4s and cedar boards I had laying around. LONG overdue! Like most of my projects LOLI went with southern yellow pine for the frame, all M&T joinery glued with Epoxy. Didn't want to invest a lot into it as I might end up making another frame with drawers, no rush though! That's all coated with solid body stain.I wanted to be able to move it but didn't want to see wheels really, so I got some 5” casters and tossed the mounts, then used a piece of stainless rod between the legs on the left end. The axle is drilled for cotter pins to keep the wheels in position but as seen in the picture on sawhorses they can slide from side to side without the pins for painting. And repainting.The wheels hold the legs slightly off the ground and the other legs have plastic nail-on furniture sliders to do the same. It shouldn't ever be sitting in water this way.The top is deadhead cypress (aka sinker aka river recovered) from a local river and sawyer. ended up just over an inch thick. I used Penofin Blue Label on the top. I decided to make it the same size as the commercial offerings (60×30) so I could use an off-the-shelf cover, you can see that in one picture.Now I've got to cut some of the same wood to replace the tired handle on the egg too! That and figure out if I want to add a drawer on the bottom, it would be handy!
Read more here
posted at: 12:00am on 13-Jul-2019
path: /Woodworking | permalink | edit (requires password)
Scrunchie Pole
Furnished content.
(from Lumberjocks.com)
 A week ago I didn't know what a “scrunchie” was. A week ago I didn't know what a “scrunchie” was.
Then my grand daughter asked me to make something to hold her scrunchies.
I found out a scrunchie is like a rubber band to hold hair in a bun, duh.
Luckily she drew the dimensions which were easy to follow.
The first pole or stem was a bit ordinary so I did a fancier one.
.
Thanks for looking.
Read more here
posted at: 12:00am on 13-Jul-2019
path: /Woodworking | permalink | edit (requires password)
5 Gallon Bucket Sleeve
Furnished content.
(from Lumberjocks.com)
 I had an order for this piece to be square and I was not going to post it because it would be a simple project. I had an order for this piece to be square and I was not going to post it because it would be a simple project.
I did not want to make it like that so I asked her if I could make a hex bucket sleeve to give it a better appearance…and she agreed. It is to cover a bucket they leave out for something and wanted it hidden from view from the road.
I used 1×10 rough sawn cedar and the boards were cupped a bit and I could not bevel the edges accurately enough like that so they got planed flat. This was good job to tune up my Dewalt biscuit cutter with as I found it to be off for flat work and after fixing the stop for that, the 60 degree angle came out right on for this work.
The sleeve is 14” across the flats inside and 15” high. The are 3 #20 biscuits in each joint. I routed in a hand slot on two sides to lift it off. It is unfinished and she will probably stain it.To make the 60 degree bevels parallel I had to make an addition to my fence so the first cut could ride on the bevel surface and not the thin edge. I had to make 3 little T-nuts to go in my fence to hold it on there. I added 2 shots of the fence addition.Cheers, Jim
Read more here
posted at: 12:00am on 12-Jul-2019
path: /Woodworking | permalink | edit (requires password)
Table Saw Upgrades
Furnished content.
(from Lumberjocks.com)
 In late May or early June I had a pretty nasty kickback accident on my table saw. Put me in the ER for some gluing and stitching… I decided to take the time to upgrade my saw some to make it safer and work better for me. The best change for safety was I installed a Shark Guard with kick back pawls and splitters. I added a fold down table to the back of the saw and made it so I have 25” sawing capabilities on the right side. Had to expend the rail and add table to the right side. I've had this saw for over 12 years and have reconfigured it several times. Trying to adjust to very limited space. I think I am going to be real happy with this setup. In late May or early June I had a pretty nasty kickback accident on my table saw. Put me in the ER for some gluing and stitching… I decided to take the time to upgrade my saw some to make it safer and work better for me. The best change for safety was I installed a Shark Guard with kick back pawls and splitters. I added a fold down table to the back of the saw and made it so I have 25” sawing capabilities on the right side. Had to expend the rail and add table to the right side. I've had this saw for over 12 years and have reconfigured it several times. Trying to adjust to very limited space. I think I am going to be real happy with this setup.
Read more here
posted at: 12:00am on 12-Jul-2019
path: /Woodworking | permalink | edit (requires password)
Kids Table
Furnished content.
(from Lumberjocks.com)
 This is a very simple and easy kids table to make. I wall selling a dining table and the lady that purchased the table asked me to build a small farmhouse style kids table for her 1st grade class. I've also built few shelves and benches for her class.Visit our website for more info TheDIYPlan This is a very simple and easy kids table to make. I wall selling a dining table and the lady that purchased the table asked me to build a small farmhouse style kids table for her 1st grade class. I've also built few shelves and benches for her class.Visit our website for more info TheDIYPlan
Also, check out a video of how I made this table. YouTube
Read more here
posted at: 12:00am on 12-Jul-2019
path: /Woodworking | permalink | edit (requires password)
Dream a Little Dream
Furnished content.
(from Lumberjocks.com)
 Come along with me as I fly my seaplane over a sea that looks like a Mulberry slab, the waves look like Maple logs, and the puffy clouds in the sky resemble, just a little bit, the leaves of a hedge. If I may direct your attention below the ship (mmm mmm airplane), and slightly to the port (left) side, you may observe what appears to be a tiny desert island with a single tree. Come along with me as I fly my seaplane over a sea that looks like a Mulberry slab, the waves look like Maple logs, and the puffy clouds in the sky resemble, just a little bit, the leaves of a hedge. If I may direct your attention below the ship (mmm mmm airplane), and slightly to the port (left) side, you may observe what appears to be a tiny desert island with a single tree. We skim the wave tops to get a closer look, all around (the waves do exist all around). We skim the wave tops to get a closer look, all around (the waves do exist all around).   Here's what it looked like before I lit into it. Here's what it looked like before I lit into it.  Not what I was aiming for. Not at all what I was aiming for. Delightful, the way that happens, innit?Thank you. And, I apologize.- When you tell your friends about me, please try to think of something nice to say - Not what I was aiming for. Not at all what I was aiming for. Delightful, the way that happens, innit?Thank you. And, I apologize.- When you tell your friends about me, please try to think of something nice to say -
Read more here
posted at: 12:00am on 11-Jul-2019
path: /Woodworking | permalink | edit (requires password)
Dowel Makes a Good Frame For Small Projects
Furnished content.
(from Lumberjocks.com)
 These two fractal burn projects needed a frame as they were done on plywood. These two fractal burn projects needed a frame as they were done on plywood.
 ; ;
 I thought an easy way would be to run a groove through some dowel on the table saw. I thought an easy way would be to run a groove through some dowel on the table saw.
All I needed was a short pin (dowel) just behind the blade on the sacrificial insert. That kept the groove straight.
With the dowel up against the fence & a featherboard the job was an easy one.
 ; ; I think the result was ok I think the result was ok
Thanks for looking
Read more here
posted at: 12:00am on 11-Jul-2019
path: /Woodworking | permalink | edit (requires password)
Fractal Bowl
Furnished content.
(from Lumberjocks.com)
 This project was going ok This project was going ok

until the bottom of the bowl blew out because I ran the tooling too deep.
 
One thing with working with wood, you can usually cover up your mistakes.

Both ends

The end result was satisfactory.
 
Champhor Laurel finished with wipe on poly.
Thanks for looking
Read more here
posted at: 12:00am on 11-Jul-2019
path: /Woodworking | permalink | edit (requires password)
Tabletop Bowling Alley
Furnished content.
(from Lumberjocks.com)
 I noticed several other LJ's built this project from the WOOD magazine of November 20, 2018, issue 257 starting on page 60. It's great for family fun occasions. The Woodbuddies built two so each family would have a game to play.The pins, and other specialty parts are sold as a kit from a Wood magazine vendor. The wood used for the alley lane is Northern Hard Maple mounted on a Baltic Birch base. The surrounding sides are Alder and the lane triangle markers are Walnut.We purchased additional marbles via Amazon along with bowling scoring sheets. The idea was to use this game as a STEM (Science, Technology, Engineering, Math) experience for all the kids. We discovered the youngest could not control the spring loaded marble pusher but had just as much fun rolling the marbles to hit the pins.All family members are still enjoying these after several months. Some of the older children are learning how to write numbers, do math and fill in the score sheets. I noticed several other LJ's built this project from the WOOD magazine of November 20, 2018, issue 257 starting on page 60. It's great for family fun occasions. The Woodbuddies built two so each family would have a game to play.The pins, and other specialty parts are sold as a kit from a Wood magazine vendor. The wood used for the alley lane is Northern Hard Maple mounted on a Baltic Birch base. The surrounding sides are Alder and the lane triangle markers are Walnut.We purchased additional marbles via Amazon along with bowling scoring sheets. The idea was to use this game as a STEM (Science, Technology, Engineering, Math) experience for all the kids. We discovered the youngest could not control the spring loaded marble pusher but had just as much fun rolling the marbles to hit the pins.All family members are still enjoying these after several months. Some of the older children are learning how to write numbers, do math and fill in the score sheets.
Read more here
posted at: 12:00am on 10-Jul-2019
path: /Woodworking | permalink | edit (requires password)
A standing small sculpted piece
Furnished content.
(from Lumberjocks.com)
 I had a 4 ft piece of cypress that has been sitting in the barn for quite a while and finally decided I had to use it for something other than gathering dust. I had a 4 ft piece of cypress that has been sitting in the barn for quite a while and finally decided I had to use it for something other than gathering dust.
This is what I came up with while playing around. I used about 30” for the sculpting and after cutting off a bad end I used the rest for the base. It has 2 visual sides so that whoever buys it can view whatever side they prefer.
The entire project went quite fast and only took a few hours. The finishing (lacquer) and sanding in between coats actually took longer than the creative part.
Read more here
posted at: 12:00am on 10-Jul-2019
path: /Woodworking | permalink | edit (requires password)
Traditional carpenters tool box
Furnished content.
(from Lumberjocks.com)
 Open top tool box made of fir and quarter sawn oak. Box weighs 14.2 pounds and 34.5 loaded. About 14 hours time. Hopefully this keeps me a little more organized at work. Open top tool box made of fir and quarter sawn oak. Box weighs 14.2 pounds and 34.5 loaded. About 14 hours time. Hopefully this keeps me a little more organized at work.
Read more here
posted at: 12:00am on 10-Jul-2019
path: /Woodworking | permalink | edit (requires password)
Folding Adirondack Chairs.
Furnished content.
(from Lumberjocks.com)
 Having moved we now have two decks, one in the front and one in the back of the house so I was ordered to create another set of chairs for the back of the house. I elected to go with folding Adirondack chairs because I wanted to be able to move them out of the weather and store in the winter. After looking at a number of chair designs I chose the design from The Barley Harvest. They have some nice plans that are pretty easy to follow. And they give you full size plans that I mounted on 1/8” hardboard and made templates to trace. They also have a number of matching pieces like foot rests and a table. I liked the curved backs on these chairs. Flat ones get uncomfortable rather quickly. Also the nice addition of making UHMW plastic washers between the moving parts and using plastic tubing in the holes of the pivots so the holes don't wear out and the chair becomes loose. You sit pretty deep into this chair but once in it is very comfortable. Nice wide arms to hold a sparkling malt beverage. Pretty sturdy but if I were to use on the lawn or sand beach I would probably drill a hole in the back support and back part of the leg and put a carriage bolt with a wing nut to hold in place. Easy enough to fold up and unfold. Just grab the top of the back and push forward. The whole thing lays flat. To unfold just the opposite, while laying on the ground grab the top of the back and pull back. Make sure the back support is all the way to the rear and it's as sturdy as any other chair.All pieces are western red cedar. The pieces are glued with gorilla glue non foaming clear and screwed with coated deck screws. I also bored and plugged all the holes for a better look. Used my CNC to put our name on the front so they will be a bit less likely to walk away some night and a message on the inside for the next owner. Kind of like a software Easter egg. Finished off with 3 coats of BLO. Having moved we now have two decks, one in the front and one in the back of the house so I was ordered to create another set of chairs for the back of the house. I elected to go with folding Adirondack chairs because I wanted to be able to move them out of the weather and store in the winter. After looking at a number of chair designs I chose the design from The Barley Harvest. They have some nice plans that are pretty easy to follow. And they give you full size plans that I mounted on 1/8” hardboard and made templates to trace. They also have a number of matching pieces like foot rests and a table. I liked the curved backs on these chairs. Flat ones get uncomfortable rather quickly. Also the nice addition of making UHMW plastic washers between the moving parts and using plastic tubing in the holes of the pivots so the holes don't wear out and the chair becomes loose. You sit pretty deep into this chair but once in it is very comfortable. Nice wide arms to hold a sparkling malt beverage. Pretty sturdy but if I were to use on the lawn or sand beach I would probably drill a hole in the back support and back part of the leg and put a carriage bolt with a wing nut to hold in place. Easy enough to fold up and unfold. Just grab the top of the back and push forward. The whole thing lays flat. To unfold just the opposite, while laying on the ground grab the top of the back and pull back. Make sure the back support is all the way to the rear and it's as sturdy as any other chair.All pieces are western red cedar. The pieces are glued with gorilla glue non foaming clear and screwed with coated deck screws. I also bored and plugged all the holes for a better look. Used my CNC to put our name on the front so they will be a bit less likely to walk away some night and a message on the inside for the next owner. Kind of like a software Easter egg. Finished off with 3 coats of BLO.
Read more here
posted at: 12:00am on 09-Jul-2019
path: /Woodworking | permalink | edit (requires password)
Home Bar
Furnished content.
(from Lumberjocks.com)
 This bar was veneered with “oriental” veneer with a lacquered finish. Shelf holes all have brass inserts with screw in shelf pegs. Stone was done by a stone shop. This bar was veneered with “oriental” veneer with a lacquered finish. Shelf holes all have brass inserts with screw in shelf pegs. Stone was done by a stone shop.
Read more here
posted at: 12:00am on 09-Jul-2019
path: /Woodworking | permalink | edit (requires password)
Louvered Doors
Furnished content.
(from Lumberjocks.com)
 I haven't posted anything in a while. It's not that I haven't been busy, just hasn't been woodworking projects suitable for project posting. I've been spending a lot of time bringing my new 1984 sailboat up to my standards and most of it has been either non-woodworking or boring woodworking. I haven't posted anything in a while. It's not that I haven't been busy, just hasn't been woodworking projects suitable for project posting. I've been spending a lot of time bringing my new 1984 sailboat up to my standards and most of it has been either non-woodworking or boring woodworking.
Anyway I hate drop boards when I'm out sailing and much prefer doors so I made these to suit the boat and compliment the cockpit grate I did last summer. They are solid Teak which means only slightly more valuable than solid gold but since I've ruined it by making them fit only my boat, I think I'm pretty safe leaving them in sight. :-)
Read more here
posted at: 12:00am on 09-Jul-2019
path: /Woodworking | permalink | edit (requires password)
Pine Bed for Quinn
Furnished content.
(from Lumberjocks.com)
 Hey Lumberjocks, Hey Lumberjocks,
A request from my daughter – the oldest needs her first big bed. Pretty simple and not a Fine Woodworking cover project, but nonetheless. I bought 10 each, 1” x 12” x 12' and cut everything to rough size and then began to laminate the four legs, the foot rail, the head rail and the side rails to the rough thickness. I then planed all the pieces to final dimension. I then tapered the bottom of the legs 7 degrees. Assembly was pretty straight foreword- pocket screws and Titebond 2. The requirement was to have the top of the mattress 20” inch off the floor – no higher, so that set the assembly sequence. The mattress has one inch of clearance on each side front and back, side to side and that seems to be working. Not pictured are side safety rails that match the design.
Thanks for checking out the Pine bed for Quinn.
Greg
Read more here
posted at: 12:00am on 08-Jul-2019
path: /Woodworking | permalink | edit (requires password)
Western Red Cedar Planter Boxes
Furnished content.
(from Lumberjocks.com)
 So I wanted to build some western red cedar planter boxes to add to my garden space. After making the first one, I decided to take a few photos and post it in some local Buy and Sell groups, thinking maybe I could sell a half dozen or so and that would pay for all the wood for the ones I want for myself.A month and a half later, I;m still trying to keep up with all the orders, including some custom sized larger ones. I've sold nearly a hundred so far but still have not had time to make some to keep for myself. Well, that is a good problem to have. Been having a lot of fun building these. So I wanted to build some western red cedar planter boxes to add to my garden space. After making the first one, I decided to take a few photos and post it in some local Buy and Sell groups, thinking maybe I could sell a half dozen or so and that would pay for all the wood for the ones I want for myself.A month and a half later, I;m still trying to keep up with all the orders, including some custom sized larger ones. I've sold nearly a hundred so far but still have not had time to make some to keep for myself. Well, that is a good problem to have. Been having a lot of fun building these.
Read more here
posted at: 12:00am on 08-Jul-2019
path: /Woodworking | permalink | edit (requires password)
Experimental Prototype of Segmented Pen
Furnished content.
(from Lumberjocks.com)
 This is my first attempt at a segmented pen. I made it from some scrap pieces of walnut and the cut off from an acrylic pen blank. The white spacers came from a hotel room key card.I like the way it turned out, but I think I can do better on the fit and finish. I plan to disassemble it and use the pen kit on another try at a segmented pen blank. This is my first attempt at a segmented pen. I made it from some scrap pieces of walnut and the cut off from an acrylic pen blank. The white spacers came from a hotel room key card.I like the way it turned out, but I think I can do better on the fit and finish. I plan to disassemble it and use the pen kit on another try at a segmented pen blank.
Read more here
posted at: 12:00am on 08-Jul-2019
path: /Woodworking | permalink | edit (requires password)
Stickley 802 Hall Table
Furnished content.
(from Lumberjocks.com)
 Table built for our beautiful daughter and her fianc.You can find the build process here:https://www.lumberjocks.com/TigerTed/blog/129097 Table built for our beautiful daughter and her fianc.You can find the build process here:https://www.lumberjocks.com/TigerTed/blog/129097
Read more here
posted at: 12:00am on 07-Jul-2019
path: /Woodworking | permalink | edit (requires password)
Oak Bench
Furnished content.
(from Lumberjocks.com)
 This is a bench I made for my future mother-in-law. I used red oak with the Varathane “weathered” stain. I am pleased with how it turned out. It is quite sturdy as it held my 300+ pound frame. It is more for decoration than anything. It was a fun build for sure and will get many years of use! As always, I am open to questions, comments, ideas, advice, and critiques!I used my new Ridgid Octane Router to give a slight round over and exposed edges. That tool is awesome. I am slowly upgrading my Ridgid tools to the Octane version! This is a bench I made for my future mother-in-law. I used red oak with the Varathane “weathered” stain. I am pleased with how it turned out. It is quite sturdy as it held my 300+ pound frame. It is more for decoration than anything. It was a fun build for sure and will get many years of use! As always, I am open to questions, comments, ideas, advice, and critiques!I used my new Ridgid Octane Router to give a slight round over and exposed edges. That tool is awesome. I am slowly upgrading my Ridgid tools to the Octane version!
Read more here
posted at: 12:00am on 07-Jul-2019
path: /Woodworking | permalink | edit (requires password)
Face Frame Cabinet Doors
Furnished content.
(from Lumberjocks.com)
 I built some cabinet doors and face frame to access more cabinet space, especially the far left cabinet door. This was a fun yet challenging build for me, as my skills are not that advanced. I used the Kreg concealed hinge jig to set the soft close hinges. It worked great. All in all, I would like to continue to explore cabinets and doors as I found it enjoyable! Always open to thoughts, ideas, questions, and critiques! I built some cabinet doors and face frame to access more cabinet space, especially the far left cabinet door. This was a fun yet challenging build for me, as my skills are not that advanced. I used the Kreg concealed hinge jig to set the soft close hinges. It worked great. All in all, I would like to continue to explore cabinets and doors as I found it enjoyable! Always open to thoughts, ideas, questions, and critiques!
Read more here
posted at: 12:00am on 07-Jul-2019
path: /Woodworking | permalink | edit (requires password)
Cherry Bowl
Furnished content.
(from Lumberjocks.com)
 This is a 10” cherry bowl that is 3 3/4” high and finished with Danish Oil and 3 stage buffed and waxed.I was cleaning out the barn, making room for the cheap bandsaw I put in there and sorted out all the logs that were in the barn for years. Many were cracked from end to end and those I split and put on the firewood pile. This cherry log was one of them but I saved half of it because it did not have full length cracks. I had a lull in projects so I turned this bowl to see how it would come out. I had to fill some cracks with turquoise powder and then finished the turning.Cheers, Jim This is a 10” cherry bowl that is 3 3/4” high and finished with Danish Oil and 3 stage buffed and waxed.I was cleaning out the barn, making room for the cheap bandsaw I put in there and sorted out all the logs that were in the barn for years. Many were cracked from end to end and those I split and put on the firewood pile. This cherry log was one of them but I saved half of it because it did not have full length cracks. I had a lull in projects so I turned this bowl to see how it would come out. I had to fill some cracks with turquoise powder and then finished the turning.Cheers, Jim
Read more here
posted at: 12:00am on 06-Jul-2019
path: /Woodworking | permalink | edit (requires password)
Corn Hole Boards
Furnished content.
(from Lumberjocks.com)
 My wife is a teacher and every year her class gives a gift to the local fire fighters to show appreciation for all they do. Typically it's a basket of snacks and stuff to eat. This year I was recruited to build these. Pleased with the way they came out. I used rattle can poly for the first time on them, and to be honest it was a bit more tedious than expected.Thanks for looking My wife is a teacher and every year her class gives a gift to the local fire fighters to show appreciation for all they do. Typically it's a basket of snacks and stuff to eat. This year I was recruited to build these. Pleased with the way they came out. I used rattle can poly for the first time on them, and to be honest it was a bit more tedious than expected.Thanks for looking
Read more here
posted at: 12:00am on 06-Jul-2019
path: /Woodworking | permalink | edit (requires password)
Simple Walnut Coffee Table
Furnished content.
(from Lumberjocks.com)
 Here is a simple walnut coffee table I just finished. All 5/4 stock, and made to match the walnut sofa table I made a while back, finished in satin poly. Here is a simple walnut coffee table I just finished. All 5/4 stock, and made to match the walnut sofa table I made a while back, finished in satin poly.
Read more here
posted at: 12:00am on 06-Jul-2019
path: /Woodworking | permalink | edit (requires password)
Spalted Pecan Bowl
Furnished content.
(from Lumberjocks.com)
 Spectacularly spalted Pecan bowl, 6” diameter and 3-1/4” high. It's got a coat of wipe-on poly.It had been roughed out and sitting in the stack-o-bowls for years and years. This really dry Pecan, though spalted, was still pretty dang hard! Even so, I was able to make good cuts with freshly sharpened tools. And finally I sanded the fool out of it with the right angle drill and sanding mandrels.It was good to get out in the shop and make something even though it was hot as the dickens. Spectacularly spalted Pecan bowl, 6” diameter and 3-1/4” high. It's got a coat of wipe-on poly.It had been roughed out and sitting in the stack-o-bowls for years and years. This really dry Pecan, though spalted, was still pretty dang hard! Even so, I was able to make good cuts with freshly sharpened tools. And finally I sanded the fool out of it with the right angle drill and sanding mandrels.It was good to get out in the shop and make something even though it was hot as the dickens.
Read more here
posted at: 12:01am on 05-Jul-2019
path: /Woodworking | permalink | edit (requires password)
Refinished Bedroom door ( Red Pine)
Furnished content.
(from Lumberjocks.com)
 I bought the home my Aunt owned since 1962, this door took a lot of beating with her kids growing up , so I with all my woodworking skills refinished and repaired it , took 5 days. had to cut out the area for the door knob, it was busted and made new panels. Next is the door jamb, it's all busted from slamming it from the kids arguing. I bought the home my Aunt owned since 1962, this door took a lot of beating with her kids growing up , so I with all my woodworking skills refinished and repaired it , took 5 days. had to cut out the area for the door knob, it was busted and made new panels. Next is the door jamb, it's all busted from slamming it from the kids arguing.
It was a challenge taking the door apart , one side was already broke loose and each joint had 3' dowels .
Read more here
posted at: 12:01am on 05-Jul-2019
path: /Woodworking | permalink | edit (requires password)
Washer and Dryer Pedestal
Furnished content.
(from Lumberjocks.com)
 Front loader risers, with storage below. Front loader risers, with storage below.
Read more here
posted at: 12:01am on 05-Jul-2019
path: /Woodworking | permalink | edit (requires password)
Pen #35
Furnished content.
(from Lumberjocks.com)
 Purpleheart, it is. Slimline , it is.I set out to make two pens, today. I got two pairs of barrel blanks ready. I have the second mounted up, now. I'll begin turning it after dinner. The next one you'll see will be another of mixed woods.Why?Because, on the final pass of the barrel trimmer, this happened. Purpleheart, it is. Slimline , it is.I set out to make two pens, today. I got two pairs of barrel blanks ready. I have the second mounted up, now. I'll begin turning it after dinner. The next one you'll see will be another of mixed woods.Why?Because, on the final pass of the barrel trimmer, this happened. The blanks at the top of the photo are this #35.So many things I could've got done today. But, no. My hands felt like doing something. I made a pen, and started another one.Thank you. And, I apologize. The blanks at the top of the photo are this #35.So many things I could've got done today. But, no. My hands felt like doing something. I made a pen, and started another one.Thank you. And, I apologize.
Read more here
posted at: 12:00am on 04-Jul-2019
path: /Woodworking | permalink | edit (requires password)
Ball Cutting Jig for a Nova Galaxi Lathe
Furnished content.
(from Lumberjocks.com)
 Having fun the last 2 days making a ball/sphere cutting jig. Turners use these as making a “perfectly round ball”, with regular gouges, is no easy task. After researching designs of jigs on Youtube, I found none of them inserted directly into the tool rest.They all had to be attached directly to the ways one way or another. It's very important for the bottom of the jig be able to be directly under the ball.Luckily my lathe tool rest fits directly under the proposed ball if I turned the tool rest towards the back. I still have a bit of tweaking to do but this is going to work well.A bowl full of various sized and colored wood spheres in a homemade bowl is a terrific centerpiece.This jig is made of brass and aluminum.Bob A in NJ July 3, 2019 Having fun the last 2 days making a ball/sphere cutting jig. Turners use these as making a “perfectly round ball”, with regular gouges, is no easy task. After researching designs of jigs on Youtube, I found none of them inserted directly into the tool rest.They all had to be attached directly to the ways one way or another. It's very important for the bottom of the jig be able to be directly under the ball.Luckily my lathe tool rest fits directly under the proposed ball if I turned the tool rest towards the back. I still have a bit of tweaking to do but this is going to work well.A bowl full of various sized and colored wood spheres in a homemade bowl is a terrific centerpiece.This jig is made of brass and aluminum.Bob A in NJ July 3, 2019
Read more here
posted at: 12:00am on 04-Jul-2019
path: /Woodworking | permalink | edit (requires password)
Retirement Flag
Furnished content.
(from Lumberjocks.com)
 Retirement Thin Red Line Flag for this local firefighter.. Made from pine, full panel, routered stripes and union Retirement Thin Red Line Flag for this local firefighter.. Made from pine, full panel, routered stripes and union
Read more here
posted at: 12:00am on 04-Jul-2019
path: /Woodworking | permalink | edit (requires password)
Urn for a friend
Furnished content.
(from Lumberjocks.com)
 I lost a good friend this last January, and was both honored and grieved to be able to make his cremation urn. It took me quite a long time of starting, stopping, and changing design before it finally got finished. Emotionally, it was pretty hard to make. He was a sculptor, so I did a photo transfer on to a maple panel of his hand holding a tool. He liked weird antique boxes, so the other panels are a laser cut filigree rose pattern. All ribbon mahogany and a walnut base. It is pretty imperfect, but that's what I kind of liked about it. I lost a good friend this last January, and was both honored and grieved to be able to make his cremation urn. It took me quite a long time of starting, stopping, and changing design before it finally got finished. Emotionally, it was pretty hard to make. He was a sculptor, so I did a photo transfer on to a maple panel of his hand holding a tool. He liked weird antique boxes, so the other panels are a laser cut filigree rose pattern. All ribbon mahogany and a walnut base. It is pretty imperfect, but that's what I kind of liked about it.
Read more here
posted at: 12:00am on 03-Jul-2019
path: /Woodworking | permalink | edit (requires password)
Navy Split Flag
Furnished content.
(from Lumberjocks.com)
 36” x 20” Navy Split flag with Laser cut Navy Emblem. All from Pine aside from Emblem. 36” x 20” Navy Split flag with Laser cut Navy Emblem. All from Pine aside from Emblem.
Full panel with routered stripes and union.
Read more here
posted at: 12:00am on 03-Jul-2019
path: /Woodworking | permalink | edit (requires password)
Bangle #2
Furnished content.
(from Lumberjocks.com)
 After making the first one and having a hard time with it because it wasn't complete circle, I decided to try a segmented one using .5” BB plywood as a prototype. Once I saw what it was going to look like I knew it had to have some color. I tried red, blue and yellow on a scrap and I liked the red even before I put a finish on it.It is made of 32 segments and was fun to see what was going on with the strips. I didn't expect it to look as cool as it did. I've seen pieces of furniture made with BB and always liked them, but never thought it would work for a piece of costume jewelry.Here are the only other pictures I took. I only have these because I was so amazed at the pattern it made that I took a couple of shots to send to my wife. After making the first one and having a hard time with it because it wasn't complete circle, I decided to try a segmented one using .5” BB plywood as a prototype. Once I saw what it was going to look like I knew it had to have some color. I tried red, blue and yellow on a scrap and I liked the red even before I put a finish on it.It is made of 32 segments and was fun to see what was going on with the strips. I didn't expect it to look as cool as it did. I've seen pieces of furniture made with BB and always liked them, but never thought it would work for a piece of costume jewelry.Here are the only other pictures I took. I only have these because I was so amazed at the pattern it made that I took a couple of shots to send to my wife. 
Read more here
posted at: 12:00am on 03-Jul-2019
path: /Woodworking | permalink | edit (requires password)
Tumbling Block Ladder Toy
Furnished content.
(from Lumberjocks.com)
 This is a toy I made for our great granddaughter for when she gets a little older. Kids like toys that move and make a lot of noise and this does both. I will put her picture on both sides of the block before I give it to her. This is a toy I made for our great granddaughter for when she gets a little older. Kids like toys that move and make a lot of noise and this does both. I will put her picture on both sides of the block before I give it to her.
It is 30” tall and had 11 rungs. It should have been 12 so the bock winds up in the same position as when it was started but she won't know that. I added a plan for it with dimensions and made it a 12 rung ladder and 33” tall.The ladder is made from maple with walnut cap on the outside. It has 11 – 1/2” dowels in it and they were machined on the router table to 1/4” thick . The block is box elder and you have to tweak it a bit to get it tumble and not stop. I added a 7/16” x 3/8” long piece of brass on one side to mover the center of gravity of the block to keep it moving
Here is a video of it working.
https://youtu.be/ClJQIKPsjloThe following process shots were taken when I had the camera in the shop:
cheers, Jim   
Read more here
posted at: 12:00am on 02-Jul-2019
path: /Woodworking | permalink | edit (requires password)
My Version of the Horton Bench
Furnished content.
(from Lumberjocks.com)
 This is my version of a project I saw on Reddit. I've made a couple of changes to the original: I wanted a bigger top to sit on the legs, I used a rabbet to hold the bottom rather than cleats, and a couple other minor things.This is my 3rd woodworking project since woodshop in high school some 40 years ago so it was a bit beyond my skillset. I've learned so much building this including making 4 inch through-tenons and resawing and book-matching panels. Pictures of the build process can be found here. This is my version of a project I saw on Reddit. I've made a couple of changes to the original: I wanted a bigger top to sit on the legs, I used a rabbet to hold the bottom rather than cleats, and a couple other minor things.This is my 3rd woodworking project since woodshop in high school some 40 years ago so it was a bit beyond my skillset. I've learned so much building this including making 4 inch through-tenons and resawing and book-matching panels. Pictures of the build process can be found here.
Read more here
posted at: 12:00am on 02-Jul-2019
path: /Woodworking | permalink | edit (requires password)
Toy Box
Furnished content.
(from Lumberjocks.com)
 Son-in law asked me to make a toy box within a few days of my great grand kids birthday. So I set my other projects aside to make this. Used up extra materials I had on hand (didn't have to go out and buy anything for this toy box). 4×4 pine cut to 3×3 rails & stiles, A red oak chest lid I was saving for another project, 3/4” red oak plywood panels to save time (for sides, back and front) and hickory legs. With the three lid supports, the lid can be 1” open to fully open and it will remain open till you push it closed. I surprised myself by having this done in 3 days, including using a waterbased stain on the panels and 3 coats of waterbased poly inside & out. I myself don't like using plywood, but it was the only way to save time to get this done in 3 days. Son-in law asked me to make a toy box within a few days of my great grand kids birthday. So I set my other projects aside to make this. Used up extra materials I had on hand (didn't have to go out and buy anything for this toy box). 4×4 pine cut to 3×3 rails & stiles, A red oak chest lid I was saving for another project, 3/4” red oak plywood panels to save time (for sides, back and front) and hickory legs. With the three lid supports, the lid can be 1” open to fully open and it will remain open till you push it closed. I surprised myself by having this done in 3 days, including using a waterbased stain on the panels and 3 coats of waterbased poly inside & out. I myself don't like using plywood, but it was the only way to save time to get this done in 3 days.
Read more here
posted at: 12:00am on 02-Jul-2019
path: /Woodworking | permalink | edit (requires password)
Wall mounted laundry room table
Furnished content.
(from Lumberjocks.com)
 The table is a mishmash of lumber I had on hand. The apron, vertical supports, and cleats are all made from pine I had left over from other projects(and in the case of the apron I made it from some lumber the previous homeowner left in my garage). The angled supports are simple red oak from Lowes. The tabletop itself is from a huge piece of spalted maple I bought a few months ago. This was the first time I made a panel this size and flattened it. It's definitely not perfect, but I'm feeling pretty good about it.Finished with Osmo Polyx.I secured the top using table buttons to allow the top to move as the wood shrinks and expands. Despite how the one pictured looks from this angle it is in there quite securely. The buttons are from a scrap piece of cherry I found in the shop. You can see the 2 holes on the underside of the apron from when I initially planned on holding the tabletop down with screws. I initially thought screwing it down in the center would be fine, but decided to go with buttons instead. The table is a mishmash of lumber I had on hand. The apron, vertical supports, and cleats are all made from pine I had left over from other projects(and in the case of the apron I made it from some lumber the previous homeowner left in my garage). The angled supports are simple red oak from Lowes. The tabletop itself is from a huge piece of spalted maple I bought a few months ago. This was the first time I made a panel this size and flattened it. It's definitely not perfect, but I'm feeling pretty good about it.Finished with Osmo Polyx.I secured the top using table buttons to allow the top to move as the wood shrinks and expands. Despite how the one pictured looks from this angle it is in there quite securely. The buttons are from a scrap piece of cherry I found in the shop. You can see the 2 holes on the underside of the apron from when I initially planned on holding the tabletop down with screws. I initially thought screwing it down in the center would be fine, but decided to go with buttons instead.
Read more here
posted at: 12:00am on 01-Jul-2019
path: /Woodworking | permalink | edit (requires password)
Dice Towers
Furnished content.
(from Lumberjocks.com)
 The first dice tower I made is weirdly tall. It was essentially a series of rings that I then built a spiral staircase inside. In later iterations of my design I realized it's easier to build the steps as part of the ring itself, wasting less wood and making assembly much easier.For that first tower I wasn't sure how bit to make the opening in the top, so I tried making an open hatch and it looked terrible. Covered it with felt and called it a day.look avideo of the tower in useWith each iteration of the design it gets a little simpler to make. the later ones have much more visually pleasing proportions, in my opinion. The first dice tower I made is weirdly tall. It was essentially a series of rings that I then built a spiral staircase inside. In later iterations of my design I realized it's easier to build the steps as part of the ring itself, wasting less wood and making assembly much easier.For that first tower I wasn't sure how bit to make the opening in the top, so I tried making an open hatch and it looked terrible. Covered it with felt and called it a day.look avideo of the tower in useWith each iteration of the design it gets a little simpler to make. the later ones have much more visually pleasing proportions, in my opinion.
Read more here
posted at: 12:00am on 01-Jul-2019
path: /Woodworking | permalink | edit (requires password)
Another pair of peek a boos
Furnished content.
(from Lumberjocks.com)
 A couple of smoothers in my signature style. The walnut one is 8in long, 50 degree bed angle, the other is a 6in long mini smoother with a honey locust body and 52.5 degree bed. Both use Hock blades, 1-3/4 in the 8in and 1-1/2 in the 6in. As before, all metal is stainless and, with the exception of the screws, milled out by me from bar and round stock. Both work extremely well.Some more pics of the finished planes and construction process. A couple of smoothers in my signature style. The walnut one is 8in long, 50 degree bed angle, the other is a 6in long mini smoother with a honey locust body and 52.5 degree bed. Both use Hock blades, 1-3/4 in the 8in and 1-1/2 in the 6in. As before, all metal is stainless and, with the exception of the screws, milled out by me from bar and round stock. Both work extremely well.Some more pics of the finished planes and construction process.           Thanks for looking. Thanks for looking.
Read more here
posted at: 12:00am on 01-Jul-2019
path: /Woodworking | permalink | edit (requires password)
Promoted by Feed Shark
|