home << Woodworking << auto build a frame saw part 4 shaping the arms and finishing the project
| May 2024 |
|---|
| Sun |
Mon |
Tue |
Wed |
Thu |
Fri |
Sat |
| |
|
|
1 |
2 |
3 |
4 |
| 5 |
6 |
7 |
8 |
9 |
10 |
11 |
| 12 |
13 |
14 |
15 |
16 |
17 |
18 |
| 19 |
20 |
21 |
22 |
23 |
24 |
25 |
| 26 |
27 |
28 |
29 |
30 |
31 |
|
|
|
Build a Frame Saw Part 4: Shaping the Arms and Finishing the Project
Furnished content.
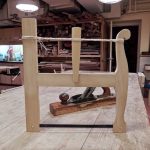 Once the H frame parts were ready the time camefor some ergonomics and design. My handle is quite simple, it includes a few curves that can be cut with a band saw or a coping saw, orchopped outwith a chisel. I decided to use a chisel becauseI wanted to emulate what my students would be doing once they startthe project. I believe that a chisel would give themmorecontrol thana coping […]The post Build a Frame Saw Part 4: Shaping the Arms and Finishing the Project appeared first on Popular Woodworking Magazine. Once the H frame parts were ready the time camefor some ergonomics and design. My handle is quite simple, it includes a few curves that can be cut with a band saw or a coping saw, orchopped outwith a chisel. I decided to use a chisel becauseI wanted to emulate what my students would be doing once they startthe project. I believe that a chisel would give themmorecontrol thana coping […]The post Build a Frame Saw Part 4: Shaping the Arms and Finishing the Project appeared first on Popular Woodworking Magazine.
Read more here
posted at: 12:01am on 17-Mar-2016
path: /Woodworking | permalink
comment...
home << Woodworking << auto build a frame saw part 4 shaping the arms and finishing the project
| May 2024 |
|---|
| Sun |
Mon |
Tue |
Wed |
Thu |
Fri |
Sat |
| |
|
|
1 |
2 |
3 |
4 |
| 5 |
6 |
7 |
8 |
9 |
10 |
11 |
| 12 |
13 |
14 |
15 |
16 |
17 |
18 |
| 19 |
20 |
21 |
22 |
23 |
24 |
25 |
| 26 |
27 |
28 |
29 |
30 |
31 |
|
|
|